- Woocommerce
- Shopify Apps
- WordPress
This guide is set up to help you offload your WordPress Media Library to an Amazon S3 bucket using Offload Media swiftly and promptly.
To create an IAM user, you must first log in to your existing AWS account through here.
If you don’t have an AWS account, you can easily sign up for a new one from here.
Once logged in, you will be directed to the AWS Management Console.
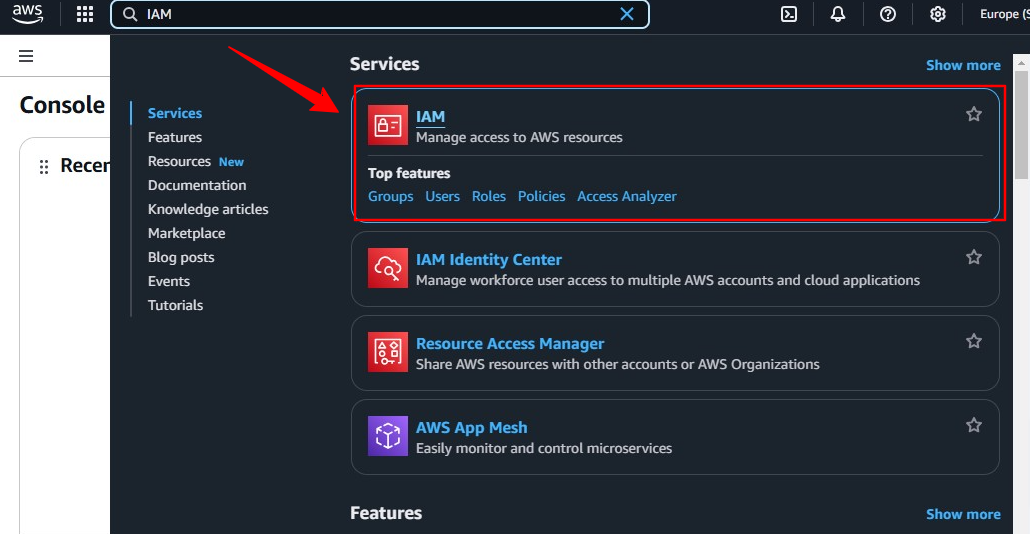
Step 1: In the AWS Management Console, type “IAM” in the search bar and then select “ IAM “ from the search.
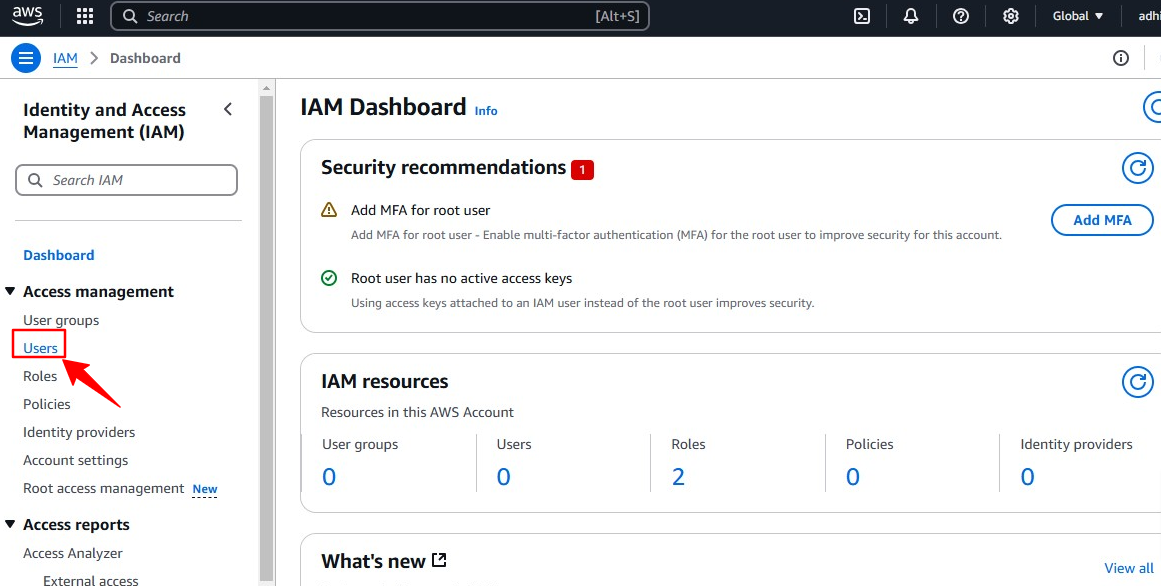
Step 2: Click the “Users” tab, then select “Create user.”
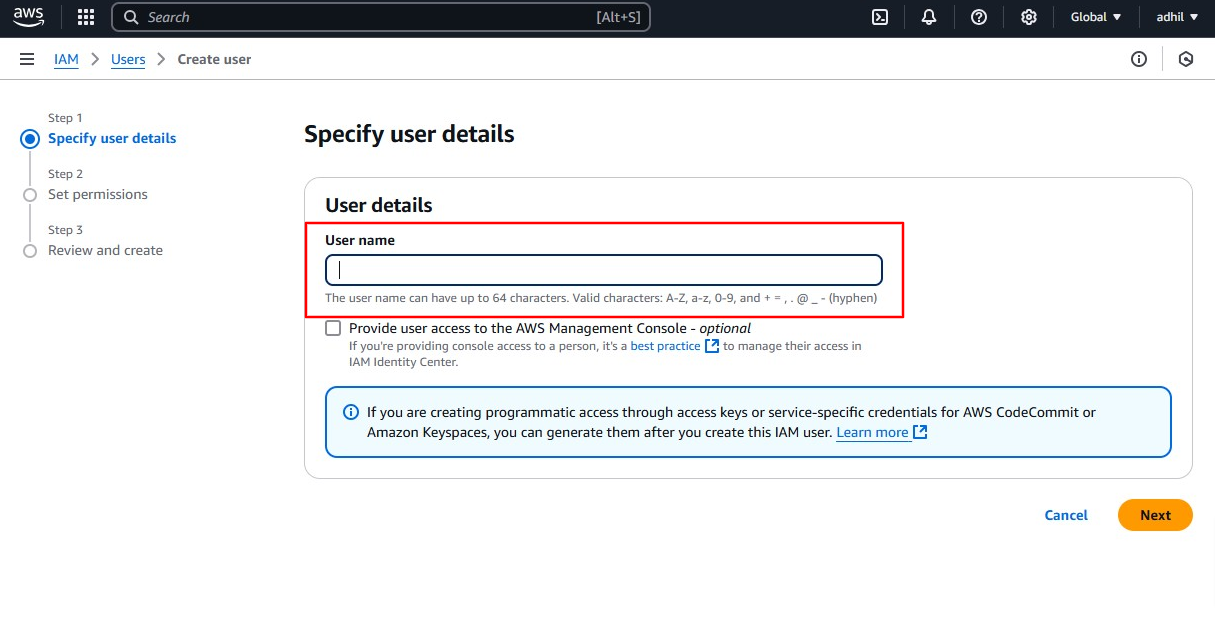
Step 3: Then, Enter a preferred name in the user name field.
Note: Usernames are case-insensitive and must be unique within your AWS account. Valid characters include letters, digits, and the following symbols: +, =, ,, ., @, and -.
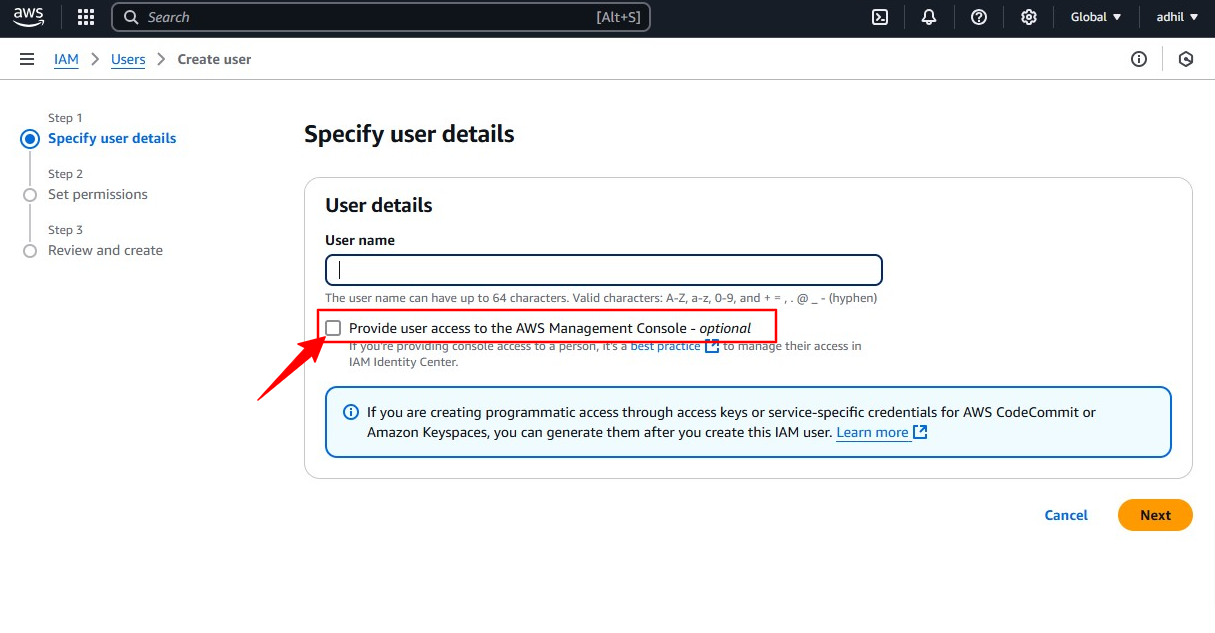
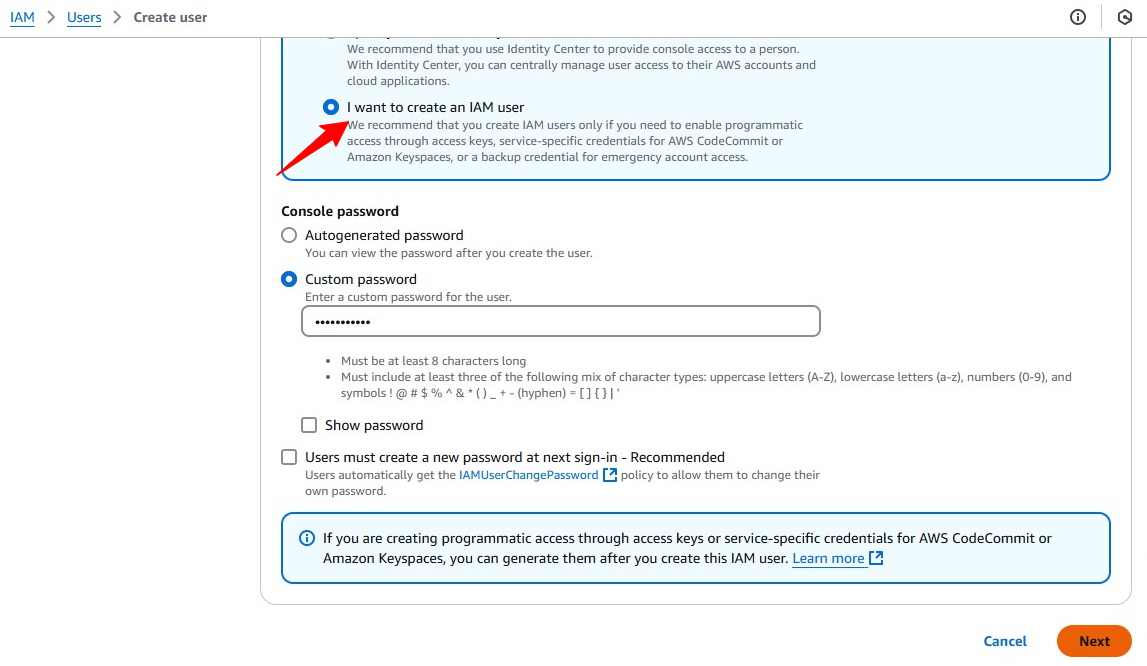
Step 4: Under the User name, select “ Provide user access to the AWS Management Console “.
Step 5: Choose “ I want to create an IAM user “ and set a secure console password for the user. Then click on “ Next” to proceed further.
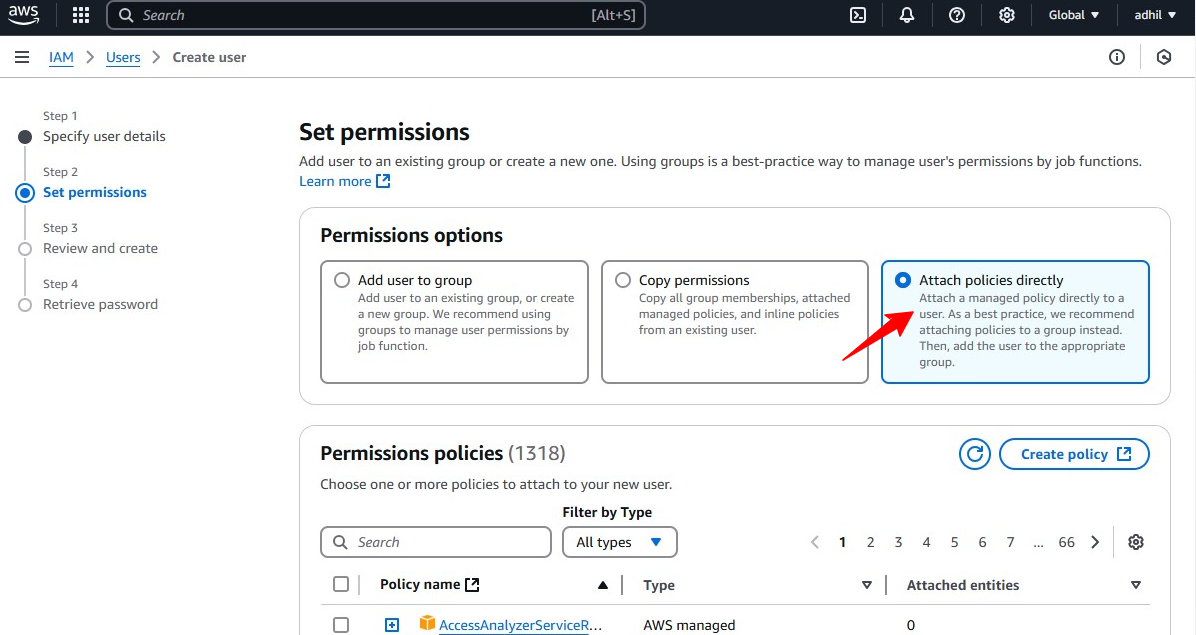
Set the user permissions
Providing full access to Amazon S3 is the recommended setup for the Offload Media plugin. Follow these steps:
Step 1: On the Permissions page, select “ Attach existing policies directly .”
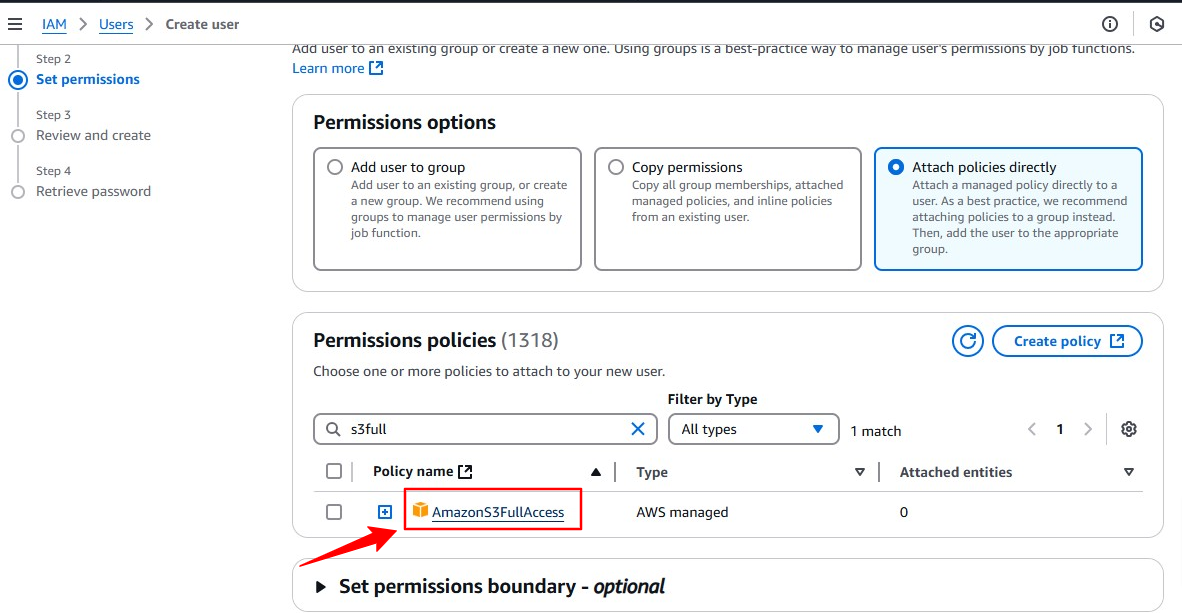
Step 2: In the search bar, type ” S3 full “. After that, Select “AmazonS3FullAccess.” and click on “ Next “ to proceed further.
Completing the user setup.
Step 1: Skip the Tags section (optional).
Adding tags is optional and is mainly used by experienced AWS users for management purposes.
Step 2: Review the user details, including the username, access type, and permissions.
Step 3: Click “ Create user “ to finalize the setup.

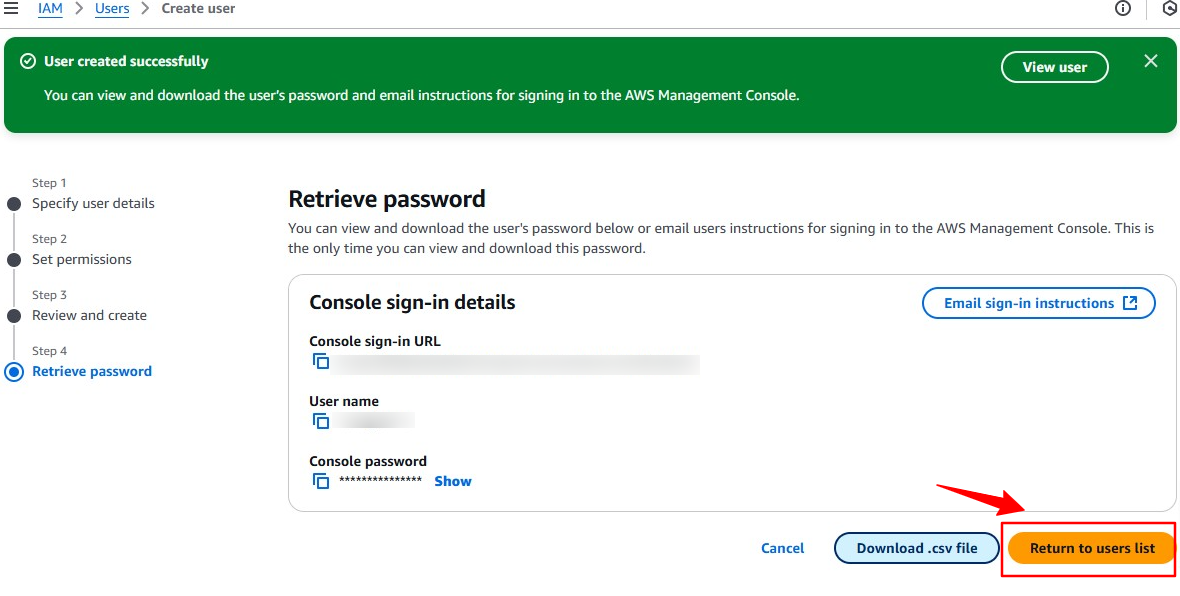
Downloading Security Credentials
Finally, after the user is created, AWS will display the security credentials, including the Access Key ID and Secret Access Key.
Important:
You can click the “Return to users list” button to return to the IAM Users page.
To upload your data to Amazon S3, you must first create an Amazon S3 bucket in one of the AWS Regions.
Follow these steps to create a bucket in your Amazon Simple Storage Service:
Step 1: Log on to your AWS Console.
Step 2: In the search bar at the top of your AWS Management Console, enter “Amazon S3.” You should see results similar to this:
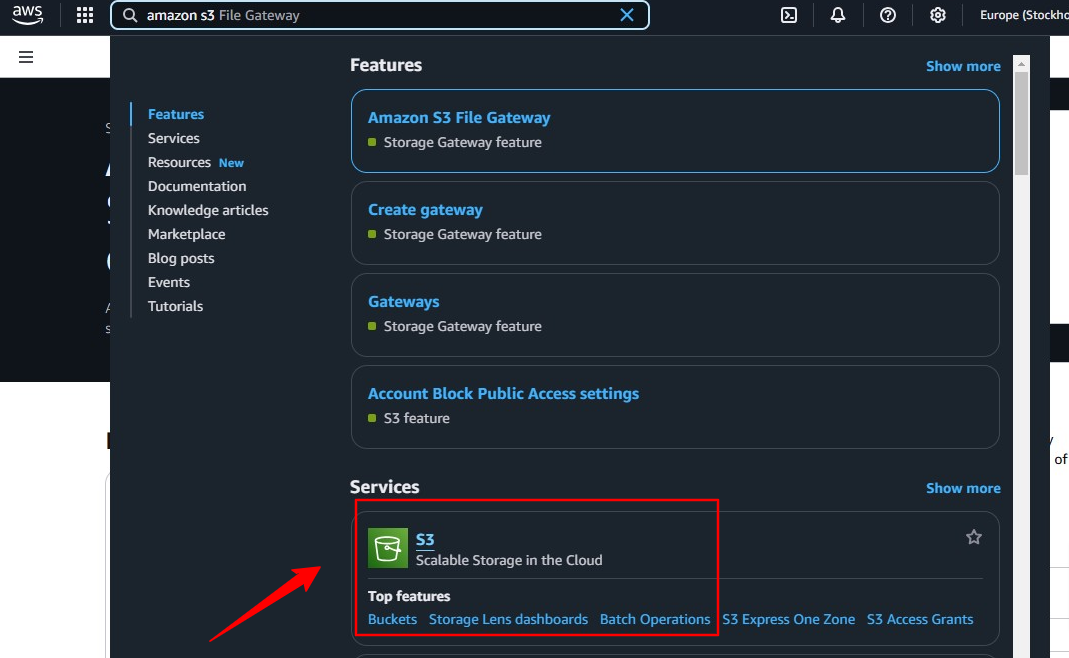
Step 3: Click on “S3 – Scalable Storage in the Cloud” and continue.
Step 4: Click on “Create Bucket.” A new panel will appear where you can enter the details and configure your bucket
Step 5: In the General Configuration section, Select “General purpose” as the bucket type and enter your bucket name in the “Bucket Name” field. Otherwise, if you need to specify a region for the bucket, you can select “Directory” as the bucket type.

Step 6: For the Object Ownership section, leave the default setting as recommended. When ACLs are disabled, the bucket owner automatically has full ownership and control over all objects in the bucket.
Otherwise, you can choose ACLs enabled, when Objects in this bucket can be owned by other AWS accounts. Access to this bucket and its objects can be specified using ACLs.
Step 7: In the Block Public Access settings for this bucket, Uncheck the “ Block all public access “ and make sure all four checkboxes are unchecked.
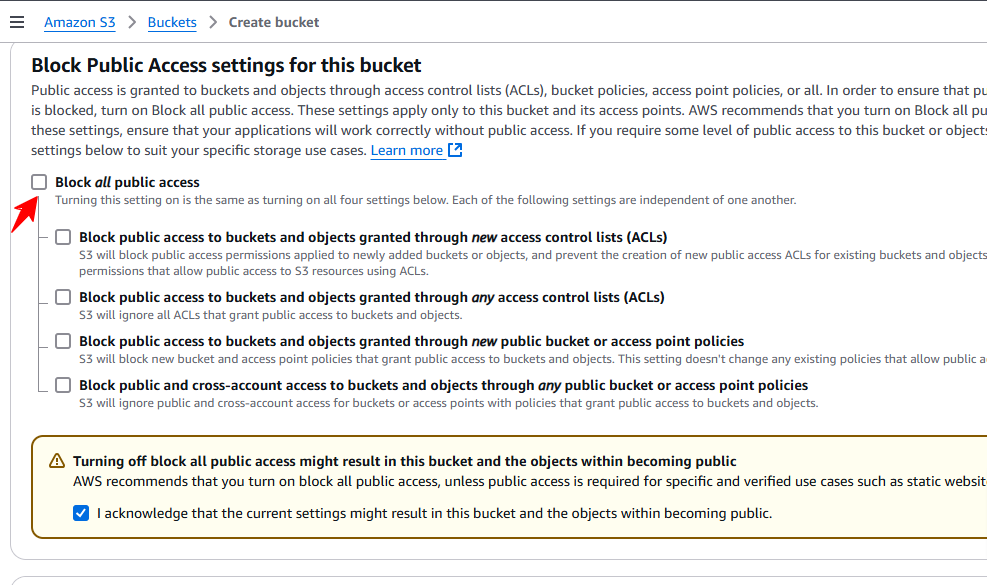
Leave other advance settings as default.
Step 7: Click on “ Create Bucket “.
If the bucket is created successfully, you will see a message like this on the top of the page:

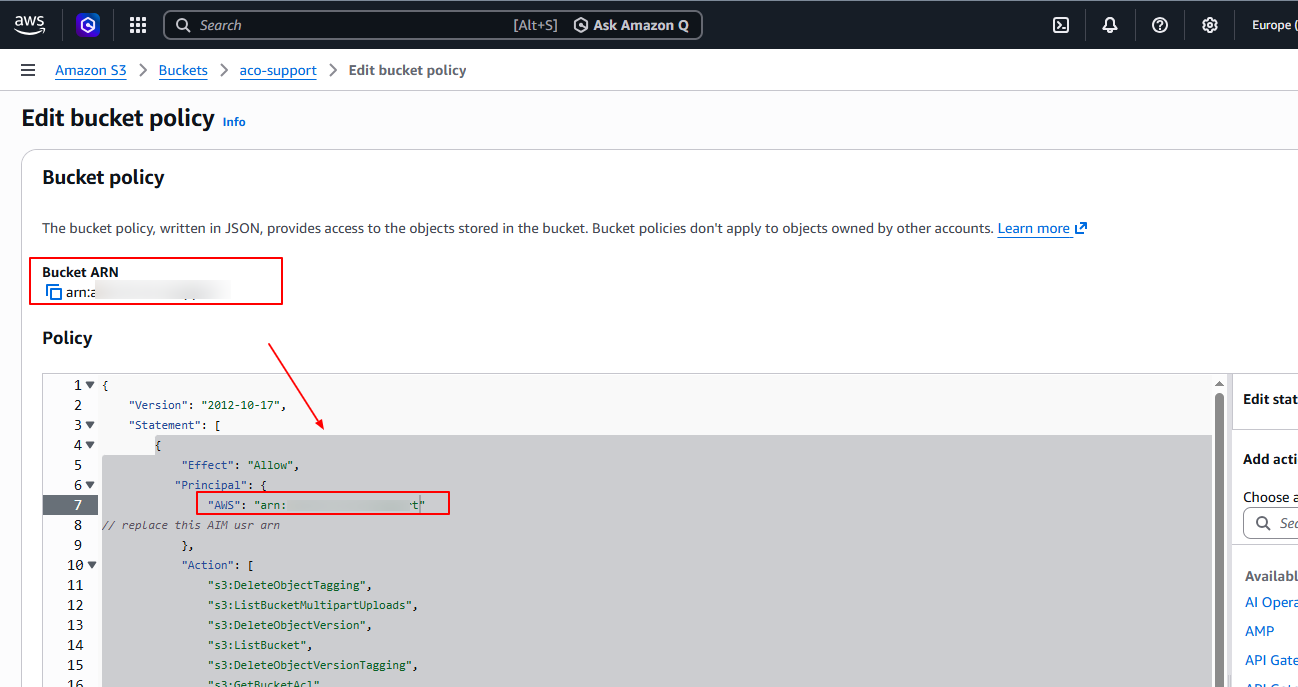
If you encounter any permission issues, you can resolve them by adding a bucket policy in JSON format. To do this, Navigate to the Amazon S3 console, and select your desired bucket. Navigate to the Permissions tab and click on Edit under the Bucket Policy section. In the provided text box, You can use the below policy for the same.
{
“Version”: “2012-10-17”,
“Statement”: [
{
“Effect”: “Allow”,
“Principal”: {
“AWS”: “arn:aws:iam::6580xxxx007:user/demo”
// replace this AIM usr arn
},
“Action”: [
“s3:DeleteObjectTagging”,
“s3:ListBucketMultipartUploads”,
“s3:DeleteObjectVersion”,
“s3:ListBucket”,
“s3:DeleteObjectVersionTagging”,
“s3:GetBucketAcl”,
“s3:ListMultipartUploadParts”,
“s3:PutObject”,
“s3:GetObjectAcl”,
“s3:GetObject”,
“s3:AbortMultipartUpload”,
“s3:DeleteObject”,
“s3:GetBucketLocation”,
“s3:PutObjectAcl”
],
“Resource”: [
“arn:aws:s3:::<BUCKET_NAME>/*”,
“arn:aws:s3:::<BUCKET_NAME>“
]
}
]
}
Be sure to replace Bucket ARN and <BUCKET_NAME> with your actual bucket name. Once the policy is added, Click on “ Save changes “ to apply the policy.
Step 1: Navigate to the Configuration Page
After successfully installing the plugin, go to the WordPress admin dashboard and select: Offload Media >> Storage provider
Step 2: Choose Your Cloud Service
On the service selection page, choose the cloud storage service you want to configure.
For this guide, we’ll select Amazon S3.
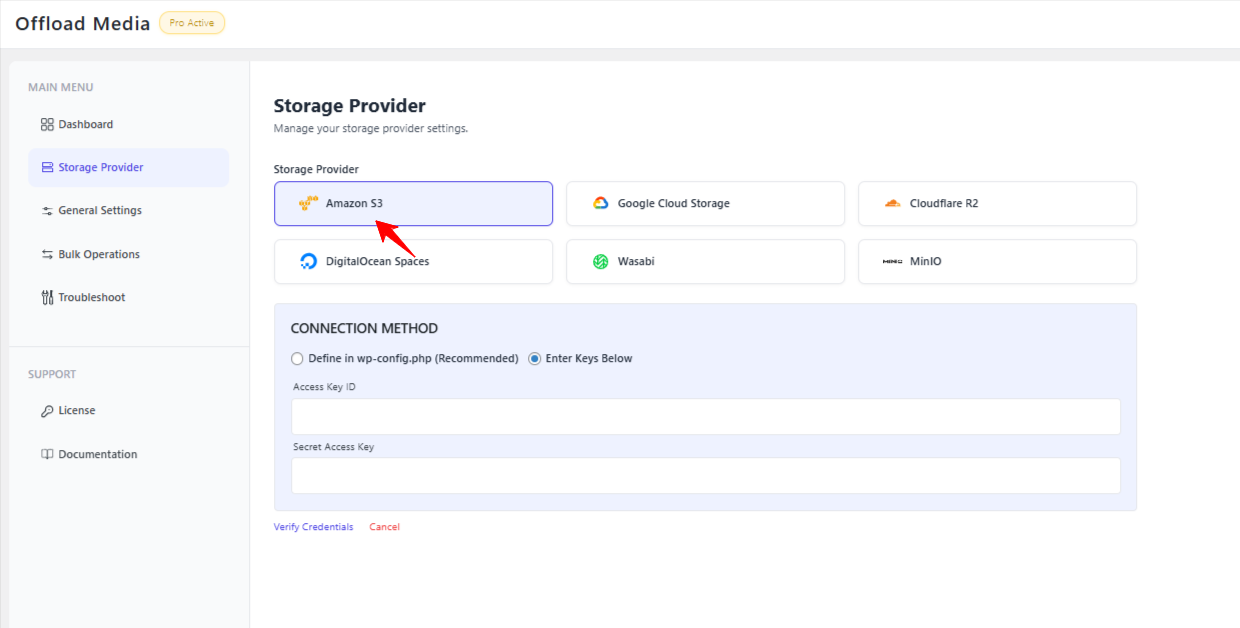
Step 3: Enter Amazon S3 Credentials
Next, enter the credentials you previously created for your Amazon S3 account. This typically includes: Access Key and Secret Key.
After entering the credentials, click “Verify Credentials” to confirm that the connection is valid.
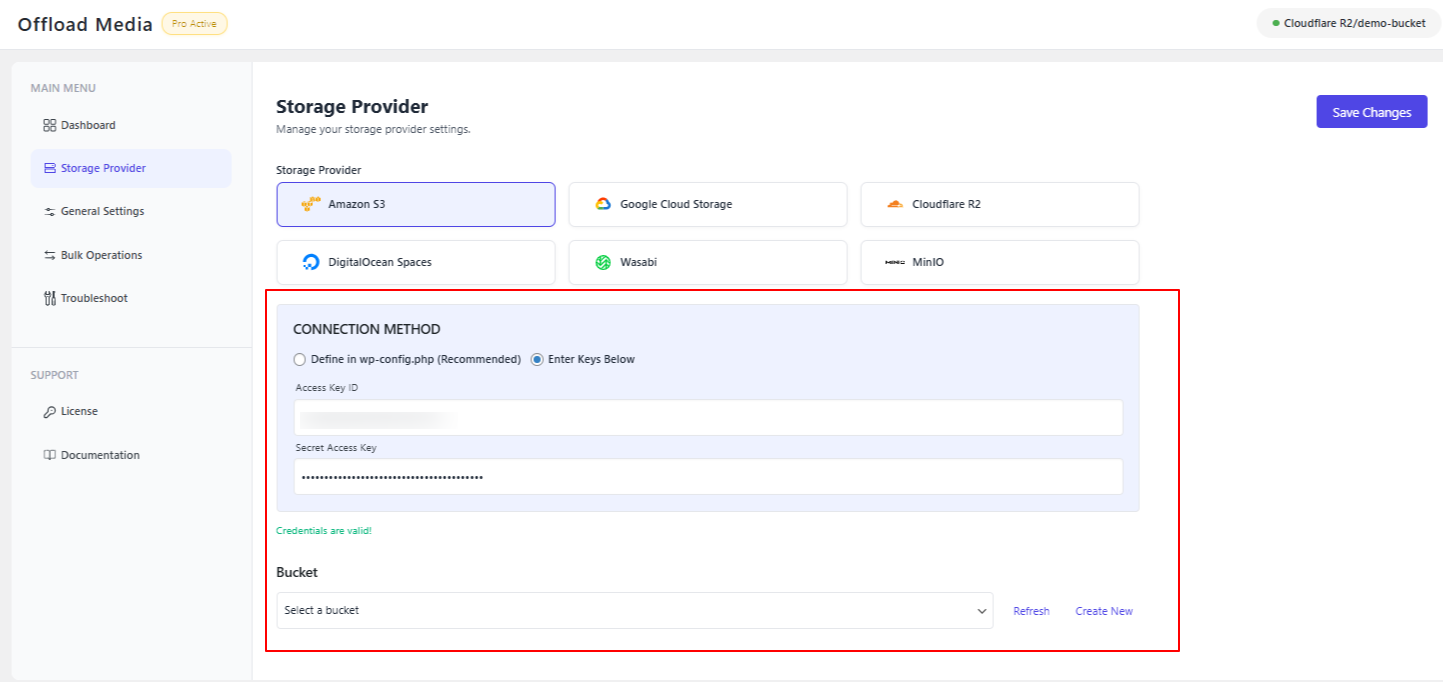
Once the credentials are verified, you will see an option to select a bucket from the list.
If you already have a bucket in Amazon S3, simply select it from the dropdown.
If you do not have a bucket yet, you can use the “Create New” option to create a new bucket directly from the plugin.
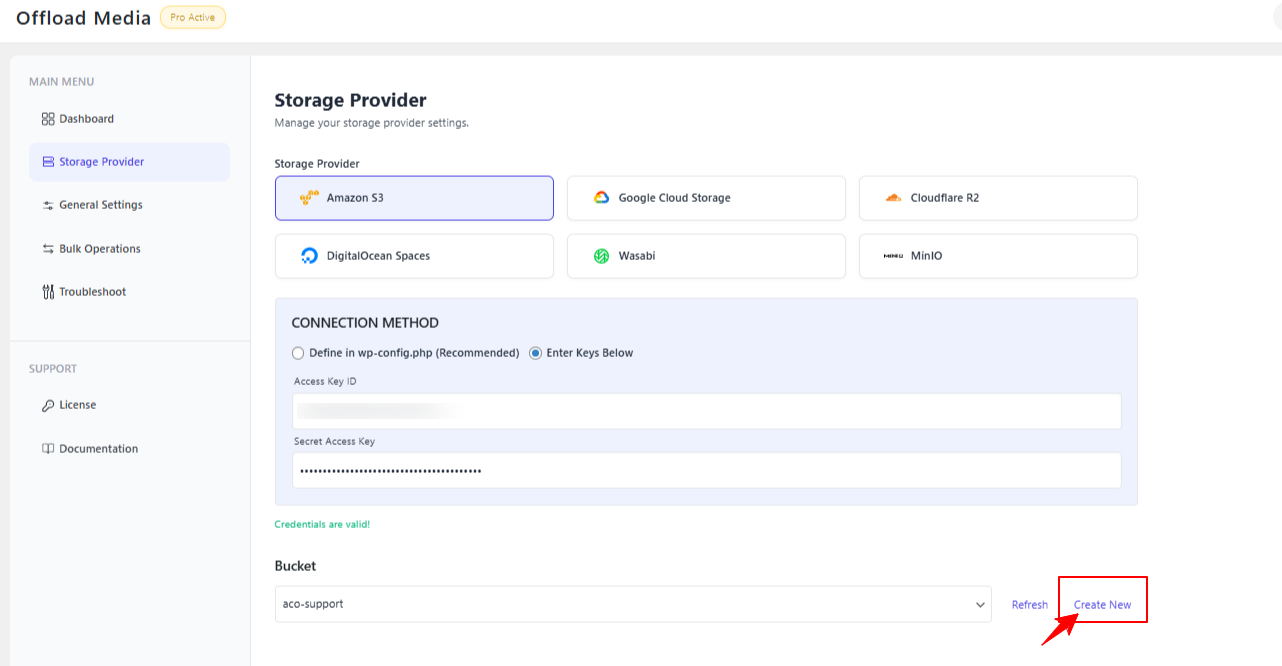
Once you have selected or created the bucket, click “Save Changes.”
Congratulations! You have successfully configured the Offload Media plugin with Amazon S3.
Your media files are now ready to be seamlessly offloaded to your cloud storage.
To create a CDN (Content Delivery Network) or a custom endpoint in AWS, you typically use Amazon CloudFront, which is AWS’s CDN service. Below is a step-by-step guide to creating a CDN or custom endpoint using CloudFront:
Setting Up a CDN in AWS CloudFront
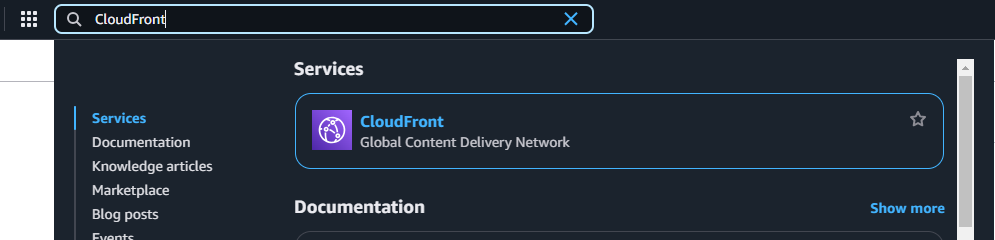
Step 1: Open AWS Management Console and log in to your account.
Step 2: In the search bar at the top, type “ CloudFront “ and select it from the list of services.
Step 3: Click on the “ Create a CloudFront distribution “ button.
Step 4: Configure the Distribution.
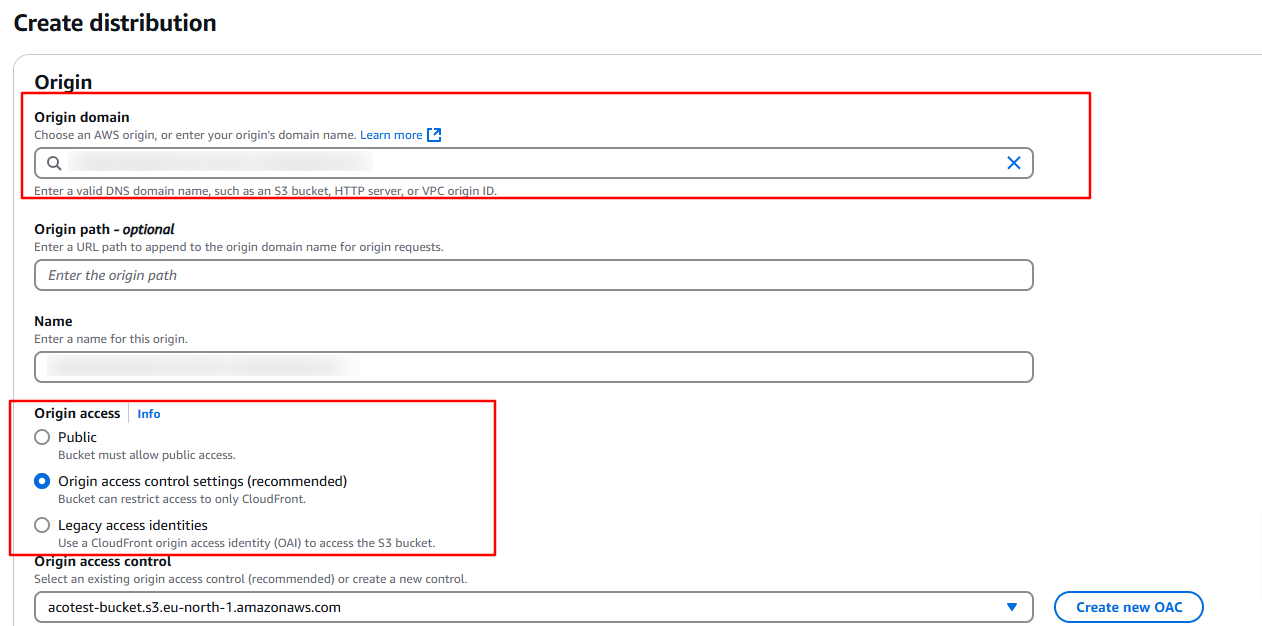
Step 5: After configuring the settings, review them carefully. Click “ Create Distribution “. The process may take some time to deploy.
Thank You!!!!!!!
If you have questions about our plugin(s), are experiencing issues with any of our plugin


 Login
Login
 Cart
Cart