Login
Login
 Cart
Cart
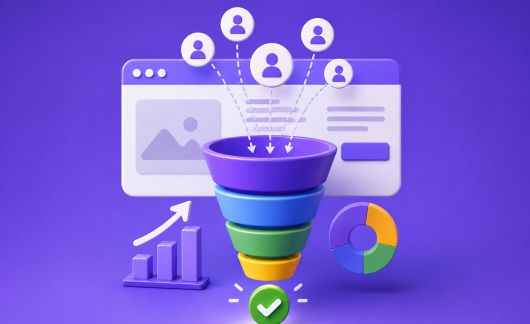
Launching a new website is an important undertaking that requires careful planning and preparation. Getting all the essential elements in place beforehand can make the difference between a seamless launch and facing unexpected issues that frustrate visitors and hurt your brand.
This guide will walk you through the essential things to do before launching a WordPress website. We will discuss selecting the right hosting plan and domain name, designing pages, and testing functionality. We will also cover some important finishing touches to provide security and aid optimization.
By taking the time to set up key elements as well as complete backend tasks, you can avoid surprises and issues to demonstrate your professionalism from day one.
1. Choose the Right Plan
Evaluating Your Needs
The first step in launching a WordPress website is to carefully evaluate your unique goals and requirements. Consider what level of functionality you need initially, as well as room for future growth.
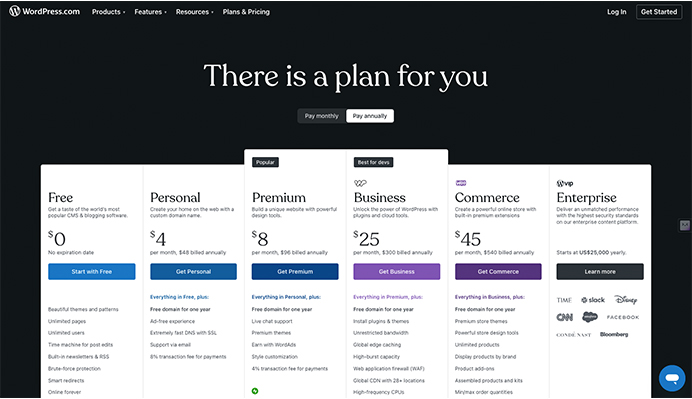
WordPress.com offers a range of plans, including free basic options perfect for getting started up to premium paid solutions tailored for advanced features and large volumes of traffic.
Factors to Consider
Some important factors to take into account include whether your site will utilize e-commerce capabilities, require third-party plugins, or need storage space for high-resolution images and videos.
You may also want to assess the level of design customization and support accessibility included with each plan.
Choosing the Right Fit
Take the time to thoroughly research each WordPress.com plan, paying close attention to specs regarding storage limits, user limits, capabilities for themes, and monetization strategies.
Seeking input from WordPress.com support or others who have launched similar sites can also help you determine the optimal starting point. While a basic free plan is great for initial testing, selecting a paid option with room for growth ensures your site will stay fully featured as your goals and traffic scale over time.
Choosing the right initial plan forms a foundation for long-term success. Make sure to select one aligned with both your current and future vision. With the planning dilemma addressed you can move forward confidently to the next task of acquiring your domain name.
2. Select a Domain
Choosing the Perfect Name
According to an infographic by Statista, there were 1.88 billion websites in 2021.
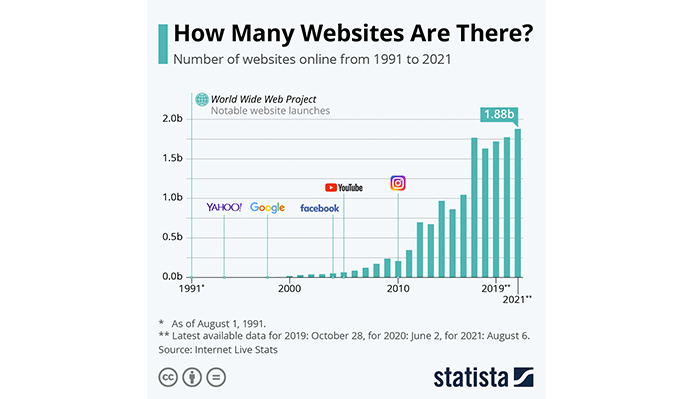
With this figure expected to increase at a fast rate, today, there could be over 2 billion websites in existence, so picking the right domain name is crucial. A name that is memorable yet relevant to your business will help boost discoverability and forge stronger brand recognition.
Take time to brainstorm names reflecting your niche and goals before checking availability.
Tips for Selection
When choosing a domain, favor shorter, simpler names that clearly convey what you offer. Abide by proper spelling and avoid strings of numbers or uncommon characters.
According to statistics by DomainWheel, “shorter domain names, in general, bring in more traffic.” It’s then wise to register similar variations to protect your brand.
Free vs. Purchased Domains
When choosing between a free subdomain or custom domain, it’s important to note that purchasing an annual, multi-year, or recurring WordPress.com plan provides eligible customers with a one-year domain credit.
This credit can be used to register a new domain name for free for one year or transfer an existing domain to WordPress.com at no additional cost, covering the first year of domain registration fees.
Opting for a custom domain helps establish more authority for a website compared to a free subdomain, while the domain credit included with certain plans removes upfront costs for domain registration during the initial twelve months.
Make it Memorable
Whether choosing a subdomain or investing in a premium domain, focus on making yours descriptive yet easy to recall. With the right combination of representativeness and memorability, visitors will smoothly find their way to your site each visit.
With a little inspiration and research, you can select the perfect web address to strengthen your identity online. Up next is designing high-quality pages to match your standout domain name.
3. Design Your Website
Choosing the Right Theme
With over 11,000 free themes available in the WordPress directory, selecting one suited to your needs can feel overwhelming.

Take time to browse designs in categories like business, portfolio, or blog to find a few that match your vision. View real examples of each theme in use to determine features and overall aesthetic.
Factors to Consider
Consider the functionality required, content volume, and target audience when choosing. Review theme documentation to ensure it supports all planned elements like galleries, forms, or visions.
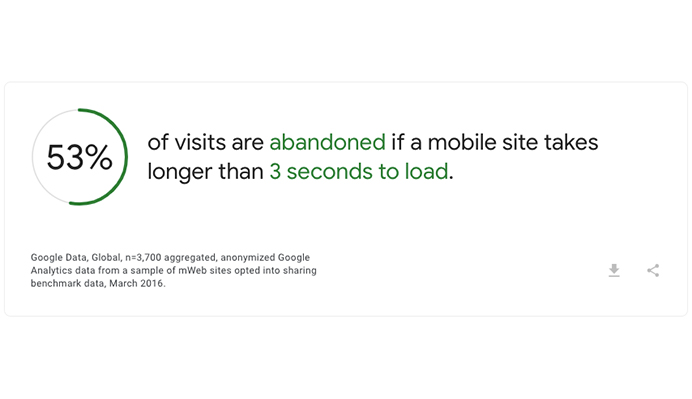
Page builder integration saves time during development. According to Think with Google, 53% of visitors will abandon a mobile site that doesn’t load within 3 seconds, so speed is also important.
Customizing to Taste
Once a theme is selected, dive into customization options. Set color schemes, header/footer designs, and layout configurations.
If coding is capable, delve into the theme files directly for deeper customizations. Over 700,000 active installs of the OceanWP theme show the demand for highly modifiable designs.
With the right theme selected and customized to suit your needs, visitors will immediately perceive professionalism and credibility in your brand. Next is populating essential pages with optimized content for strategic first impressions.
4. Create Essential Pages
Pages to Prioritize
At a minimum, focus creation efforts on a Homepage, an About page describing your business, a Contact information page, and Service/Product pages if offering items. A blog can be added later if pursuing a content marketing strategy.
Optimizing Page Content
Each page should contain at least 300 words of optimized meta descriptions and headings using target keyword phrases.
Steer clear of filler content and aim to genuinely inform and engage visitors from the start. Leverage internal website links between pages to enhance user experience flow.
Calls to Action
Include clear calls to action on critical pages, prompting relevant next steps.
For example, a “Contact Us” button on the Homepage and service pages and a “Free Quote” option on product pages.
With foundational pages established using optimized on-page elements, visitors gain an understanding of your business and reasons to further explore the site.
This lays the groundwork for positive site engagement metrics and sets the stage for launching a polished presence online. Next is refining the header and footer design.
5. Optimize Your Header
Elements to Include
The header should contain your logo, which research shows builds brand recognition for 75% of people who see it.
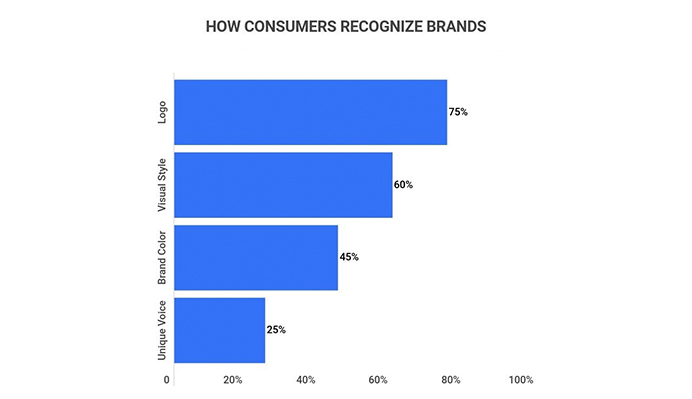
Including your logo helps potential customers identify your business and recall your brand.
Also include your business name, a compelling tagline conveying what you do, and contact details such as your phone number and email address.
Choosing the right initial plan forms a foundation for long-term success. Make sure to select one aligned with both your current and future vision. With the planning dilemma addressed you can move forward confidently to the next task of acquiring your domain name. Including your logo helps potential customers identify your business and recall your brand. Exploring some logo design examples will give you more ideas about logo design cost.
Social Media Integration
A recent report found that over 80% of shoppers utilize social media platforms when making purchase decisions.
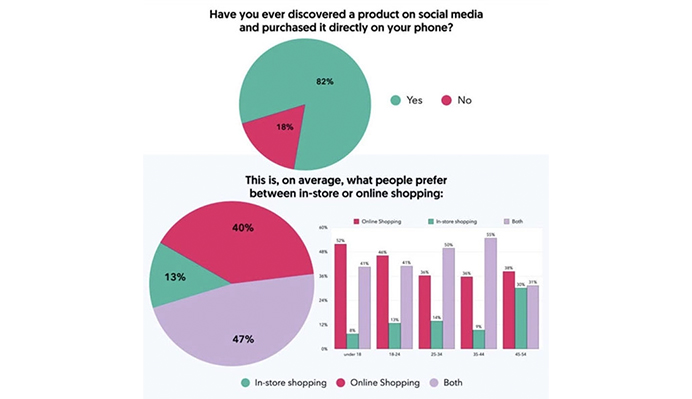
By adding links to your social profiles, you can boost discoverability among these consumers and tap into a sizable portion of your target audience.
Utilize WordPress.com’s built-in widgets to neatly integrate buttons for platforms like Facebook, Twitter, and Instagram. This allows visitors to easily explore and follow your business across various social networks from your website.
Design Considerations
Ensure readability of text on varied device widths using a maximum of 2-3 lines. Limit page distractions and prioritize above-the-fold visibility. High-contrast colors support accessibility guidelines.
Leverage the full header width and choose visually impactful images showcasing your brand personality.
With essential information and an optimized design, you establish credibility right away while enabling connections. Test all header elements across devices before launch. Up next is customizing your footer to complete brand consistency on all pages.
6. Enhance Your Footer
Important Links
The footer allows quick access to key legal pages. Always include links to your Privacy Policy and Terms of Service in the footer.
You may also add links to additional pages like FAQs, Shipping, and Returns.
Enhance Trust
Displaying important details fosters transparency. Include your business name, address, contact information, social media links, and copyright details.
A global survey conducted in 2022 found that over half of recent online shoppers believe trustworthiness and transparency to be the most important brand traits when making purchasing decisions.
Credibility and honesty are valued highly by consumers online. Providing pertinent information upfront helps build confidence in your business and encourages potential customers to feel secure engaging with and supporting your brand.
Customization Options
Leverage the theme’s footer customizer to easily edit colors, fonts, column layout, and widget areas. Consistent branding builds familiarity – match your logo, buttons, and type treatment to other sections. Over 500 footer widgets in the official repository boost flexibility.
Global Exposure
Footer links appear on every page, making this a valuable real estate for internal navigation. Direct visitors efficiently to popular areas of your site, like the blog or product categories.
With key elements incorporated accessibly, your footer reassures visitors and encourages continued movement throughout your site. Up next, refining your navigation is crucial for ease of use.
7. Optimize Your Navigation Menu
Logical Organization
Group related pages under descriptive primary headings like “Services”, “Products”, and “About”. Subpages can then sit logically underneath.
Dropdown Menus
Consider dropdowns for sections exceeding 5-6 subpages to avoid clutter. These present options on hover/click vs. continuous scrolling. Test placement across devices to ensure easy access.
Clear Labeling
Give each element a unique, scannable label informing what users will find, such as “Our Work” vs. “Page 3”. Descriptive text rather than ambiguous numbers prevents confusion.
Consistent Branding
Maintain uniform styling, sizing, and colors between menu and other identifiers like logo and footer for visual cohesion. This establishes psychological familiarity.
Responsiveness
Responsiveness is critical as over 60% of traffic originates from mobile. Ensure the menu collapses neatly and all elements remain accessible across breakpoints.
With strategic organization, well-labeled items, consistency, and test-proven responsiveness, your navigation empowers intuitive journeys throughout the site. Next, integrate social platforms for valuable connections.
8. Integrate Social Media Links
Leverage Available Widgets
WordPress.com offers built-in widgets to neatly showcase links to profiles. Display icons in headers, sidebars, or footers for easy one-click connections. Consistent placement boosts familiarity.
Maximize Engagement
In 2022 alone, social media active users spent over 2 hours daily on platforms. Tapping into relevant conversations and communities drives awareness.
Track Analytics
Link positioning tests and platform insights reveal the highest-performing placements. Google Analytics social integration observes referral traffic sources.
Optimizing based on data strengthens results.
Emphasize Profiles
Clearly label each icon with your verified profile names versus ambiguous generic icons. Clarify what experiences users can expect on each channel to pique interest.
Social platforms extend the reach of your message and cultivate engaged subscribers. Updating content across networks and websites energizes two-way interactions crucial for modern marketing. Next is refining calls to action for improved conversions.
9. Test Your Forms
Validate Functionality
Thoroughly evaluate that forms are submitted as expected across all devices and browsers using sample data. Validate required fields prompt for completion, and submissions are confirmed. Add invisible fields to test spam protection.
Confirm Delivery
For critical contact or lead capture forms, have multiple users complete and ensure messages reach designated recipients. Monitor junk folders, too.
A recent survey found that the majority of users abandon online forms after starting to fill them out, and the vast majority of those users do not follow up with the business in another way.
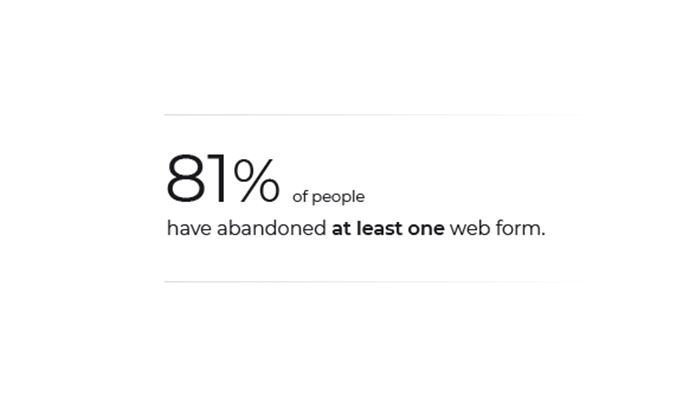
Only a small percentage will return to a form they previously quit. Testing forms extensively can help ensure they function properly and provide the best possible user experience to avoid losing potential customers and leads.
Emulate Real Users
Simulate realistic user scenarios by filling out forms in haste and with mistakes. Adjust field constraints and validation messages. Add autofill testing on mobile. Verify forms resize responsively on small screens.
User Experience
From loading speeds to visual arrangements, assess usability factors impacting experience and completion rates. Consider simple, focused designs using large, clear calls to action proven to increase conversions.
Flawless forms translate site visitors into qualified contacts and customers seamlessly. Before launch, validate submissions under real conditions to identify any needed adjustments. Next, evaluate site speed’s impact on user satisfaction.
10. Ensure Mobile Responsiveness
Consider Mobile-First Design
Mobile traffic accounts for approximately 50% of web traffic worldwide, according to Statista. Prioritizing responsive design from the start streamlines development.
Test Across Devices
Thoroughly test rendering and interactions on an array of mobile phones and tablets with varying screen sizes and operating systems. Check content is readable and interactive elements are usable.
Resize and Zoom In/Out
In addition to testing multiple devices, verify functionality under changes in viewport width by resizing browsers and zooming. Evaluate images, videos, and overloaded pages.
Simplify for Small Screens
Remove non-critical or distracting elements from mobile views. Focus on above-the-fold priority content and aim for load times under 3 seconds for optimal UX, as slow sites see high bounce rates.
With the majority of web traffic originating from mobile, ensure your site caters seamlessly across devices prior to launch. Validate responsiveness handles all viewing conditions. Up next is analyzing overall site speed for positive impressions.
11. Check for Broken Links and Images
Verify Internal Links
Thoroughly click and test all internal links pointing to pages within the site. Ensure they lead to the intended destination page and do not result in 404 errors, which damage SEO.
Confirm External Links
Similarly, validate outsider links to third-party pages and social profiles function correctly. Avoid broken links detracting from user experience and hurting your authority in search results.
Inspect Image References
Review image HTML for validity of SRC file paths and dimensions defined for proper rendering. Missing or corrupt images leave ugly holes in the design and confuse visitors.
Leverage Link Checking Tools
For large sites, utilize free link checkers like Xenu to methodically scan link structure, identify issues, and receive reports. Fix broken elements before traffic arrives.
Thorough link and asset auditing protect against launch day frustrations. Fixing technical glitches upfront avoids confusing first impressions. With the site validated, optimization for speed enhances the user journey.
12. Optimize Site Speed
Impact on User Experience
Speed influences whether visitors engage with your content or bounce immediately. As previously stated, 53% of mobile users expect pages to load in 3 seconds or less.
Page Load Times
Analyze load performance, including total blocking time when critical resources delay rendering. Focus on optimizing images, JavaScript, CSS, and front-end code delivery.
Compress Assets
Lossless compression of assets like JPEGs and PNGs without quality loss can significantly reduce payload sizes. Enable browser caching for faster subsequent page loads.
Minify Code Files
Removing unnecessary characters from code files like HTML, JavaScript, and CSS trims kilobytes from downloads. Leverage plugins to automatically minify files.
Content Delivery Networks
Partnering with global CDNs like Cloudflare distributes cached static assets at local edge servers for higher speeds. Especially critical for international traffic.
First impressions through speed impact engagement and search visibility. Validate performance meets modern user expectations before launch to maximize potential for success. Next is refining key on-page elements.
Don’t Forget the Crucial Finishing Touches
1. Security and Performance
Protect users and enhance experiences through measures like strong passwords, two-factor authentication, and keeping software up-to-date. Regularly checking sites over SSL also boosts credibility.
2. Tracking and Testing
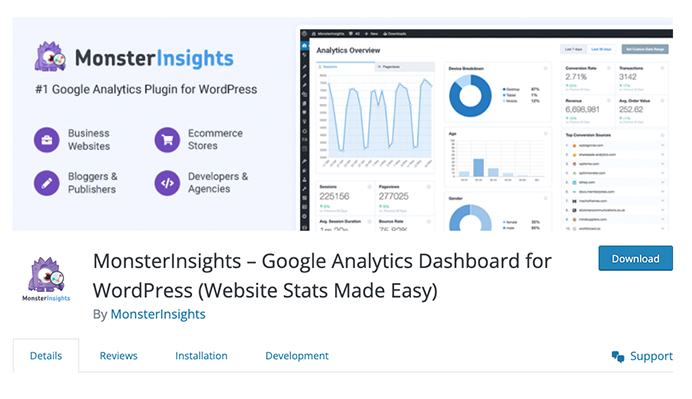
Set up analytics like Google Analytics for actionable insights into engagement. Continually reviewing data guide optimization. Ensure forms, images, and links remain functional with testing.
3. Content Curation
Proofread all material for typos and clarity. Pursue consistent publishing to establish authority and engage through high-quality posts.
4. Backup Procedures
Automated backups to remote servers with version control defend content integrity. Schedule backups for uptime dependability to avoid disruptions.
5. Technical SEO
From XML sitemaps to keyword targeting, elevate discovery by expressing unique value through technical semantic optimizations.
6. Futureproofing
Launch with scalability in mind. Modular, well-structured websites flexibly accommodate growth. Dropping new features post-launch prevents rework from hindering progress.
With security, performance, data evaluation, and technical SEO addressed, your site gains stability and visibility, ready to succeed. Paired with ongoing refinement, these finishing touches ensure your website makes the desired first impression and beyond.
The steps highlighted above are mostly for launching a WordPress website by yourself, using pre-existing themes. If you’re serious about a business website, you coud also opt for google web design company where they will not only take care of all these aspects,but will come up with a custom theme that suits your business objectives and other requirements.
Conclusion
Taking the time to complete thorough pre-launch tasks will help ensure any website is off to a smooth start.
From selecting the optimal hosting plan and domain name to designing pages, integrating social media, and meticulously testing all functions, the preparations covered in this guide form a solid foundation for launching a professional, fully functional WordPress website Examples.
With security, speed, and usability addressed upfront, websites can make the ideal first impression on visitors and search engines alike. Fully debugging links, forms, and more minimizes post-launch issues.
Following these best practices leads to websites built for success from day one and optimized to continually surprise and delight users into the future.
Acowebs are the developers of the WooCommerce PDF Invoices and Packing Slips generate PDF invoices automatically and add them to the confirmation emails sent to your customers. We also have developed applications like Email Customizer and Designer For WooCommerce that helps you build and customize WooCommerce emails with a drag-and-drop user interface.