Login
Login
 Cart
Cart
Are you looking to boost your eCommerce sales and outshine your competitors? Customizing your WooCommerce checkout page is crucial for success in today’s competitive online market. A study conducted by the Baymard Institute found that the average cart abandonment rate is around 69.99%, with a significant portion of shoppers leaving due to a cumbersome or lengthy checkout process. Creating a smooth, tailored checkout experience can significantly reduce cart abandonment and increase conversions.
The WooCommerce Checkout Field Editor & Manager Plugin offers an excellent solution to help you create a unique and efficient checkout experience. In this guide, we will walk you through the step by step of customizing your checkout page and strategies you can implement with the plugin to get that competitive edge you need. Let’s dive in and show you how to outshine your competitors with a customized WooCommerce checkout page. But before we start, let’s run through the basics.
Understanding the WooCommerce Checkout Page
The WooCommerce Checkout Page is a crucial part of any online store powered by WooCommerce. It’s where your customers finalize their purchases by reviewing their orders, entering shipping and payment information, and confirming the transaction.
The checkout page plays a significant role in the customer experience, as it can influence their decision to complete the purchase or abandon their cart. The critical components of the WooCommerce Checkout page include:
- Billing and Shipping Information: This is where customers provide their personal details, such as name, address, email, and phone number. Collecting this data is essential for processing orders, calculating shipping fees, and keeping customers updated on their order status.
- Order Summary: Customers can double-check their order in this section, which displays the products, quantities, and prices, along with discounts, promotions, and estimated shipping costs.
- Payment Methods: Offering secure and reliable payment options, like credit cards, PayPal, and other payment gateways, builds trust and ensures a seamless checkout experience.
- Shipping Options: Giving customers a choice between different shipping methods, such as standard, expedited, or overnight shipping, caters to diverse delivery preferences and enhances customer satisfaction.
- Coupon and Discount Codes: Allowing customers to apply coupons or discount codes at checkout incentivizes purchases and encourages customer loyalty.
- Terms and Conditions and Privacy Policy: Including links to these policies on the checkout page promotes transparency and informs customers of their rights and obligations while shopping at your online store.
While the default checkout page provided by WooCommerce is functional, it may not cater to the unique needs of your specific business. For example, you might want to change the layout, add or remove fields, or display certain fields only under particular conditions.
The default checkout page could also lack features that help reduce cart abandonment, such as a step-by-step checkout process, custom fields for better data collection, or simple integration with other plugins and platforms. Let’s examine why customizing your WooCommerce checkout page is essential for your store’s success.
Why Customize Your Woocommerce Checkout Page?
1. Improved User Experience
A customized checkout page can provide your customers with a seamless and enjoyable shopping experience. By streamlining the checkout process and removing unnecessary fields, you can make it easier for shoppers to complete their purchases. This increases customer satisfaction and encourages them to return to your store in the future.
2. Reduced Cart Abandonment
A long and complicated checkout process is one of the main reasons customers abandon their carts. However, when you customize your checkout page, you can simplify the process, making it quicker and more efficient for customers to complete their transactions. This will ultimately lead to reduced cart abandonment rates and increased sales.
3. Enhanced Branding
A customized checkout page allows you to showcase your brand’s unique identity. By incorporating your brand’s colours, logo design, and other design elements, you can create a consistent and memorable experience for your customers. This fosters trust and helps establish an emotional connection with your audience.
4. Tailored Functionality
Every online store has its specific requirements regarding the checkout process. Customizing your WooCommerce checkout page allows you to add or remove fields, offer various payment gateways, and implement features that cater to your store’s unique needs. This tailored functionality ensures that your checkout page aligns with your business objectives and customer expectations.
5. Increased Conversions
A well-designed and customized checkout page can help drive conversions by making it more appealing and convenient for customers to complete their purchases. You can optimize the layout, offer guest checkout options, and include progress indicators to create an intuitive experience that encourages customers to finalize their transactions.
Methods to Customize Your WooCommerce Checkout Page
Depending on your technical skills and requirements, you can use various methods to customize your WooCommerce checkout page. These are some popular options:
1. Built-in WooCommerce features, blocks, and shortcodes
Pre-built page templates and themes: Many WooCommerce-compatible themes come with pre-built templates for the checkout page. These templates often include custom styling and features that can be easily applied to your store, allowing you to create a more professional and engaging checkout experience without any coding knowledge. The drawback is it offers limited flexibility.
2. Custom code
If you have some coding experience, you can customize your checkout page by modifying the template files or adding custom CSS. This method gives you more control over the layout and appearance of your checkout page. However, it requires a good understanding of PHP, HTML, and CSS and may be time-consuming. Additionally, you’d need to ensure that your custom code is compatible with future updates to prevent issues or conflicts with the core WooCommerce system.
3. Plugins
If you’re not tech-savvy or just want a fast and uncomplicated way to improve your WooCommerce checkout page, a plugin is the ideal solution. The WooCommerce Checkout Field Editor & Manager Plugin is easy to set up and requires minimal support. Using plugins is the most efficient and user-friendly approach among the four customisation methods. It eliminates the need to write custom code or search for specific templates, saving you time and effort.
How to Customize WooCommerce Checkout Fields with a Plugin
As discussed earlier, using a plugin is the most efficient and user-friendly way to customize your WooCommerce checkout fields. Although several plugins are available for this purpose, the WooCommerce Checkout Field Editor & Manager Plugin by Acowebs stands out as a top choice.
With its intuitive drag-and-drop form builder, you can easily create and modify your checkout fields in just a few minutes, even if you don’t consider yourself tech-savvy. Moreover, this plugin offers a wide range of customization options and features that allow you to fine-tune your checkout page according to your needs and requirements. Best of all, these features are available in both free and premium packages, catering to various budgets and needs.
The free features include the following:
- Edit and manage default fields: Using the Checkout Field Manager, you can effortlessly modify the default WooCommerce checkout fields.
- Reorganize fields: Use the drag-and-drop interface to adjust the fields’ positions and prioritize essential information.
- Enable or disable fields: Determine which fields your customers need to fill out and disable those that aren’t required.
- Hide or show fields: Control the visibility of default WooCommerce checkout fields based on your store’s requirements.
- View customer-filled fields in order details and emails: Access the checkout fields submitted by customers in order details and confirmation emails.
- Adjust column width: Customize the display of fields in half or full width on the checkout page to enhance user experience.
- Set custom CSS classes: Assign custom CSS classes to individual checkout fields for a more personalized appearance.
- Multilingual support: Seamlessly integrate with WPML and Polylang plugins for a smooth multilingual experience.
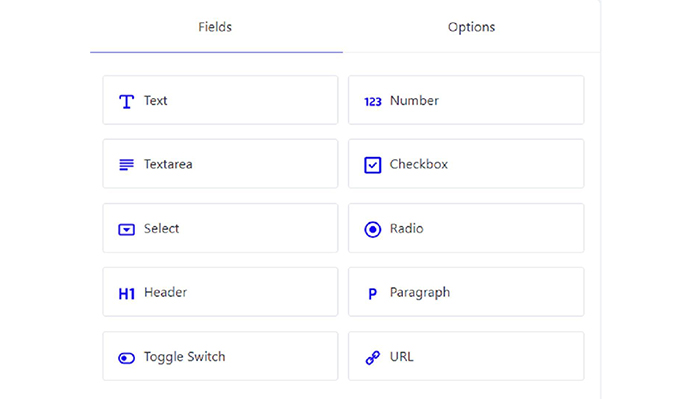
The WooCmmerce Checkout Field Editor plugin free version also support all these available fields:
- Text Field
- Email Field
- Password Field
- Textarea
- Select Field
- Toggle switch
- Phone Field
- Number Field
- Radio
- Header fields
- Paragraph
- Checkbox Field
- URL Field
If your store could benefit from even more customization options, the plugin’s premium version. The WooCmmerce Checkout Field Editor plugin version offers even greater flexibility and extra features that enable you to customize further and enhance your WooCommerce checkout page, providing a smooth and unique shopping experience for your customers.
The premium features include these advanced features:
- All the free features
- Access to over 24 field types for enhanced customization.
- Set up conditional checkout fields and sections for a tailored customer experience.
- Create rules based on products, categories, variations, user roles, payment, and shipping methods.
- Enhance both checkout and account registration pages with added fields.
- Implement custom validation rules with RegEx for text and textarea inputs.
- Easily create new sections and place them in up to 13 available positions.
- Edit, duplicate, and delete custom sections as needed.
- Add extra fees based on field selections, with the option to apply taxes.
You’ll have access to all these checkout fields with the premium plugin:
- Text
- Hidden
- Textarea
- Radio
- Select
- Multi Select
- Checkbox
- Heading
- Date picker
- Time picker
- Telephone
- Password
- Number
- Checkbox Group
- Paragraph
- Label
- Datetime picker
- Colour picker
- URL
- Toggle switch
- Google place select
- Image Group
- File Upload
- Colour Group
Ultimately, the WooCommerce Checkout Field Editor (also known as WooCommerce Checkout Manager) plugin provides you with all the necessary tools, and even more, to tailor your WordPress WooCommerce checkout page to your preferences.
Customizing Your WooCommerce Checkout Page
Let’s see it in action now that you know all the plugin can do. We’ll walk you through the process of customizing your WooCommerce checkout page step by step.
Step 1: Install and Activate the Plugin
To begin customizing your WooCommerce checkout page, you’ll need to install and activate the Checkout Field Editor plugin.
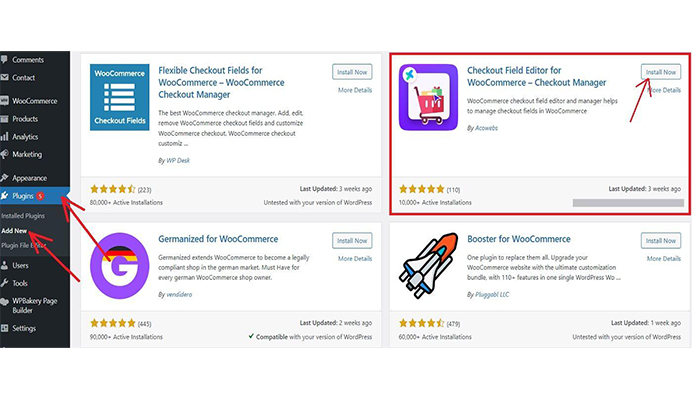
Log in to your WordPress admin dashboard. Navigate to the “Plugins” menu and click “Add New.” In the search bar, type “WooCommerce Checkout Field Editor & Manager Plugin” and look for the plugin by Acowebs. Click “Install Now” to install the plugin.
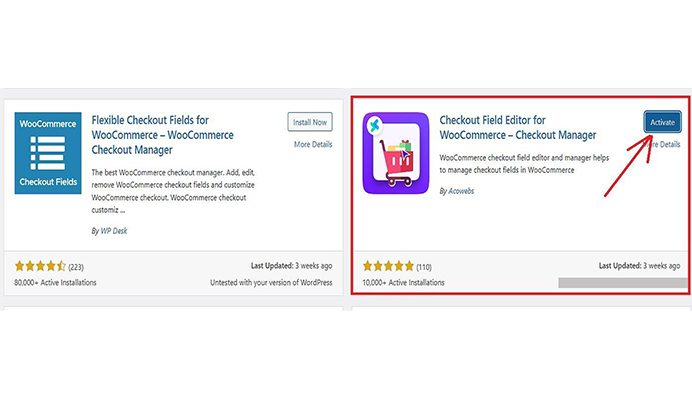
Then click “Activate” to apply the functionalities on your site.
Once the plugin is installed and activated, you can customise your WooCommerce checkout page according to your preferences.
Step 2: Configure and Customize the Checkout Fields
After the plugin is installed and activated, it’s time to configure and customize the checkout fields on your WooCommerce checkout page. Here’s how to do it:
A. Access the plugin settings
Go to your WordPress dashboard, navigate the “WooCommerce” menu, and select the “Checkout Fields” tab.
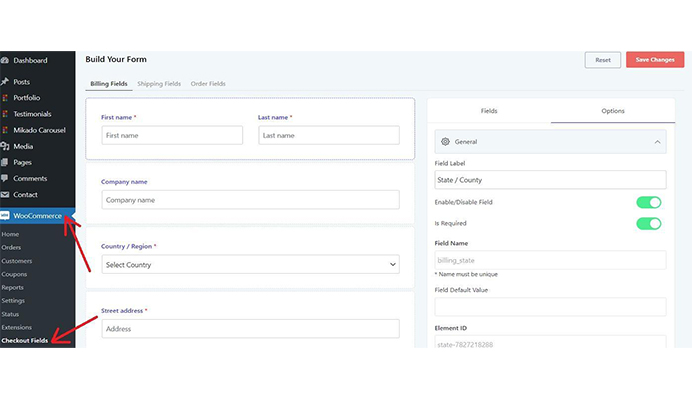
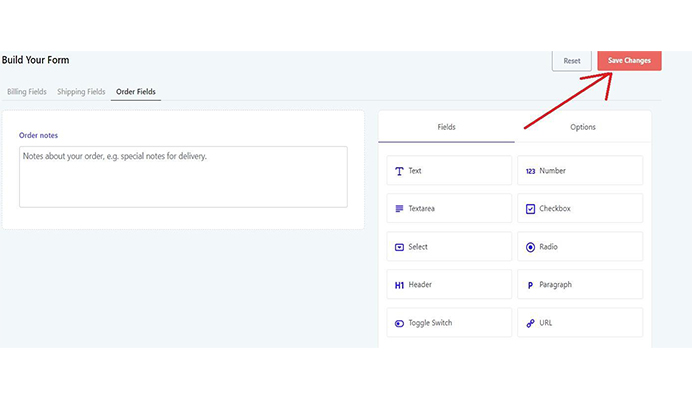
B. Customize the checkout fields
You will see different sections in the “Checkout Fields” tab, such as Billing, Shipping, and Order fields. Choose the section you want to customize.
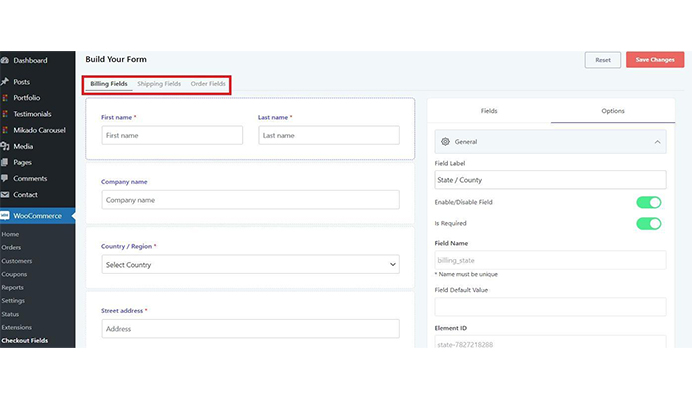
Add, remove, or edit fields using the available options. You can adjust field labels, text areas, and types according to your requirements.
You can also reorder fields using the drag-and-drop functionality to arrange them in the desired order. Once you are done, click on save changes at the top right corner.
Step 3: Test and Launch Your Customized Checkout Page
Once you’ve configured and customized the checkout fields to your satisfaction, testing and launching your updated checkout page is crucial.
A. Review the changes made to the checkout page
Visit your WooCommerce store’s checkout page (Pages > All Pages > checkout page) and carefully review your changes to ensure everything appears as expected.
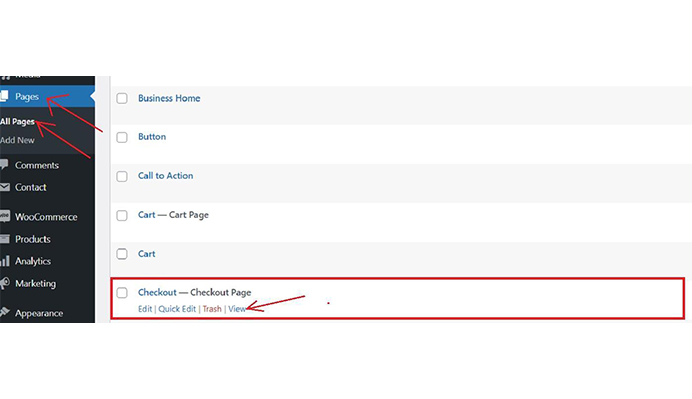
Make any necessary adjustments as needed. Preview the checkout page on different devices, such as desktops, tablets, and smartphones, to check the responsiveness and confirm that it’s user-friendly and visually appealing on all platforms.
B. Perform test transactions to ensure smooth functionality
Conduct test transactions using different payment methods, shipping options, and customer information to ensure the checkout process functions smoothly and without issues.
Ensure that any conditional logic or custom field types you’ve implemented work as intended.
Gaining a Competitive Edge with the WooCommerce Checkout Field Editor & Manager Plugin
Gather Customer Feedback:
Listen to your customers and understand their needs. Use the plugin to add custom fields for collecting feedback or suggestions during checkout. This information can help you identify areas for improvement and uncover any pain points in the customer journey. For example, suppose customers frequently complain about a specific step in the checkout process. In that case, you can use the plugin to modify or remove that step, making the process more user-friendly.
Offer Customized Products and Services:
Use the plugin to provide customers personalized product options, such as custom engravings, gift wrapping, or product bundles. Adding custom fields to collect additional information from customers allows you to deliver a unique experience tailored to their preferences. For instance, if you sell clothing, you can add a field for customers to enter their measurements, allowing you to offer bespoke sizing options that fit their needs perfectly.
Implement Conditional Logic for Upselling and Cross-selling:
The plugin’s conditional logic feature allows you to display specific fields based on the customer’s choices. This can be an effective strategy for upselling and cross-selling related products or services. For example, if a customer adds a smartphone to their cart, you can use conditional logic to display fields offering a discounted phone case or screen protector, encouraging customers to purchase additional items.
Streamline Shipping and Delivery Options:
Use the plugin to offer flexible shipping and delivery options based on your customers’ preferences or location. By adding custom fields to collect shipping information, you can provide a range of delivery options, such as same-day delivery, express shipping, or free in-store pickup.
This flexibility can help you cater to a broader audience and improve customer satisfaction. For instance, if you notice that a significant portion of your customers lives in a specific area, you can use the plugin to offer a local delivery option tailored to their needs.
Enhance Customer Retention with Loyalty Programs:
Leverage the plugin to create and manage a customer loyalty program by adding custom fields to your checkout page. Encourage customers to sign up for your program by offering exclusive discounts, rewards, or freebies. This strategy can help you build long-term customer relationships and encourage repeat purchases. For example, you could add a field for customers to enter their loyalty program membership number, enabling them to accumulate points with each purchase, which can later be redeemed for discounts or exclusive offers.
Wrapping Up
Customizing your WooCommerce checkout page using the Checkout Field Editor & Manager Plugin can provide you with a distinct advantage in the eCommerce market. Enhancing the checkout process and addressing customers’ unique needs can reduce cart abandonment rates, increase conversions, and boost your online store’s sales.
Don’t let your competitors outshine you – take advantage of the plugin’s features to create a seamless, user-friendly, and personalized checkout experience for your customers. Start customizing your WooCommerce checkout page today, and watch your business grow!
Acowebs are the developers of the Woocommerce checkout field editor and manager plugin helps to manage the checkout page fields in your WooCommerce Store. Its drag and drop form builder helps editing checkout fields easier. It can be used to modify or hide default woocommerce checkout fields. We also have developed applications like Labeler ‑ Product Labels, that will help you to highlight new items, best selling products, shop discounts or active promotions for your customers.