Login
Login
 Cart
Cart
If you run a pizza shop, you already know that the phone order model is fading fast. Customers want to browse your menu on their phones, customize their pizza, and pay in three taps , no hold music, no miscommunication, no missed orders during a lunch rush. Building an online pizza store using WordPress puts you in full control: your brand, your data, your margins , with no third-party platform taking a 15–30% commission on every order.
The good news is you do not need a developer. WordPress with WooCommerce and the right plugins gives any pizza restaurant owner a professional, fully functional online ordering website. This guide walks you through every step, from domain setup to taking your first online pizza order.
What You Need Before Starting
Before you log into WordPress for the first time, gather these essentials:
Domain name , Choose something close to your restaurant name or city. Keep it short and memorable. Register it at Namecheap, GoDaddy, or directly through your hosting provider. If your business is “Mario’s Pizza,” something like mariospizza.com or mariospizzaonline.com works well.
Web hosting – For a WooCommerce pizza ordering website, you need a managed WordPress host that handles performance and security. SiteGround, Bluehost, and Hostinger all offer one-click WordPress installs and plans suited to small businesses. Expect to pay $5–$20/month depending on the plan.
WooCommerce plugins – WooCommerce is the free eCommerce engine that turns WordPress into an online store. It handles your product catalog, cart, checkout, and order management. It powers over 28% of all online stores worldwide.
SSL certificate – Required for taking payments online. Most managed WordPress hosts include a free Let’s Encrypt SSL certificate. Make sure it is active before you accept any orders , you will see the padlock icon in your browser bar when it is working.
Once you have hosting and a domain pointed at it, you are ready to install WordPress.
Step 1 – Install WordPress and WooCommerce
Installing WordPress
Most hosting providers offer a one-click WordPress installer in their control panel (cPanel, Plesk, or a proprietary dashboard). Log in, find “WordPress” or “Auto Installer,” enter your site name and admin credentials, and click install. The whole process takes under two minutes.
After installation, log into your WordPress dashboard at yourdomain.com/wp-admin. Before doing anything else, go to Settings → General and confirm your site title, tagline, and timezone are set correctly. The timezone setting is especially important for a food delivery business , your order timestamps need to match your local time.
Installing WooCommerce

- In your WordPress dashboard, go to Plugins → Add New.
- Search for “WooCommerce.”
- Click Install Now, then Activate.
- WooCommerce will launch a setup wizard , complete it to configure your store currency, store address, and industry. Select “Food and drink” as your industry category.
- On the payments step, you can skip and configure gateways later , do not let it block your progress.
WooCommerce is now active. Your site has a shop, cart, checkout, and my account page. Now you need it to look like a pizza restaurant.
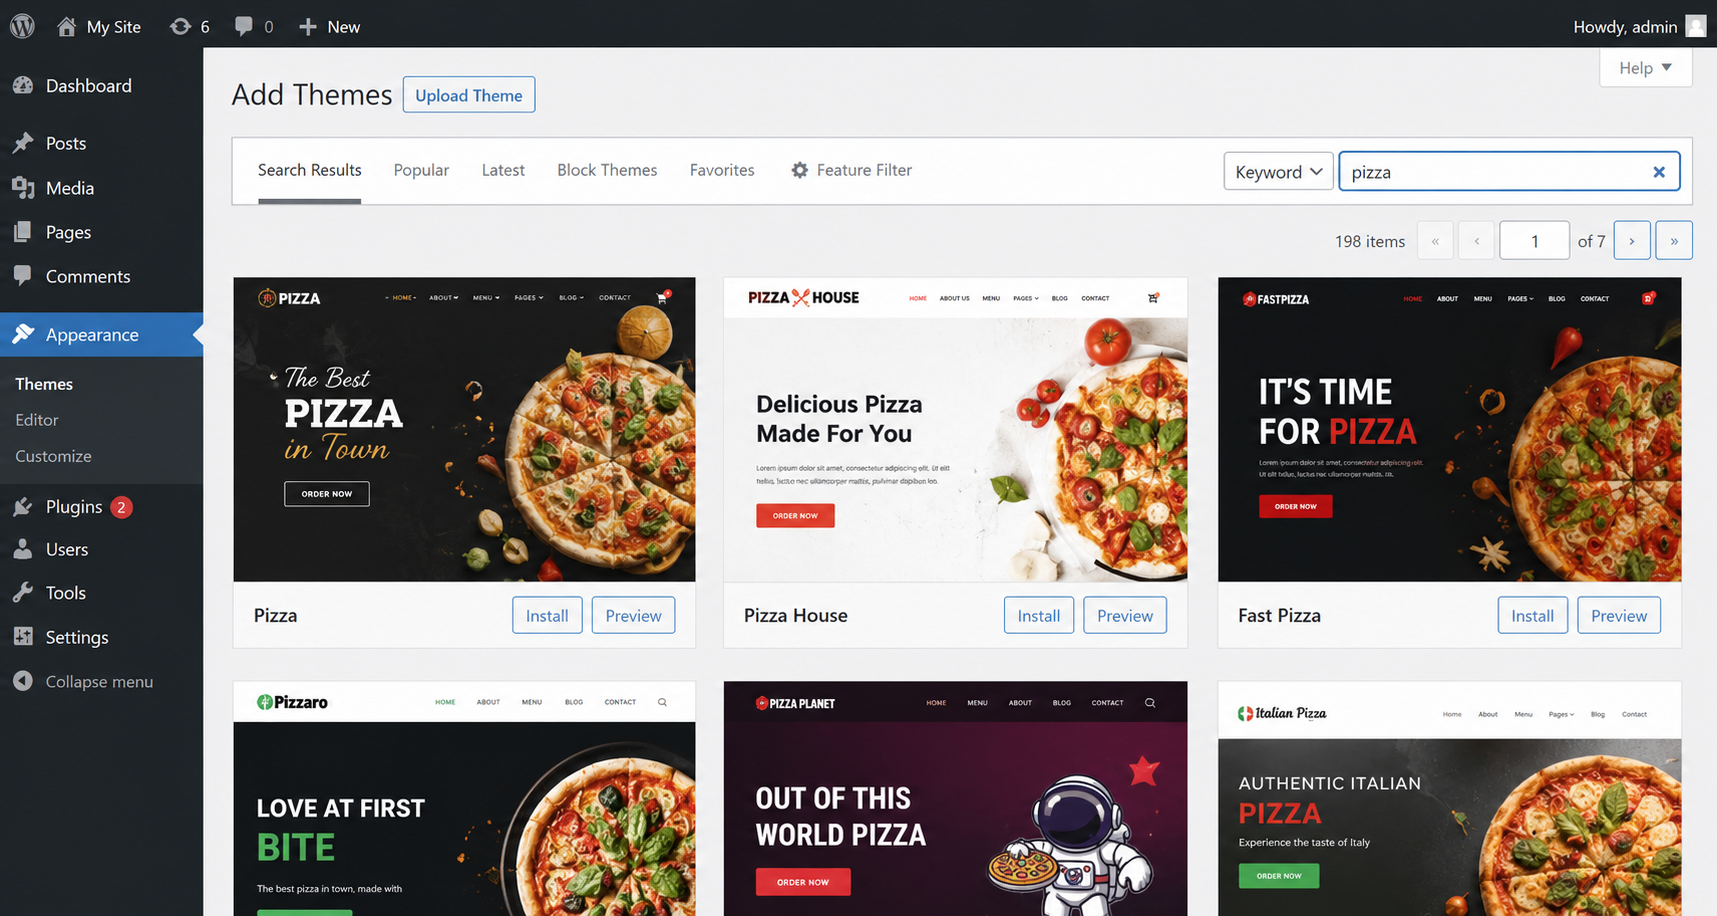
Step 2 – Choose a Pizza Restaurant Theme

The theme controls your site’s design. You want something that supports WooCommerce, loads fast, and looks great with food photography. These three themes are the most reliable choices for an online pizza delivery website:
Astra – Extremely lightweight (under 50KB on the front end), WooCommerce-ready out of the box, and includes a restaurant starter template you can import in one click. Astra’s free version is sufficient for most pizza stores; the Pro version ($47/year) unlocks more layout controls and header customizations.
OceanWP – Another fast, flexible theme with solid WooCommerce integration. The free version is feature-rich, and the OceanWP library includes food-focused demo sites you can import as a starting point. Particularly good if you want a large hero image or video at the top of your homepage.
Zakra – Clean, multipurpose, and built with page builders like Elementor and Beaver Builder in mind. Zakra’s restaurant demo gives you a professional starting layout and full Gutenberg block compatibility.
To install a theme: go to Appearance → Themes → Add New, search for your chosen theme, and click Install, then Activate. Most themes let you import a demo in one click via their own onboarding wizard.
Customize your colors, logo, and fonts through Appearance → Customize to match your restaurant’s branding. Consistent branding across your site and social channels builds the trust that converts a first-time visitor into a repeat customer.
Step 3 – Add Pizza Products in WooCommerce
Each pizza on your menu is a WooCommerce product. Here is how to add them properly:
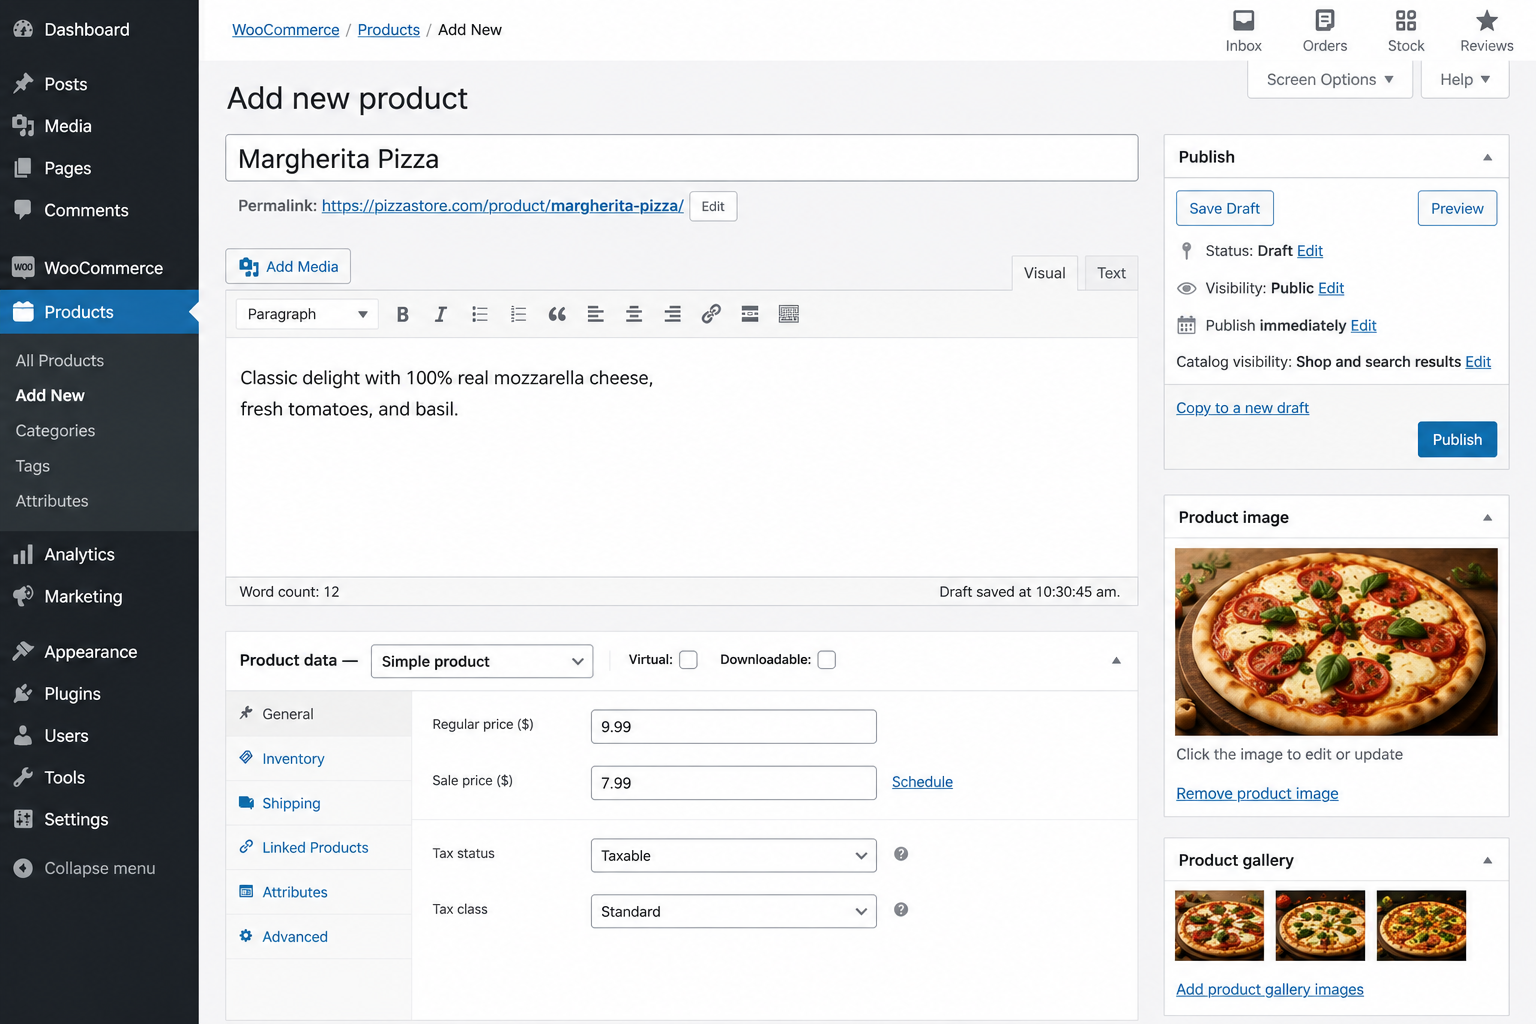
- Go to Products → Add New.
- Give the product a clear, descriptive name: “Margherita Pizza” or “Spicy BBQ Chicken Pizza.”
- Write a short, appetite-stimulating description. Mention key ingredients, flavor profile, and what makes it special. This text also helps your pizza ordering website rank in search for long-tail queries like “margherita pizza WooCommerce store.”
- Set a base price , this is the starting price before size or topping add-ons. For a pizza, this is typically your smallest size price.
- Upload a high-quality product image. Food photography directly drives conversions , professional food photos can increase add-to-cart rates by 30% or more. If you can, arrange a single photography session to shoot your whole menu.
- Assign the product to a category: Veg, Non-Veg, Specials, Sides, Drinks. Create these categories under Products → Categories before you start adding products. Categories let customers filter your menu and find what they want quickly.
- Set the product type to Simple product (the default). You will add sizing and topping variations through the addon plugin in the next step rather than through WooCommerce’s native variation system.
- Click Publish.
Repeat for every pizza and side. Do not rush this step , accurate product listings with excellent images and descriptions are the foundation of your online pizza store’s success.
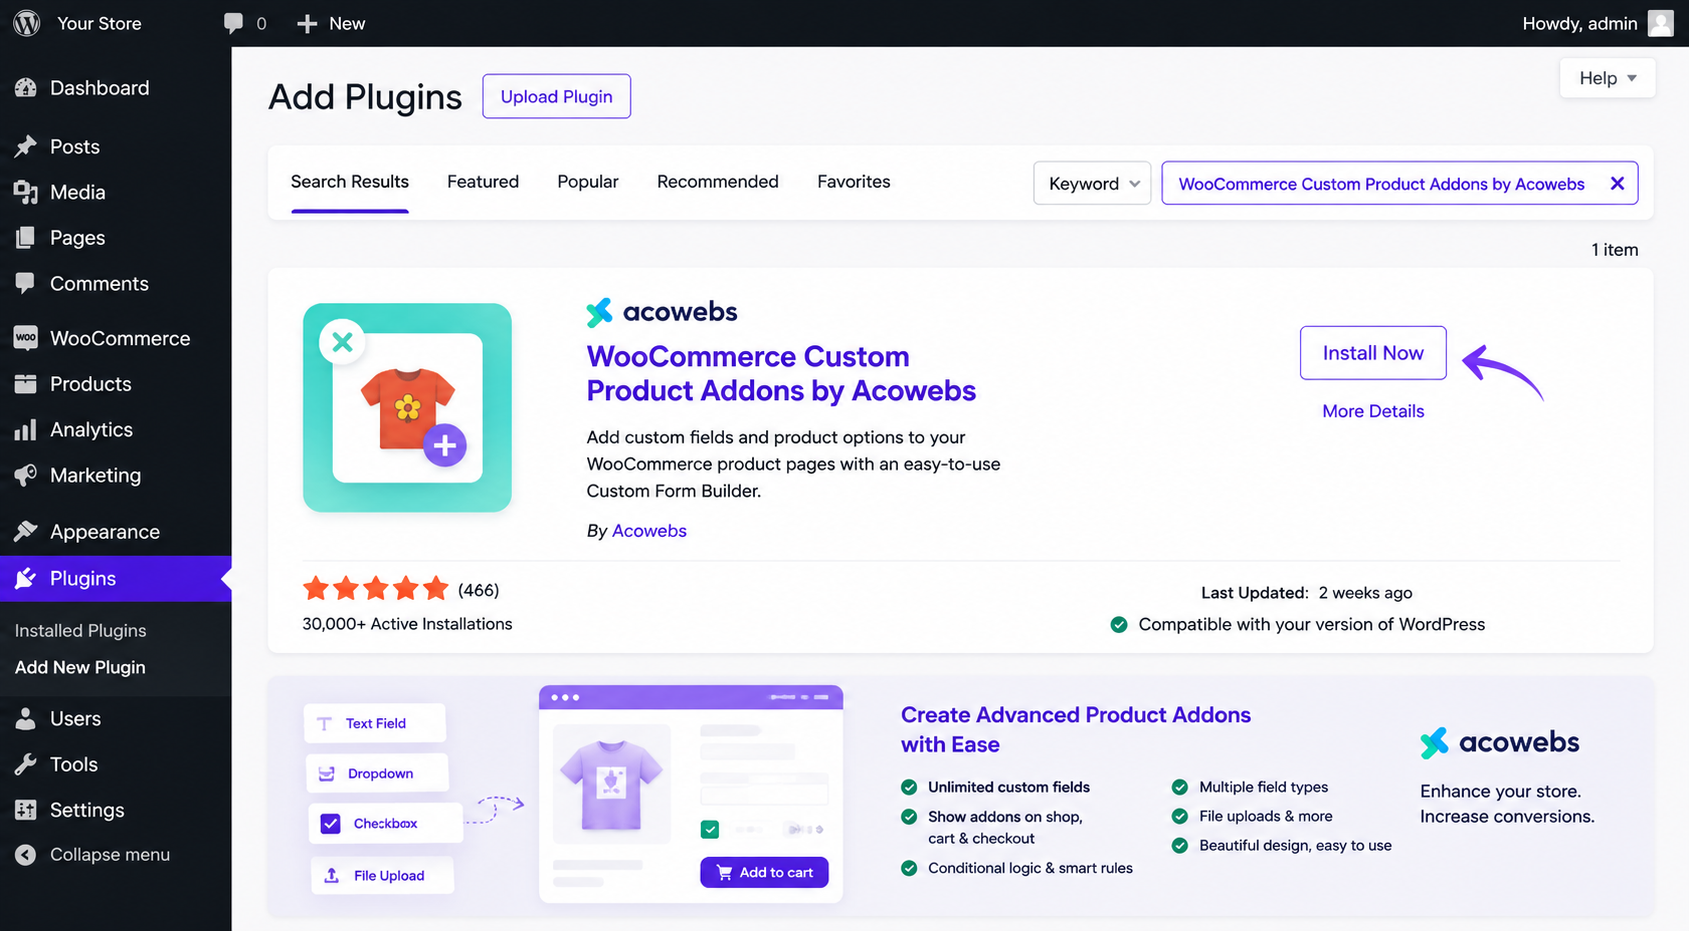
Step 4 – Install WooCommerce Custom Product Addons by Acowebs
This is the step that transforms your WordPress pizza store from a static menu into a real ordering system.
Standard WooCommerce only allows you to create product variations through a matrix of attributes. For a pizza, that means you would need to create a separate variation for every combination of size, crust, and topping , which can quickly run into hundreds of entries and becomes unmanageable.
For a pizza ordering website, you need customers to select:
- Pizza size (Small, Medium, Large)
- Crust type (Thin, Thick, Stuffed)
- Toppings (multiple selections at once)
- Extra sauce
- Special instructions (free text)
and the price needs to update automatically based on what they choose.
WooCommerce Product Addons by Acowebs is purpose-built for exactly this. It is available free on WordPress.org, with a Pro version ($49) that unlocks the price formula and conditional logic features , both essential for a professional pizza pricing model.
Why Acowebs Custom Product Addons Is the Right Choice for a Pizza Store
Most topping plugins add a flat surcharge per item or require expensive monthly subscriptions. Acowebs gives you:
- Price formula (Pro): charge different amounts based on size , Medium +$2, Large +$4 , without creating dozens of separate product variations. The price updates in real time as the customer builds their pizza.
- Conditional logic (Pro): hide or show certain topping groups based on earlier selections. For example, show “Vegan Cheese” only when the customer selects a vegan crust. This keeps the interface clean for all customers.
- Multiple field types: radio buttons, dropdowns, checkboxes, text areas, color swatches, date pickers , all in one plugin, no piecemeal purchases.
- Unlimited addons per product: no artificial cap on how many customization fields you can attach to a single product.
- Works with all WooCommerce-compatible themes: no theme conflicts, no custom coding required, no JavaScript workarounds.
How to Install WooCommerce Custom Product Addons
- Go to Plugins → Add New.
- Search for “WooCommerce Custom Product Addons by Acowebs.”
- Click Install Now, then Activate.
- Alternatively, Buy the plugin directly from acowebs.com/woo-custom-product-addons/ and upload it via Plugins → Upload Plugin.
Setting Up Pizza Size Options (Radio Buttons)
- Open one of your pizza products in the editor.
- Scroll to Product Addons and click Add Group.
- Name the group “Choose Your Size.”
- Click Add Field, choose field type Radio Buttons.
- Add your options:
- Small , +$0.00 (base price)
- Medium , +$2.00
- Large , +$4.00
- Mark this field as required so customers must choose a size before adding to cart.
- Save the product.
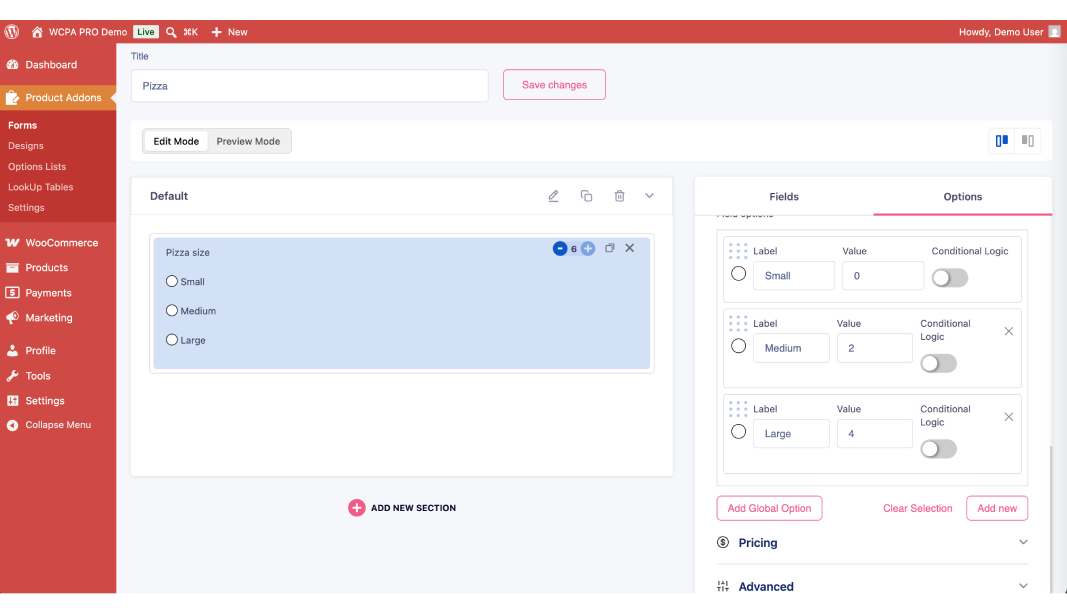
Now customers see a size selector on the product page, and the price updates automatically as they click each option.
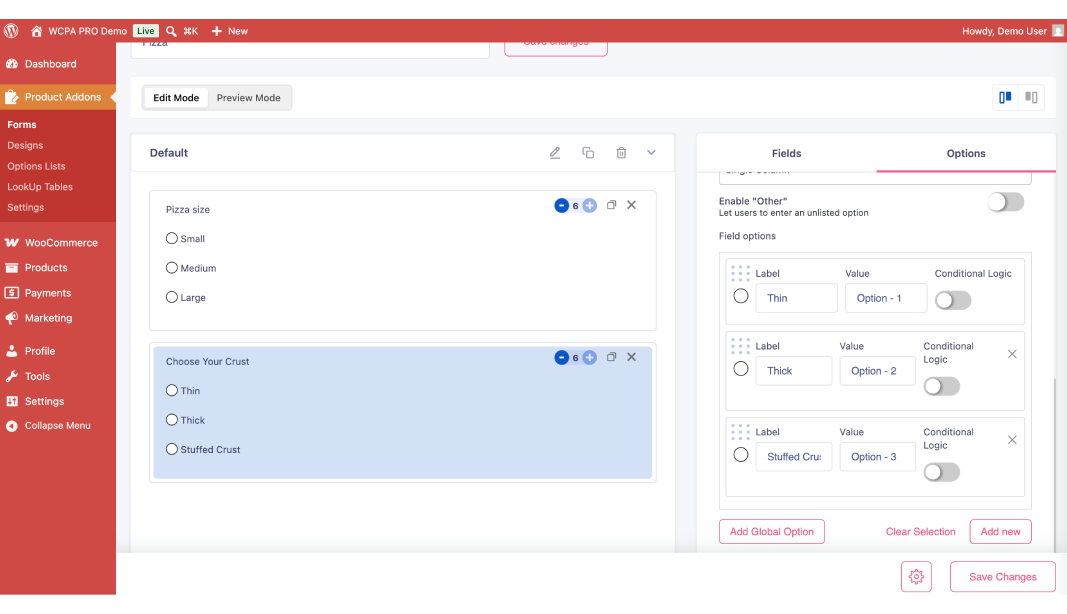
Setting Up Crust Type (Dropdown)
- Add another field group: “Choose Your Crust.”
- Field type: Dropdown.
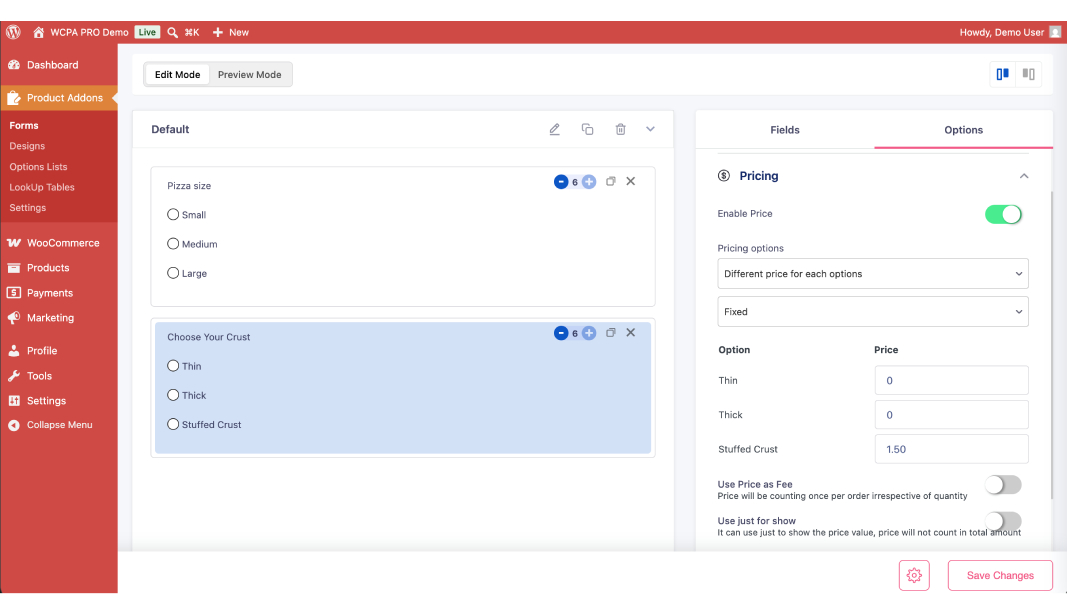
- Options: Thin Crust (+$0.00), Thick Crust (+$0.00), Stuffed Crust (+$1.50).
- Mark as required.
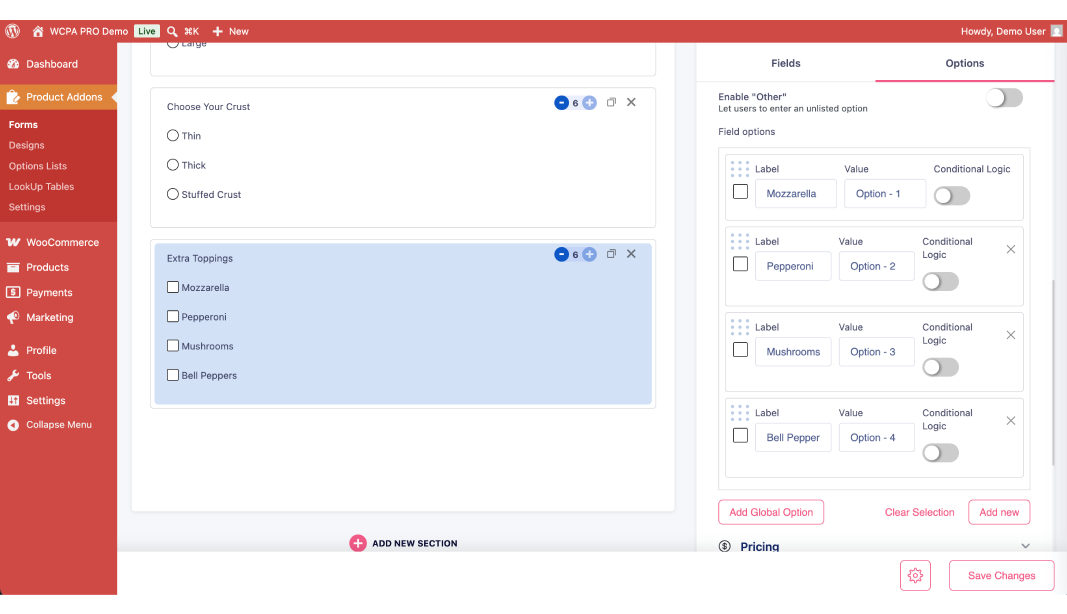
Setting Up Toppings (Checkboxes)
- Add a group: “Extra Toppings.”
- Field type: Checkboxes.
- Add your full topping menu: Mozzarella, Pepperoni, Mushrooms, Bell Peppers, Olives, Jalapeños, Chicken, Bacon, Spinach, Sun-dried Tomatoes, etc.
- Set a per-topping price ($0.75–$1.50 is typical). Each topping checked adds its price to the running total.
- Optionally set a minimum or maximum selection count using the field settings.
Setting Up Extra Sauce and Special Instructions
Extra Sauce:
- Group: “Extra Sauce.”
- Field type: Dropdown.
- Options: No Extra Sauce (+$0.00), Marinara (+$0.50), Ranch (+$0.50), Buffalo (+$0.75), Garlic Butter (+$0.50).
Special Instructions:
- Group: “Special Instructions.”
- Field type: Text Area.
- Label: “Any allergies or special requests?”
- Mark as optional. Keep the character limit generous , customers often have detailed instructions.
How the Price Formula Works (Pro)
With the Pro version, you can define a custom price formula that calculates the final price dynamically. A simple formula for a pizza might look like:
BASE_PRICE + SIZE_ADDON + (TOPPINGS_COUNT × TOPPING_PRICE)
This updates live in the customer’s browser as they make selections , the same real-time pricing experience customers expect from major pizza chain websites, now on your own branded store.
Once you have configured addons for one pizza product, you can copy the addon group and apply it to all your other pizza products, saving significant setup time.
Step 5 – Set Up Payment Gateways
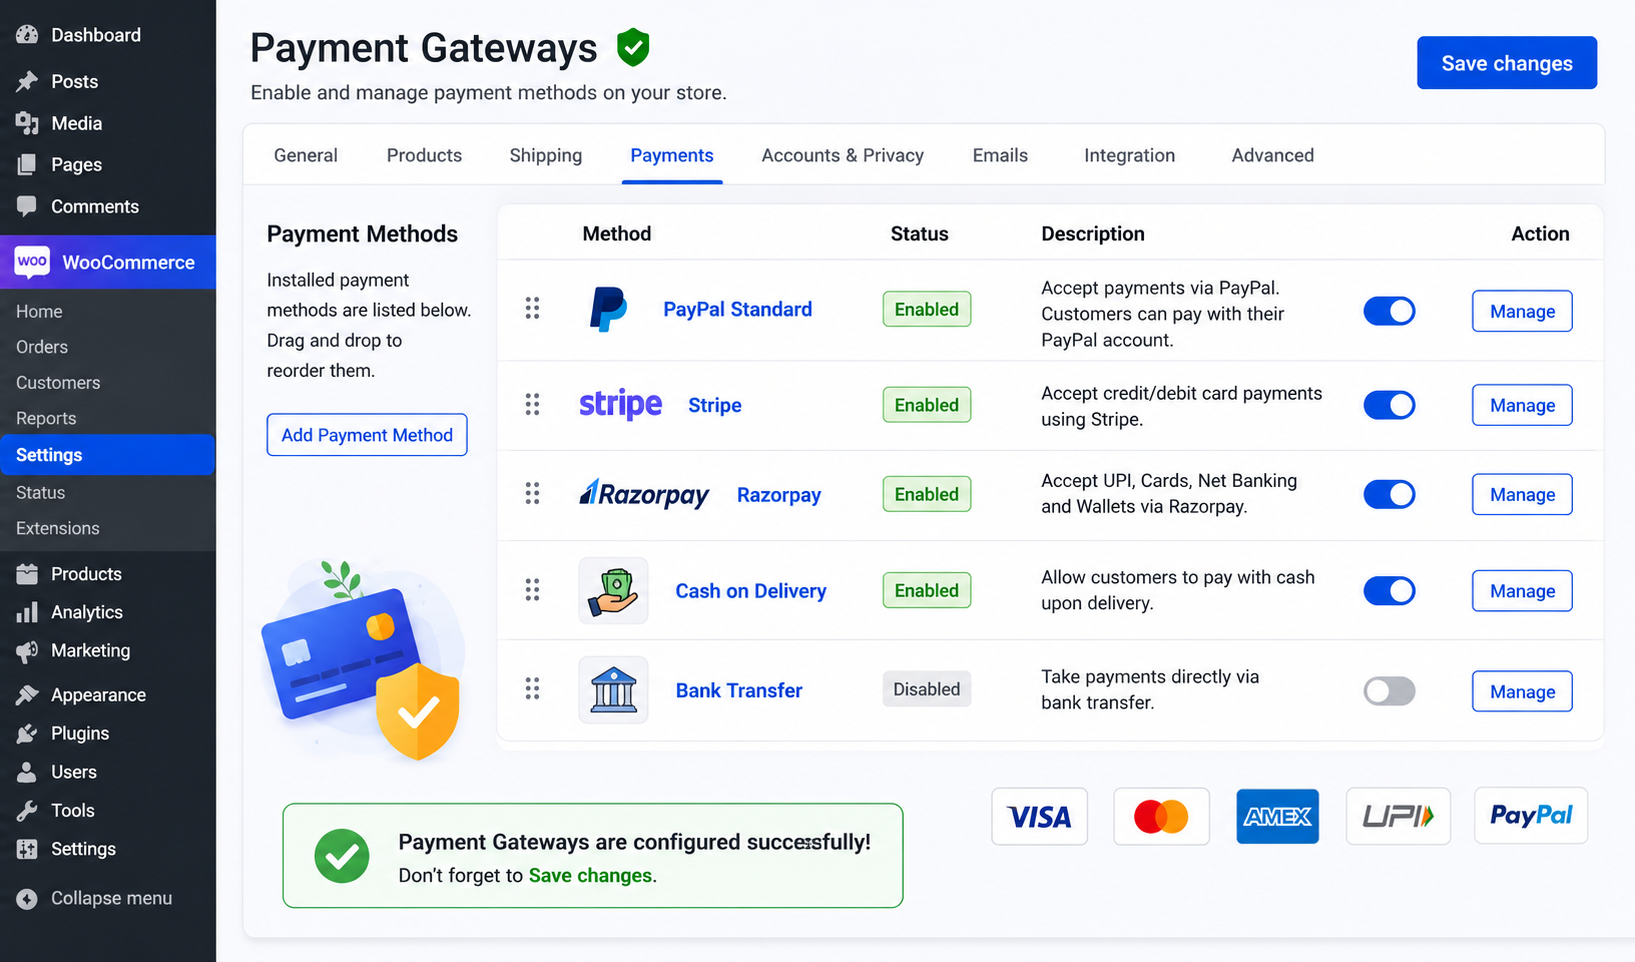
WooCommerce supports dozens of payment processors. For a pizza store, enable at minimum:
Stripe , The most reliable global card payment gateway. Free WooCommerce plugin, approximately 2.9% + 30¢ per transaction in the US. Customers pay without leaving your site. Setup takes about ten minutes with an API key.
PayPal , WooCommerce ships with PayPal integration built in. Enable it under WooCommerce → Settings → Payments. Still widely used and adds trust signals for first-time customers.
Razorpay / PayU , If you operate in India, these are the dominant payment gateways. Both offer free WooCommerce plugins and accept UPI, net banking, and all major wallets.
Cash on Delivery , Enable this for local pickup and delivery customers who prefer cash. Under WooCommerce → Settings → Payments → Cash on Delivery, you can restrict it to specific shipping methods (e.g., local delivery only) if you do not want it available for pickup orders where cash handling is different.
Run a test transaction for each gateway before going live. WooCommerce has a sandbox/test mode in most payment plugins , use it to confirm the full checkout flow works correctly.
Step 6 – Set Up Local Delivery
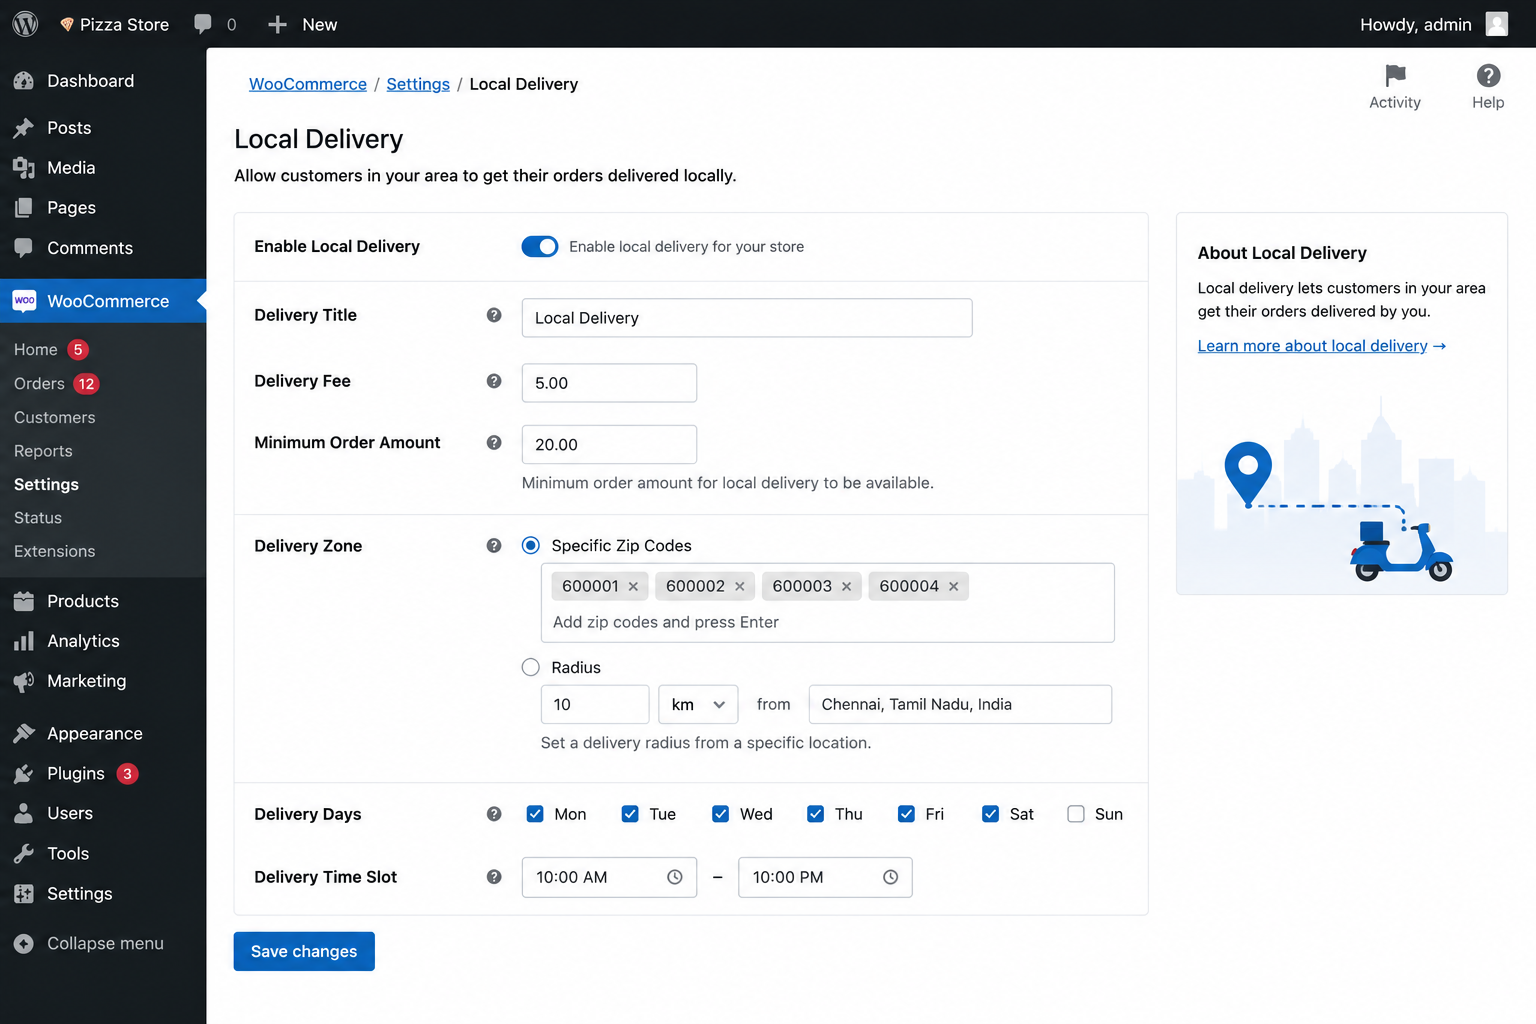
WooCommerce’s built-in shipping system handles local delivery with straightforward configuration.
Create Delivery Zones
- Go to WooCommerce → Settings → Shipping.
- Click Add Shipping Zone.
- Name it after your delivery area (e.g., “Downtown,” “North Side”).
- Under Zone Regions, enter your delivery postcodes/ZIP codes or draw a geographic region.
- Add a Flat Rate shipping method and set your delivery fee.
- Repeat for each zone if you have tiered pricing by distance (e.g., closer areas pay $2 delivery, farther areas pay $4).
Free Delivery Threshold
To encourage larger orders, offer free delivery above a minimum cart value. Under your Flat Rate method, use the Free Shipping coupon-based trigger or set a minimum order amount in the Free Shipping method settings directly.
Estimated Delivery Time
Customers want to know when their pizza will arrive. Display estimated delivery times using a plugin like WooCommerce Delivery Time or a simple notice in your checkout page message. Set realistic expectations , under-promising and over-delivering keeps customers happy.
Step 7 – Add Essential Pages
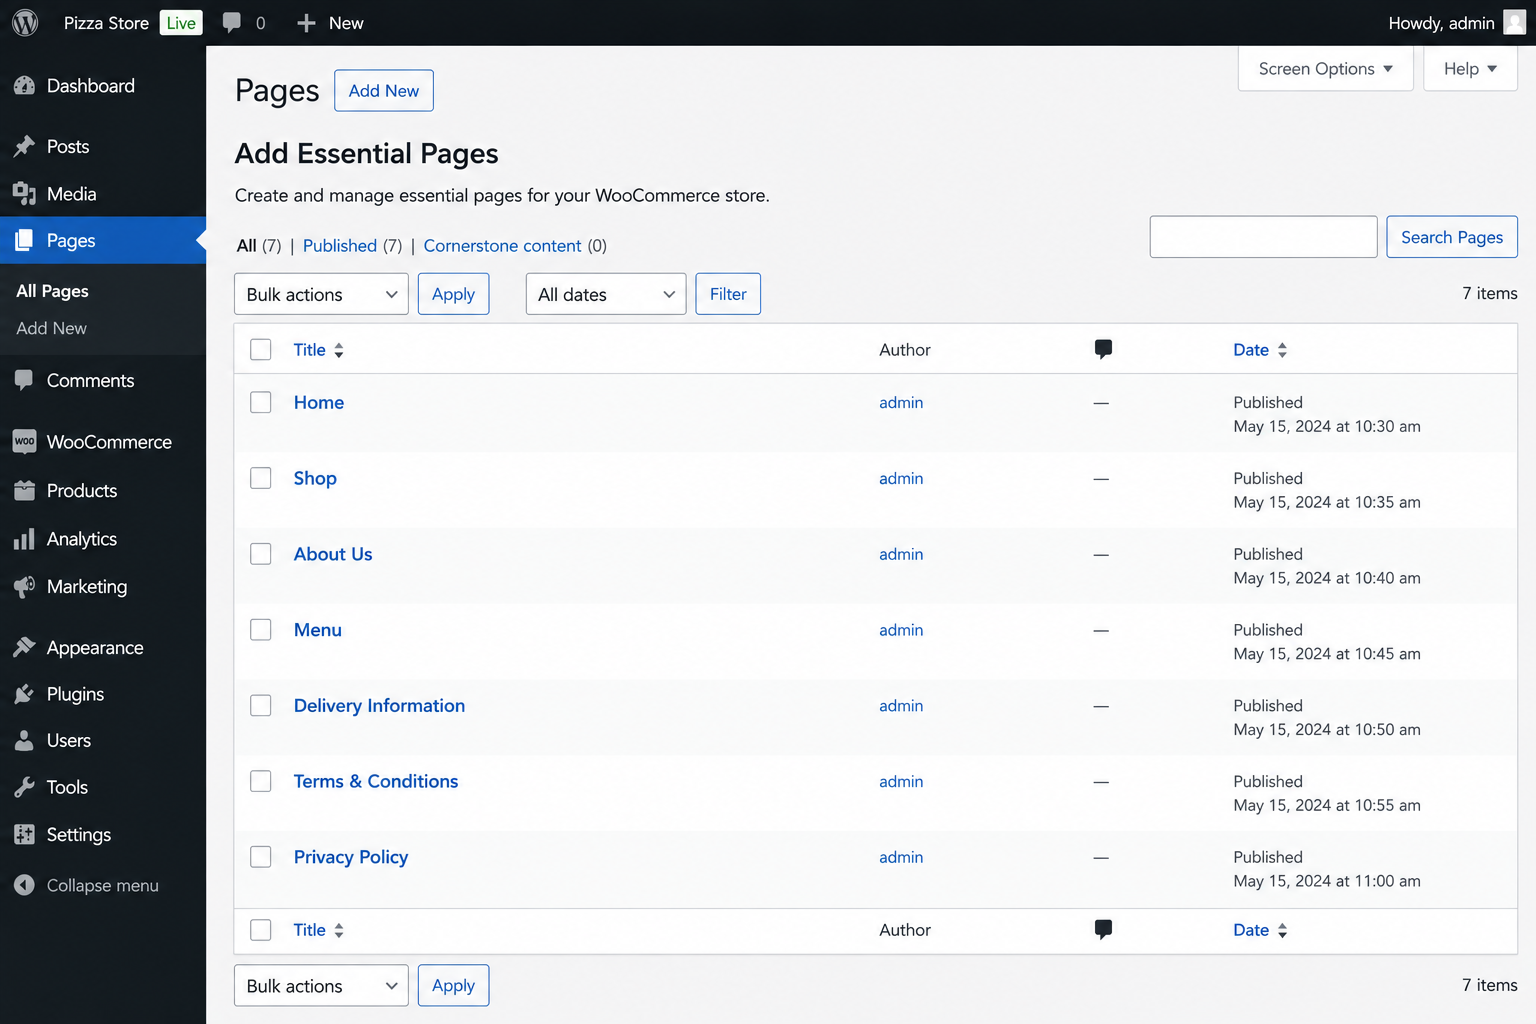
Your online pizza delivery website needs more than just a shop page. Build out these core pages:
Home – Communicate your brand immediately: what you make, where you deliver, and a prominent “Order Now” button. Link your CTA directly to your shop/menu page. Keep the homepage load time under 2 seconds , a slow homepage kills conversions.
Menu – This is your WooCommerce shop page. Display product category tabs or a sidebar filter so customers can quickly jump to Veg, Non-Veg, Specials, or Sides. Use the YITH WooCommerce Ajax Product Filter plugin to make category filtering work smoothly without page reloads.
About – Tell your restaurant’s story. Where did you start? What makes your dough different? Customers ordering food online cannot smell your kitchen , the about page builds the human connection that makes them choose you over the algorithm’s top result.
Contact – Include your restaurant address, phone number, delivery hours, and a contact form. Ensure your address matches your Google Business Profile exactly , discrepancies hurt local search rankings.
Order Tracking – WooCommerce provides basic order status emails and a “Track Order” page. For a better experience, use the Shipment Tracking plugin or configure custom statuses (“Preparing Your Order,” “Out for Delivery”) with the WooCommerce Order Status Manager plugin.
Tips to Get More Online Pizza Orders
A well-built site is step one. Getting consistent orders takes ongoing effort. These strategies work specifically well for local pizza delivery businesses:
Google Business Profile , Claim and fully optimize your listing. Add your online ordering link, full menu, opening hours, and photos. Respond to every review within 24 hours. “Pizza delivery near me” searches surface GBP listings above most organic results , this single asset can drive more orders than your website SEO for the first six months.
WhatsApp Order Button , Add a floating WhatsApp chat button using a plugin like Click to Chat. Many local customers prefer confirming large or custom orders via message. Use it alongside your WooCommerce checkout, not instead of it.
Instagram Food Feed on Your Homepage , Embed your latest Instagram posts using Smash Balloon Social Photo Feed. Fresh food photos reinforce quality, show menu variety, and give visitors a reason to follow you , building a retargeting audience at no cost.
WooCommerce Coupon Codes , Create first-order discounts (“FIRST15” for 15% off), weekday lunch deals, and loyalty offers. WooCommerce handles coupons natively under WooCommerce → Coupons. Promote active codes in your Google Business posts and Instagram bio link.
Email Marketing , Collect customer emails at checkout (opt-in checkbox at the bottom of the checkout page) and send weekly specials or new menu announcements. Use Mailchimp for WooCommerce to automate welcome sequences and win-back emails for customers who have not ordered in 30 days.
Conclusion
Building an online pizza store using WordPress is achievable in a weekend for someone who has never built a website before. WordPress is the platform, WooCommerce is the commerce engine, and a well-chosen restaurant theme handles the design. The piece that elevates a static product catalog into a genuine pizza ordering experience is WooCommerce Product Addons by Acowebs.
Without the right addon plugin, your customers face a frustrating experience , limited options, no real-time price updates, no way to add special instructions. With Acowebs, they build their perfect pizza in a single screen: size, crust, toppings, extra sauce, special notes , with the total updating in real time. That is the experience that converts a first-time visitor into a repeat customer.
The free version of woocommerce product options is available now on WordPress.org and covers all the basic field types you need to get started. For a pizza store serious about revenue, the Pro version ($49 one-time, no subscription) unlocks price formulas and conditional logic , the features that make your online ordering experience match the major chains, on your own domain, keeping 100% of your order revenue.
Customers are searching for “online pizza delivery” in your city right now. A fast, well-built pizza ordering website on WordPress makes sure they find you , and order from you.