404 Not Found Error is one of the worst things that can happen. One of the most harmless error numbers on the internet is 404. It means that the page you visited isn’t there.
A “404 Not Found Error” can be annoying for both people who use the internet and people who own websites. This error shows up when the service cannot be reached.
In this guide, we will look at why this common WordPress error happens and how to fix it step by step so that your website stays user-friendly and easy to explore.
Understanding WordPress 404 Not Found Error
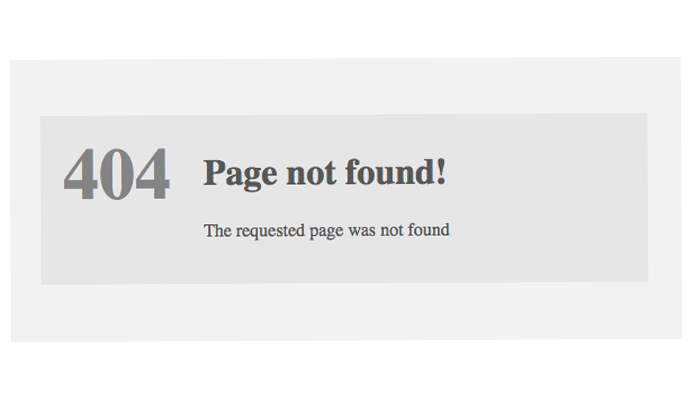
404 Not Found Error means that the server was able to be reached, but the page in question could not be found. This error not only makes things hard for users, but it can also hurt SEO results.
The HTTP response code 404 is displayed on the screen when the server cannot locate the web page requested by the client. There may be several underlying causes behind this technical mishap, including:
- A typo in the entered URL.
- Issues with file permission.
- Webpages moved without proper redirection.
- Broken internal and external links within the website.
- Migrating a site to a new host.
- Poorly coded plugins or themes.
- An issue with Domain Name System(DNS).
When any of these issues happen, instead of webpage contents, you will encounter a blank page with the 404 error code. It doesn’t necessarily have to be the same 404 error message, there could be variations in the displayed message such as:
- Error 404
- HTTP Error 404
- Page Not Found
- The page cannot be found
- 404 Page Not Found
- The requested URL was not found
- We can’t find the page you’re looking for
These error messages, regardless of their appearance, can be a frustrating experience for the audience. This can have a negative impact by causing a poor user experience and resulting in the loss of website visitors and if it frequently happens, your website might create a bad impression on the search engines as well. Sometimes all you have to do is try clearing the browser cache and cookies. This might help you with resolving the issue. But these errors can happen in WordPress because of issues like wrong permalink settings, deleted or broken .htaccess files, or problems with plugins and themes.
How Does a 404 Error Affect Your Website?
Why is the 404 error too frustrating for the users? How does it affect a website? There are certain reasons why it gets a hold on your website. If your website also gets stuck with this error, troubleshooting it can prevent the following effects:-
Poor User Experience
When people frequently visit a website, and due to any of the causes we’ve mentioned, it results in displaying a 404 error. Then, people could fall in frustration and wait at the time being to check whether the site has returned to its earlier state. But as the situation seems to be the same, people would find other site alternatively to check what they are looking for.
As a result, you could be losing a number of impressions, traffic, clicks, etc, ultimately resulting in a heavy loss on the sales you could build if the 404 error didn’t exist.
Waste of Resources
The pages that used to be available are currently unavailable. Other than users being frustrated over such pages, it should be followed that other websites have linked to your error page. The links shared with them won’t work, which idles efforts and time and reduces the chances of such pages in finding them out.
Blocks Page Indexing
Websites are created to get ranked by search engines like Google. To assign ranks, they crawl and index the websites, and then they become visible in the SERPs with higher rankings as expected. If the pages happen to get a 404 error, they are more likely to be excluded from getting indexed and collected in search engine databases.
Penalization of Websites
As websites are hit with lower metrics and KPI, Google will find out that websites are not properly optimized. The search engine crawlers cannot understand your site as they used to be earlier, and Google will penalize your site, aggravating its rankings, traffic, and other metrics.
How to fix WordPress 404 error?
Below are some common reasons and a detailed explanation on how to fix the 404 error.
1. Clear the browser cache and cookies
Clearing the browser cache and cookies is the first step to try out when facing an issue. If the error arose due to a problem with improper page loading or formatting, clearing cache or cookies might help with your problem. Browsers like Chrome store temporary files from the websites that you visit. Clearing this ensures that your browser is loading the recent version of the website. To clear cache or cookies on Chrome follow the given steps.
- Open Chrome and click on the three dots that appear on the top right corner of the page.
- Click on delete browsing data.
- On the box that appears, select a time range, then check the boxes near the information you want to remove (select cookies and other site data).
- Click on delete data.
- Reload the website and see if the issue is resolved.
If the issues continue to persist, check by accessing the same website from a different device or switch to incognito(private browsing window) to see whether a new session could resolve it. If not, try out the following solutions.
2. Checking for Incorrect Permalink Settings
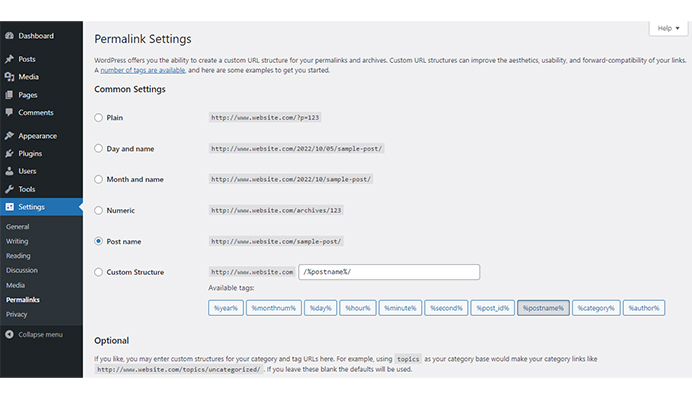
Permalinks are the permanent URLs to your individual posts, pages, and other content on your WordPress site. Incorrect permalink settings are a common culprit behind 404 errors. Navigate to “Settings” and then “Permalinks” in your WordPress dashboard to ensure the structure is correctly configured.
If you get a “404 Not Found” error on your WordPress site, it usually means that there is a problem with your permalink settings or the way your URLs are set up. Follow these steps to check and change your permalink settings and fix this error:
- First, you need to Log in to your WordPress dashboard.
- Edit the page or post that is giving the 404 error by hovering your mouse on it and clicking the ‘Edit’ button.
- Make sure the permalink is correct by clicking the ‘URL’ section and changing the slug. You can follow the same process for posts.
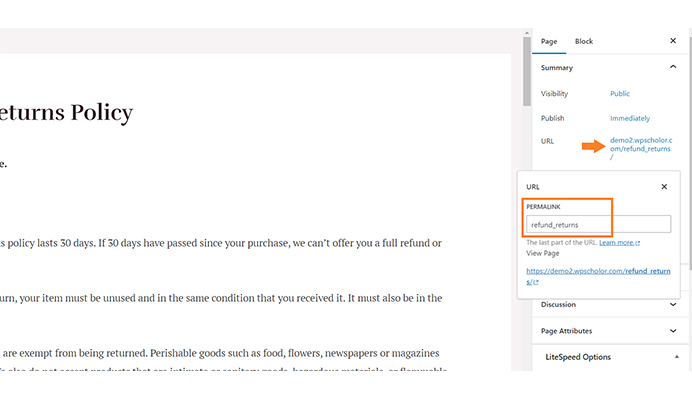
- Don’t forget to save the page or post by clicking the ‘Update’ button.
- After that, go to “Settings” and select “Permalinks.”
- You have to choose a new permalink structure, preferably “Post name.“
- Then save your changes.
- You have to test your website.
- Clear browser cache.
- Check for broken links.
- Check the .htaccess file (advanced).
- Contact hosting support if needed.
3. Updating WordPress Rewrite Rules
WordPress rewrite rules define how URLs are translated into query strings. These rules are written in the .htaccess file located in your website’s root directory. Updating your rewrite rules by simply resaving your permalink settings can often resolve 404 errors.
It’s crucial to ensure that the .htaccess file is correctly configured and writable.
If you’re encountering a “404 Not Found” error on your WordPress website, it may be due to an issue with the rewrite rules.
Rewrite rules are essential for WordPress to properly handle URLs and route requests to the correct content. Here are steps to update WordPress rewrite rules to fix the 404 error:
- Log in to your WordPress admin dashboard.
- Go to “Settings” > “Permalinks.”
- Without changing anything, click the “Save Changes” button. This action flushes and regenerates the rewrite rules.
- WordPress typically manages to rewrite rules by modifying the .htaccess file in your website’s root directory.
- Ensure that your .htaccess file exists and is writable. You can set its permissions to 666 temporarily to allow changes.
- To regenerate the .htaccess file, you can visit the Permalinks settings page again and click “Save Changes.”
- If your .htaccess file is not being automatically generated or you want to try custom rewrite rules, you can manually edit it.
- Open the .htaccess file in a text editor or via an FTP client.
- Ensure it contains the default WordPress rewrite rules. Here’s an example:
# BEGIN WordPress
<IfModu1e mod_rewrite.c>
RewriteEngine On
RewriteBase /
RewriteRule ^index\.php$ - [L]
RewriteCond %{REQUEST_FILENAME} !-f
RewriteCond %{REQUEST_FILENAME} !-d
RewriteRuIe . /index.php [L]
</IfModule>
# END WordPress
These rules should handle basic URL rewriting for WordPress.
- Sometimes, plugins can interfere with rewrite rules. Deactivate all your plugins and see if the 404 error persists. If it disappears, reactivate your plugins one by one to identify the problematic one.
- Switch to a default WordPress theme (e.g., Twenty Twenty-One) temporarily to see if your theme is causing the issue. If the error goes away, you may need to investigate your theme’s code.
- In rare cases, server misconfigurations can lead to rewrite rule issues. Consult your hosting provider or server administrator if all else fails.
- If you’re using any caching plugins or server-side caching mechanisms, clear the caches after making changes to rewrite rules.
- After making changes, test various URLs on your site to ensure they load correctly without 404 errors.
4. Restoring .htaccess File
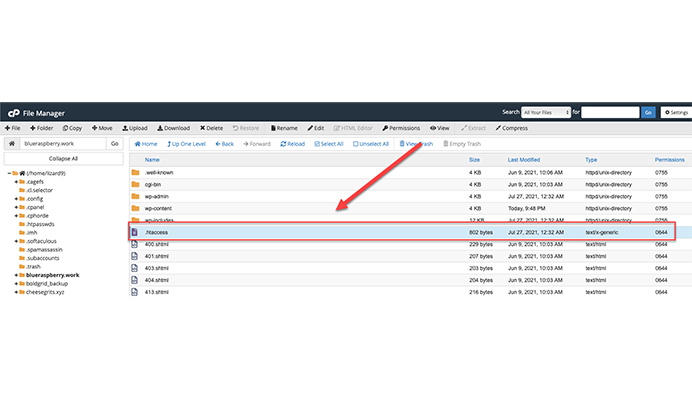
The .htaccess file is a vital configuration file used by Apache-based web servers and is crucial in generating permalinks to your page. If this file is missing or corrupted, it may result in a 404 error. Access your website’s root directory using an FTP client and check for the .htaccess file. If it’s missing or corrupted, restore it from a backup or create a new one and set the correct file permissions.
- Use an FTP client (e.g., FileZilla) or your hosting provider’s file manager to access your website’s root directory.
- Look for the .htaccess file in the root directory of your WordPress installation. If you don’t see it, it may be hidden. Be sure your FTP client is configured to display hidden files.
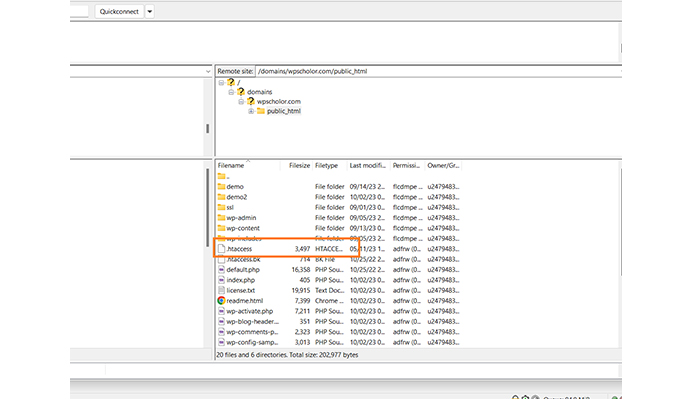
- If you have a backup of your .htaccess file (perhaps from a recent site backup), download it to your local computer.
- If you don’t have a backup, you can generate a new .htaccess file by going to your WordPress admin dashboard.
- Log in to your WordPress admin. Go to “Settings” > “Permalinks.” Without making any changes, simply click the “Save Changes” button. This will regenerate the .htaccess file with the default WordPress rewrite rules.
- If you downloaded a backup in step 3, upload that backup to the root directory, replacing the existing .htaccess file.
- If you generated a new .htaccess file in step 4, it should already be in place.
- Visit your website and check if the 404 error is resolved. Try accessing various pages and posts to ensure that everything is working correctly.
- To confirm your custom permalinks (if you had any) are applied correctly, go to “Settings” > “Permalinks” in your WordPress admin dashboard and click “Save Changes” again.
5. Deactivating Plugins and Themes
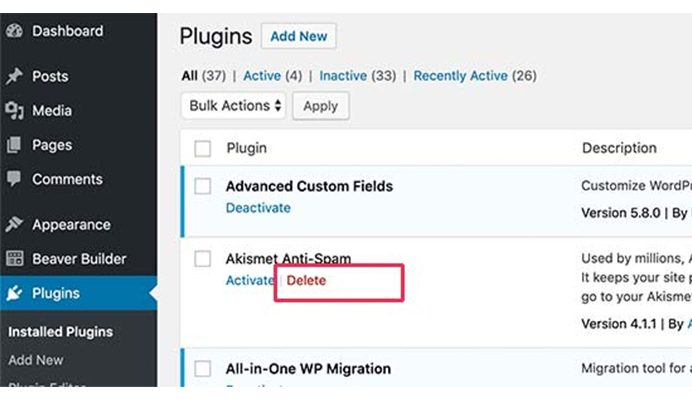
Plugins and themes enhance the functionality and appearance of your WordPress site. However, they can sometimes conflict with each other or with WordPress itself, leading to 404 errors. Deactivate all plugins and switch to a default theme to identify the problematic element. Once identified, you can either replace it or seek a resolution from the developer.
- Log in to your WordPress dashboard.
- Deactivate plugins one by one from the “Plugins” section.
- Check your website for the error after each deactivation.
- If a plugin causes the error, consider keeping it deactivated or finding a solution.
- Reactivate the remaining plugins one by one and test after each activation.
- If the error persists, switch to a default WordPress theme temporarily from the “Themes” section.
- Check your website for the error with the default theme.
- If the error is resolved, switch back to your original theme.
- Clear your browser cache and any caching plugins.
- Refresh your permalink structure in “Settings” > “Permalinks.”
- If the error remains, contact your hosting provider for server-related issues.
If you get to know about that issue in plugin flocking over the website, either update or delete it immediately. If that doesn’t resolve the error, switch to an alternative plugin. Remember that when your theme also is on a reset, create a backup of your site to avoid any loss of edits to the theme you have done till now. Furthermore, if the issue exists even now, switch to a theme that is similar and suits your website.
6. Set Up 301 Redirect Link
You can set up a 301 redirect link to resolve the 404 error by redirecting the users from old URL to the new URL. This can be easily done using the Redirection Plugin.
- Install and activate the Redirection Plugin.
- Go to the WordPress Dashboard, where you will find the Redirection Option.
- Add the source URL (old) and target URL (new).
- Save the changes and test the redirect to confirm that it is working properly.
After setting the 301 Redirect, search engines can get a signal that you have shifted to a new location like a new page, folder, domain or website. When plugins don’t work, then redirect the old URL to a new one by editing the htaccess.file.
7. Change the URL
If you encounter the message ‘The requested URL was not found on this server. If you entered the URL manually, please check your spelling and try again’, change the URL by following the below steps;
- Go to PHPMyAdmin
- Select database for the website
- Go to wp-options
- Change the URL in ‘option_name’ siteurl and home. For example, change the URL from “http://www.example.com/example” to “http://www.example.com/example1“
- Create a new .htaccess file and rename the old file to .htaccess_old.
- Visit the URL and complete the database update as directed by the system.
8. Check the Domain DNS Settings
When all these methods are already implemented and are not working, it’s time to check the DNS Settings to see if the domain is correctly connected with the server. A configuration issue in the DNS can direct to a 404 error; verifying them is vital to set it right on your part.
- Login to hpanel.
- Navigate to “Domains” at the top of the menu and check out the domains you’re most likely to have issues with.
- Click on DNS Zone Editor to see the DNS records(CNAME, MX, TXT, NS) pointing to your server’s IP.
- Confirm the server IP by checking:
hPanel → Hosting → Manage → Plan Details → Server IP
- Also, check the Nameservers under the Domain and write it correctly.
- After 24 hours, check if it’s resolved and use tools like DNS Checker, DNSMap, or whatsmydns.net to monitor the status.
9. Contact Your Hosting Provider
There is only one solution if the 404 error doesn’t seem to vanish from every possible changes in your website setting. It’s better to seek assistance from your WordPress hosting provider so that they can also try and understand the cause of a 404 error on your website.
How to Fix 404 Errors on Local Servers?
Local Servers are another implication in the topic of 404 errors. While the developers and designers install WordPress local servers, rewriting the rules could become a task and unable to work on. These servers are mostly used for needs while staging a WordPress website, and how many times permalinks are changed, site could land up showing a “404 Not Found Error”.
The only way to fix it is by rewriting the module in Apache configuration of your WAMP, XAMP or MAMP site. After the activities in them, you may click on “Stop” and restart with “Start”. Now, take a look on your admin dashboard to check if they are working as expected.
Conclusion
WordPress 404 Not Found Error can be a frustrating and disruptive issue for both website owners and visitors. However, armed with the knowledge and strategies outlined in this blog, you can effectively diagnose, troubleshoot, and often resolve this problem.
Remember that a 404 error is not always the result of a single underlying cause. It can stem from broken links, misconfigured settings, plugin or theme conflicts, or even server issues. Therefore, a systematic approach to problem-solving is key.
Start by clearing the browsing cache and cookies, if that does not work try checking your links and permalinks, ensuring they are accurate and up-to-date. Next, examine your plugins and themes, deactivating them one by one to identify any conflicts. Don’t forget to clear your cache and refresh your permalink structure or try setting up the 301 Redirect link. Finally, we have also mentioned some of the other ways through which you can troubleshoot the 404 error.
Should these steps fail to resolve the issue, it’s essential to seek assistance from your hosting provider or a wordpress support services team who can delve deeper into server-related problems.
Acowebs are the developers of woocommerce product options which is a optimized, lightweight, and fruitful plugin that is simply the best to add extra product options using its custom form builder easily. woocommerce product options also comes with drag and drop form builder, 22+ field types and custom price formula.


 Login
Login
 Cart
Cart


