Login
Login
 Cart
Cart
A wishlist is one of the most vital features for an eCommerce site, but it is also underestimated in most cases. Your users can add items to their wishlist whenever they find something interesting, and come back later to buy them.
It means that they are not leaving your site completely when they leave. Instead, they are adding interest in a product, and have the urge to come back again to purchase it after making the purchase decision.
With this feature, you can increase the chances of upselling premium products which will also boost your revenue.
Today we will show you how to add the wishlist products anywhere on your WordPress site using the shortcode feature.
For that, we will use one of the newest but effective plugins from Acowebs, which is called Aco WooCommerce Wishlist.
This plugin helps you to enable the wishlist feature on WooCommerce-powered WordPress sites.
And we can also use the plugin to generate and add WooCommerce wishlist shortcodes on your WooCommerce site for easy wishlist implementation.
Let’s get on with the guide straight away!
Adding Wishlist Feature on Your WooCommerce Site
With the perfect plugin, adding the wishlist feature on a WooCommerce website is not a big hassle. For our tutorial, we will be adding the wishlist feature using one of our plugins, the WooCommerce Wishlist plugin.
Also Read: A Review of the Acowebs Wishlist Plugin
We’ll show you everything from installation to configuration, generate shortcodes, and add them to different parts of our website. But first, let’s take a look at the basic prerequisites for the plugin to work.
The Prerequisites:
- A ready WordPress site.
- WooCommerce Plugin installed on your website (Free).
Now, if your WordPress site is ready to go with WooCommerce installed, then you already have the proper environment set up.
In that case, let’s go through to the next part of our article, which is installing the Aco Wishlist Plugin.
ALSO READ: WooCommerce Setup Tutorial on Your WordPress Website
Step 1: Installing the Plugin
The install process of the plugin is very easy. The plugin is available on the WordPress repository. So you install it like any other plugins on the WordPress repository.
If you need the advanced features that are available on the paid version, you should opt for that.
Here are some of the key features of the premium version.
- Multi wishlist option
- Privacy settings for wishlists
- Wishlist widgets
- Popular products
- Wishlist search
- Wishlist page layout option
- Move products between wishlists
- Ask for an estimate from the wishlist
As installing the free version is typical, we will show you how to install the premium versions of the Aco WooCommerce Wishlist plugin.
- Visit the Wishlist WooCommerce page on the Acowebs website.
- Choose a pricing plan from three different options, and click on Add to Cart. (Up to 5 sites with lifetime updates provides the best value for money)
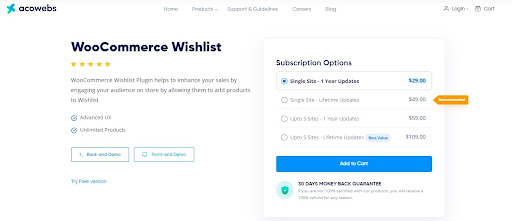
- Now you can go ahead and place your order with the payment method that you prefer.
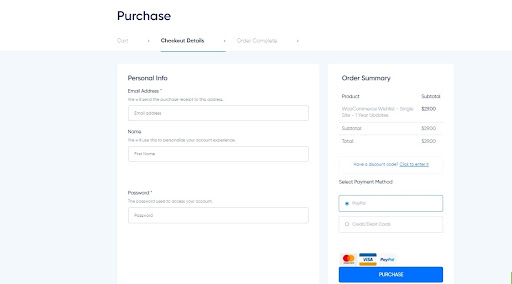
- Once you complete purchasing the plugin, you will get the downloadable zip file of the plugin. Download the plugin file.
- Now login to your WordPress admin dashboard.
- Go to Plugins > Add New.

- Click on Upload Plugin.
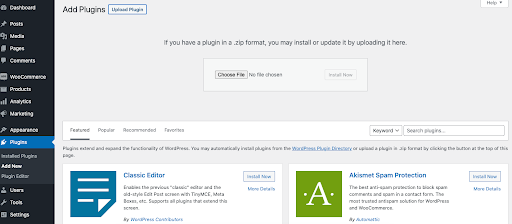
- Find & select the plugin file from your computer/device and click on Install Now.
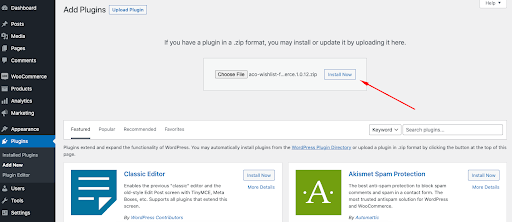
- Now activate the plugin from Plugins > Installed Plugins. And you are ready to use the premium version of the plugin on your website.
If the installation is completed, you should see the Wishlist option on your WordPress Admin Dashboard Sidebar. In order to access the wishlist option click on WordPress Admin Dashboard > Wishlist
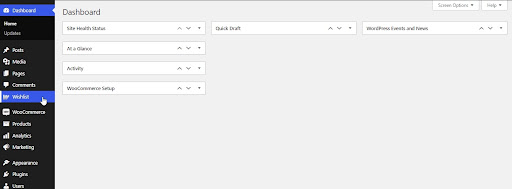
You will notice that there are 3 different settings tabs on the wishlist option. With the settings on offer, we will be able to configure our wishlist and generate the shortcode with ease. Let’s start by configuring the general settings.
ALSO READ: WooCommerce SEO Tips and Tricks to Boost Traffic and Sales
Step 2: Configuring the General Settings
To add the wishlist feature on your website, first, you need to configure the general settings.
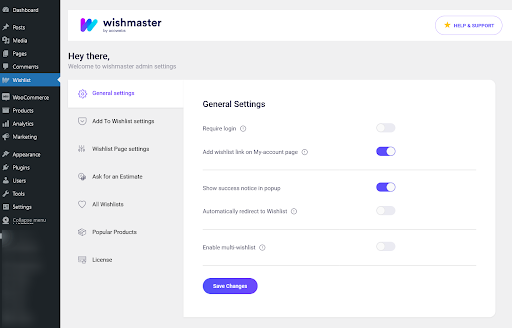
- The first option on the general settings is the Required Login. If you want to restrict the wishlist feature to only the logged in users, you can opt for it. Otherwise, keep it unchecked. If you decide to check the option, another option called Redirect to Login Page will appear, which basically lets you redirect any logged out visitors to the login page if they click on Add to Wishlist button.
- Where can the customer find the products they added to the wishlist? Well, you can enable adding a link to the wishlist page, which will make the navigation much faster for the customer. For this, you need to check the Add wishlist link on my account page option.
- Want to show a notice of successful wishlist addition, you can also do that with the function provided.
- You can also redirect the customer to the wishlist collection page once they add a product to their wishlist.
Once you’re done with the general wishlist settings, do make sure to click on Save Changes before you move on to the next settings tab, which is the Add to Wishlist Options.
Step 3: Customizing the Add to Wishlist Options
Add to Wishlist Options mainly deals with the add wishlist button style, position, texts, and other customizations.
Now you will have to configure these options before we move on to the last settings tab.

- The first Product Listing Button Settings allows you to display the Add to Wishlist button on the Product Listing page. You can also determine the position of the button.
- The button can also be added to the single product pages. You can do that by enabling Product Page Settings. The Add to Wishlist button is automatically added to all product pages, you can opt for disabling it if you want. Like the settings above, you can also set the button’s position and what the button will show once you once the product is added to the wishlist for the add to wishlist button on the product page.
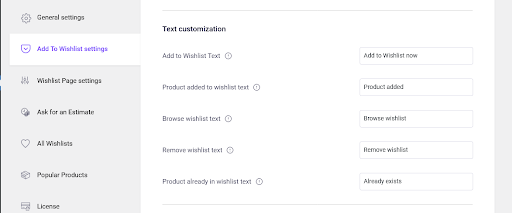
- The next option is Text Customization, which will help you customize the texts of the add to wishlist button and the notice prior to adding the product to the wishlist. You can customize these texts – “Add to Wishlist Text”, “Product added to wishlist text”, “Browse wishlist text”, “Remove wishlist text”, “Product already in wishlist text”.
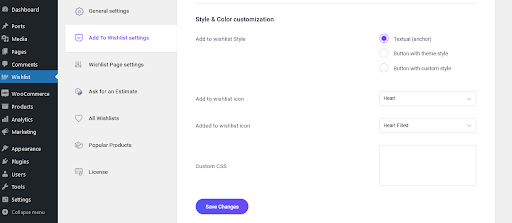
- After that, you will be able to customize the button style from the Style & Color customization option. The button can be either text-based (anchor), a button with your theme style, or a button with custom CSS.
You can also customize the icon for the “add to wishlist” button from two different options or upload an icon of your own if you want.
After making all the changes, don’t forget to click on Save Changes, before you hop on to the next.
ALSO READ: Ultimate Guide to Advanced Table Rate Shipping for WooCommerce
Step 4: Customizing the Wishlist Page Option
The product that customers add to the wishlist will be stored on a dedicated page. You can also customize that page.
The Wishlist page settings tab is dedicated to the options to customize the page. Below are the options that you can customize from this page.
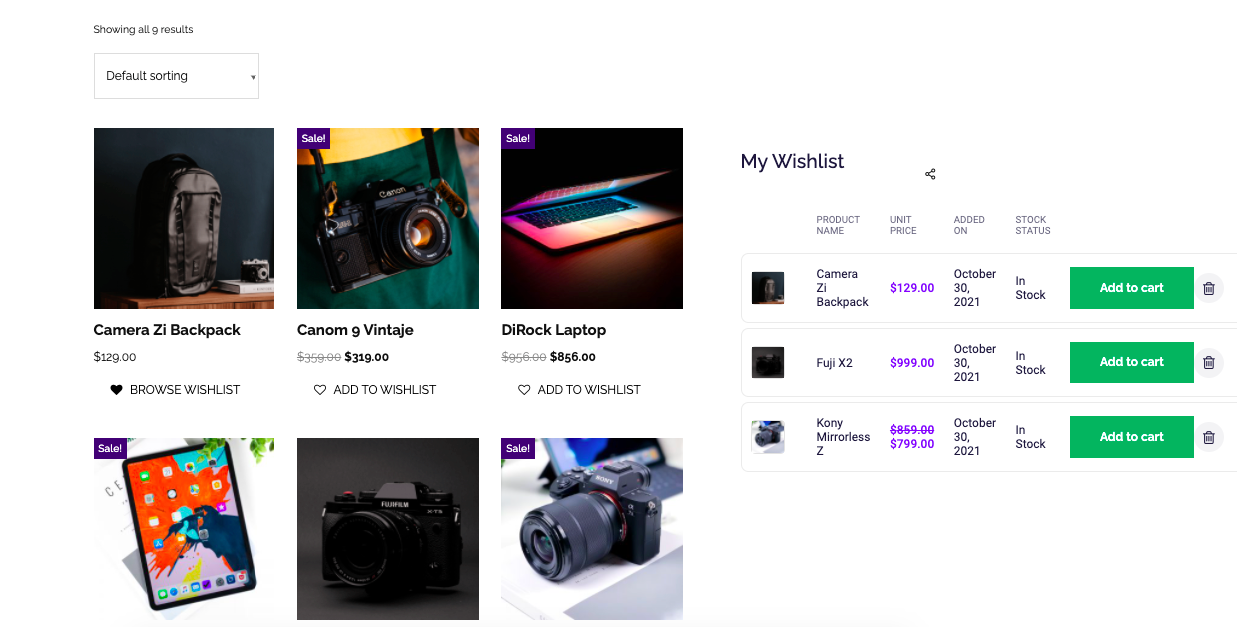
- Now comes the most important settings that we will need for this tutorial. You will find an option called the wishlist page on this page. When the Aco Wishlist plugin is installed, a wishlist page is usually automatically generated by default, you can change that from here. But we will rather use the WooCommerce wishlist shortcode [awwlm_wishlist] that we will find on the same page. Using this shortcode, you can display customers’ wishlist products literally anywhere you want. Copy the code for further use.
You will also be able to set the name for the wishlist. The add-to-cart text on the wishlist page is also customizable.
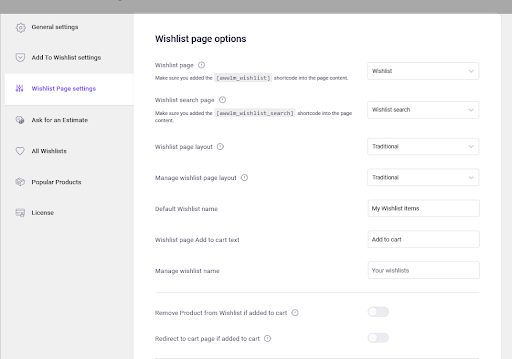
- Apart from that, you can also decide if the product should be deleted from the wishlist page if it is added to the cart by the customer. You can also set to redirect the customers to the cart page whenever they add a product to the cart from the wishlist page.
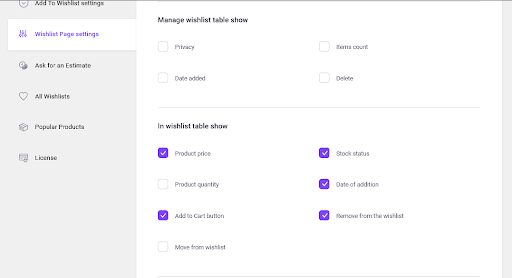
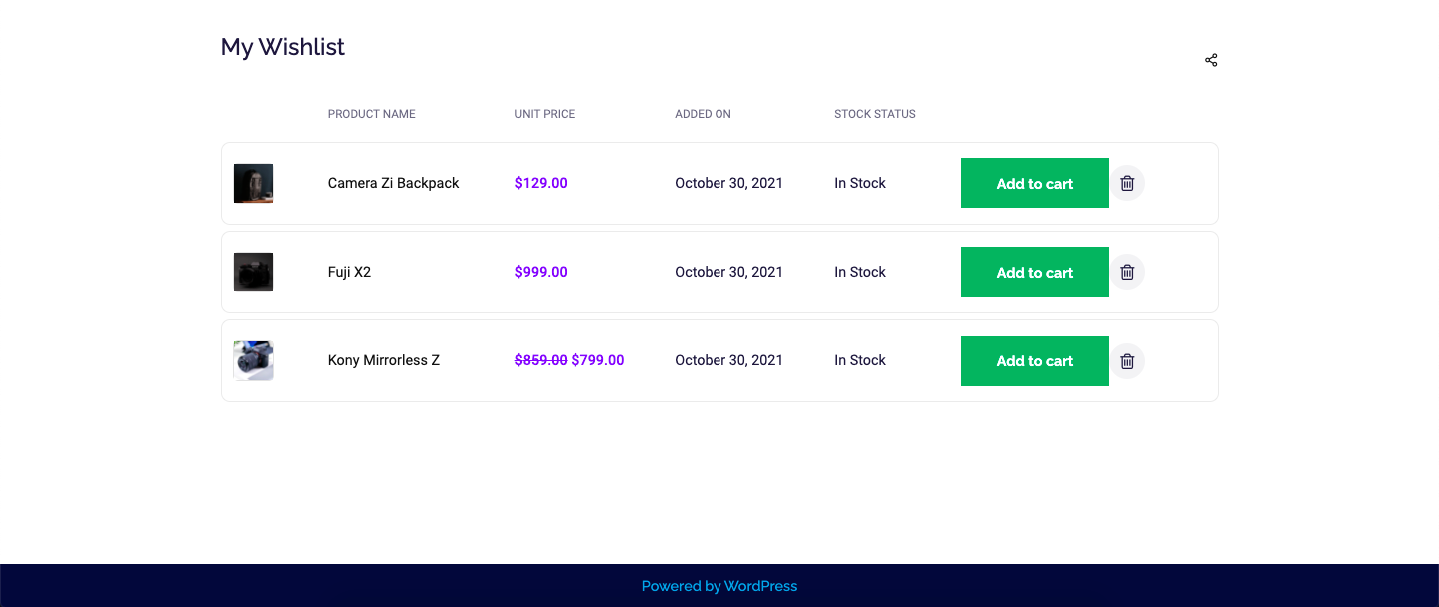
- The wishlist can also be equipped with the following information, if you want – Product price, Stock status, Date of addition, Add to Cart button and Remove from the wishlist.
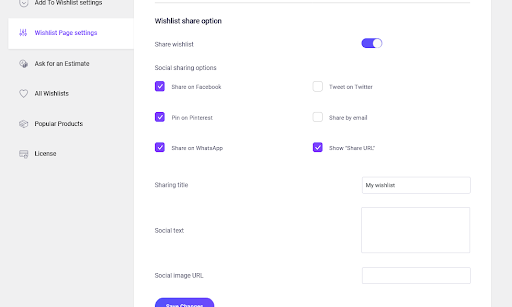
- You can also enable the option to let the user share their wishlist. You can determine the Social Sharing Options, Sharing titles, Social Text and Social Image URL as well, if you choose to enable the feature.
Now save the changes that you made. You have successfully enabled the wishlist feature on your blog.
Step 5: Displaying the Wishlist Products on Different Parts of Our Website
Now we will use the shortcode that we copied earlier to display the wishlist products on different parts of our website. Let’s start by placing it on a page.
Displaying the Wishlist Products on a Page
You can display the wishlist products on any pages that you like, whether it’s a page that already exists, or by creating a new page. To do that, follow the below procedures.
- First access the page where you want to add the wishlist into. To do that, navigate to WP Admin Dashboard > Pages > Click on Edit Page
- Now click on the plus (+) button and search for the block Shortcode.
- Add the shortcode block into the page by clicking on it.
- Paste the WooCommerce wishlist shortcode that we copied.
- Publish the page.
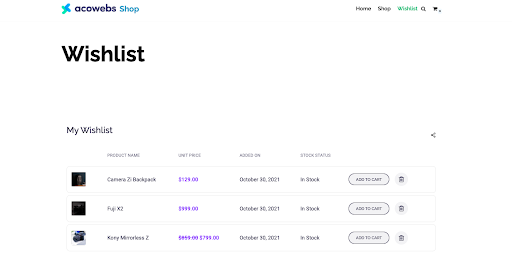
Now the wishlist products of the customer will appear on that page. Here’s how it looks like from the front end.
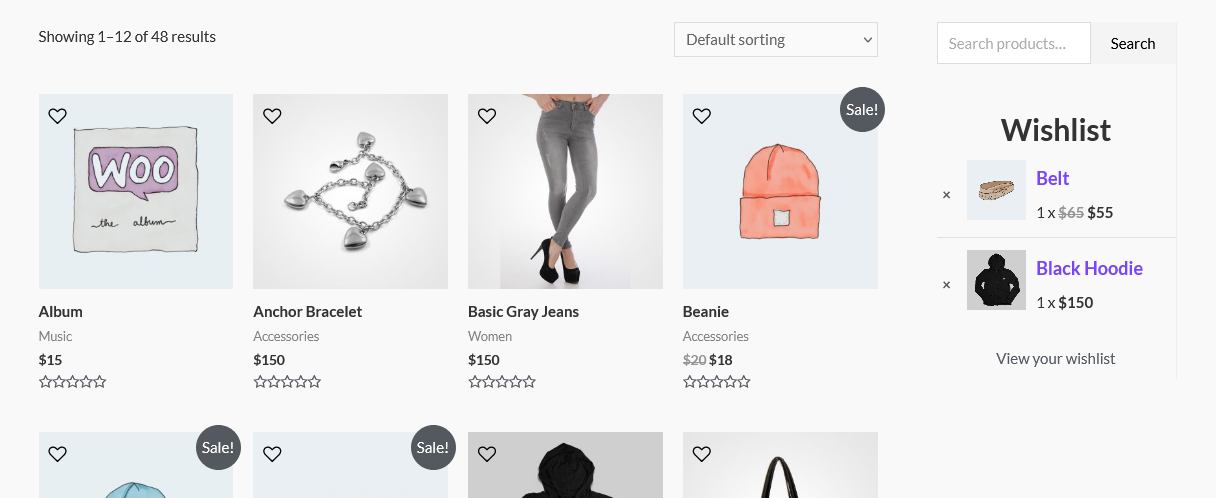
Displaying the Wishlist Products on Sidebar
You can also display the wishlist products on the sidebar (if your theme supports the sidebar). To do that, follow the below procedures.
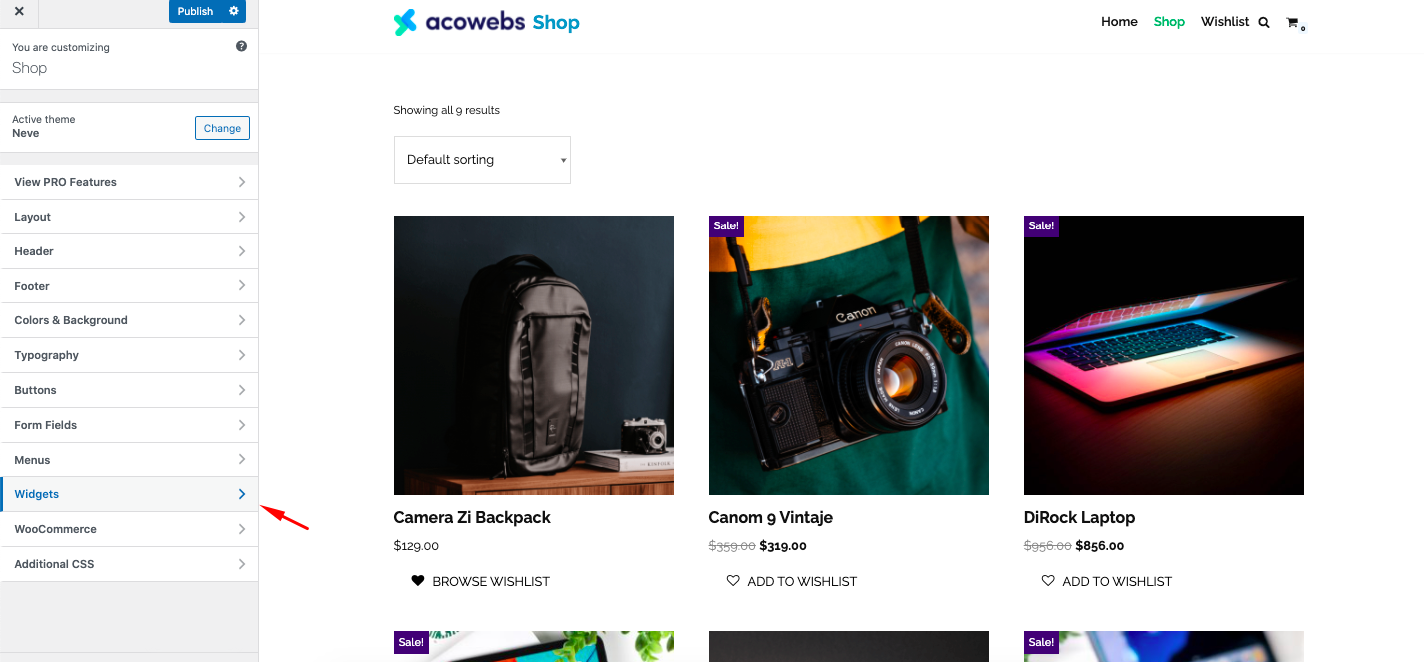
- First, navigate to WP Admin Dashboard > Appearance > Customize
- Now click on Widgets.
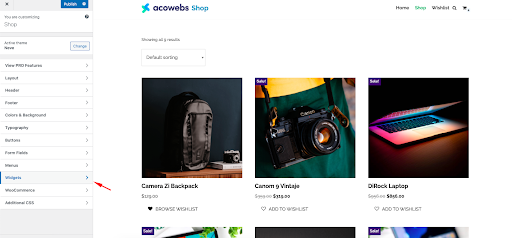
- Now click on the Sidebar where you want to add the wishlist. We want to show ours on the shop page. So we will click on the Shop Sidebar.
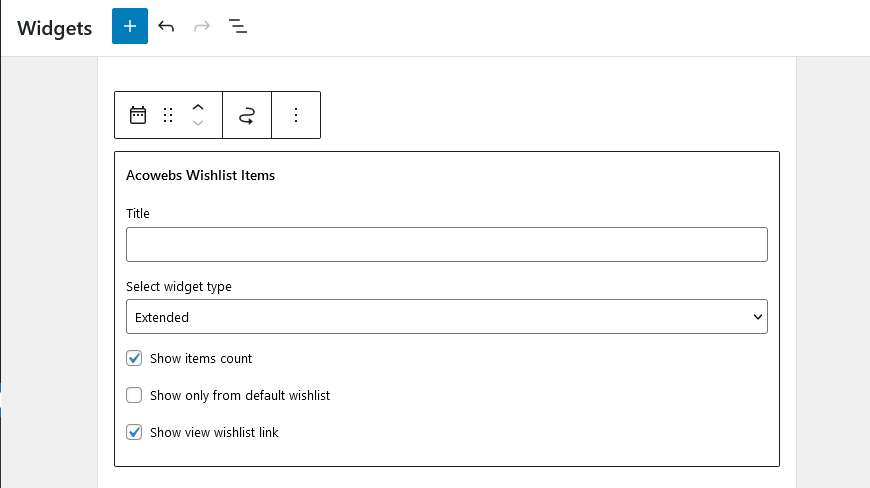
(Note: You can add sidebars from WP Admin Dashboard > Appearance > Widgets too if it doesn’t show up here.) - Search for “Acowebs wishlist items” widget. Add it. Select the display type and other settings.

- Click on Publish.
Now, look at how the wishlist looks like in our shop page sidebar. Cool, isn’t it? And what’s more, it will influence the customers to a product to the cart more often.
Also, you can add a sidebar wishlist using shortcode, Follow the below steps
- Add a shortcode block.
- Paste the WooCommerce Wishlist shortcode that we copied.
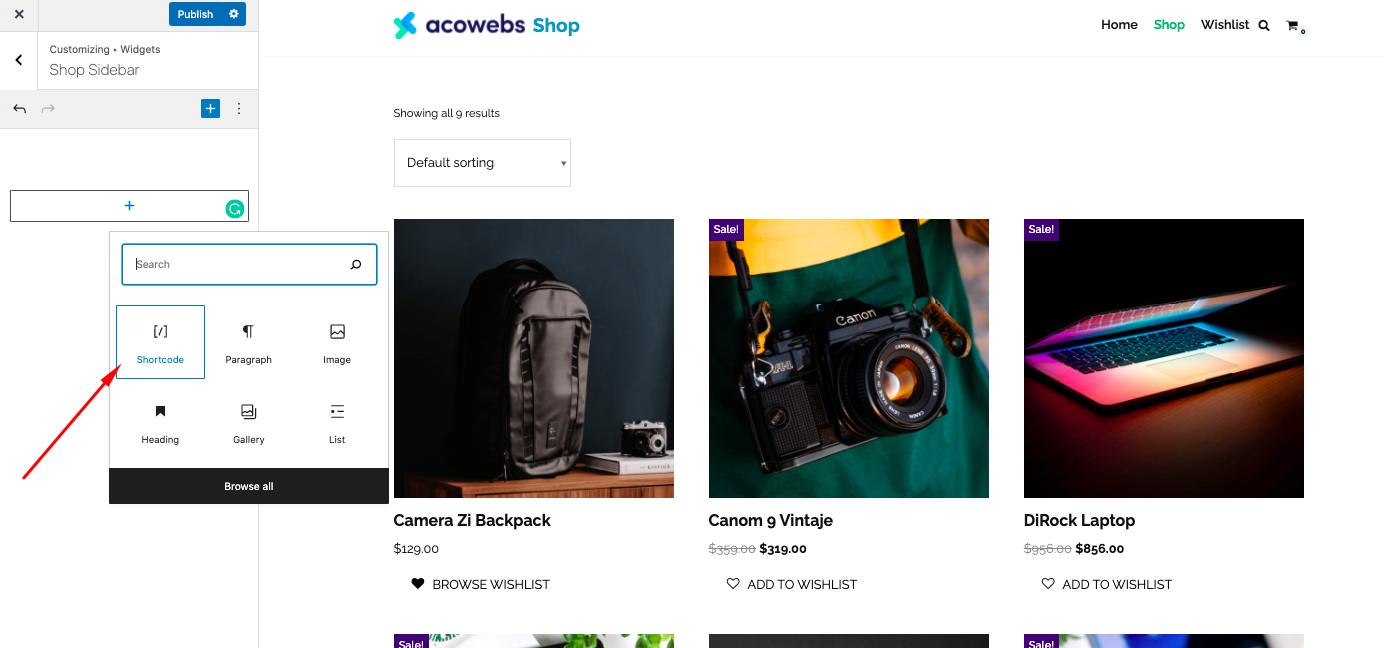
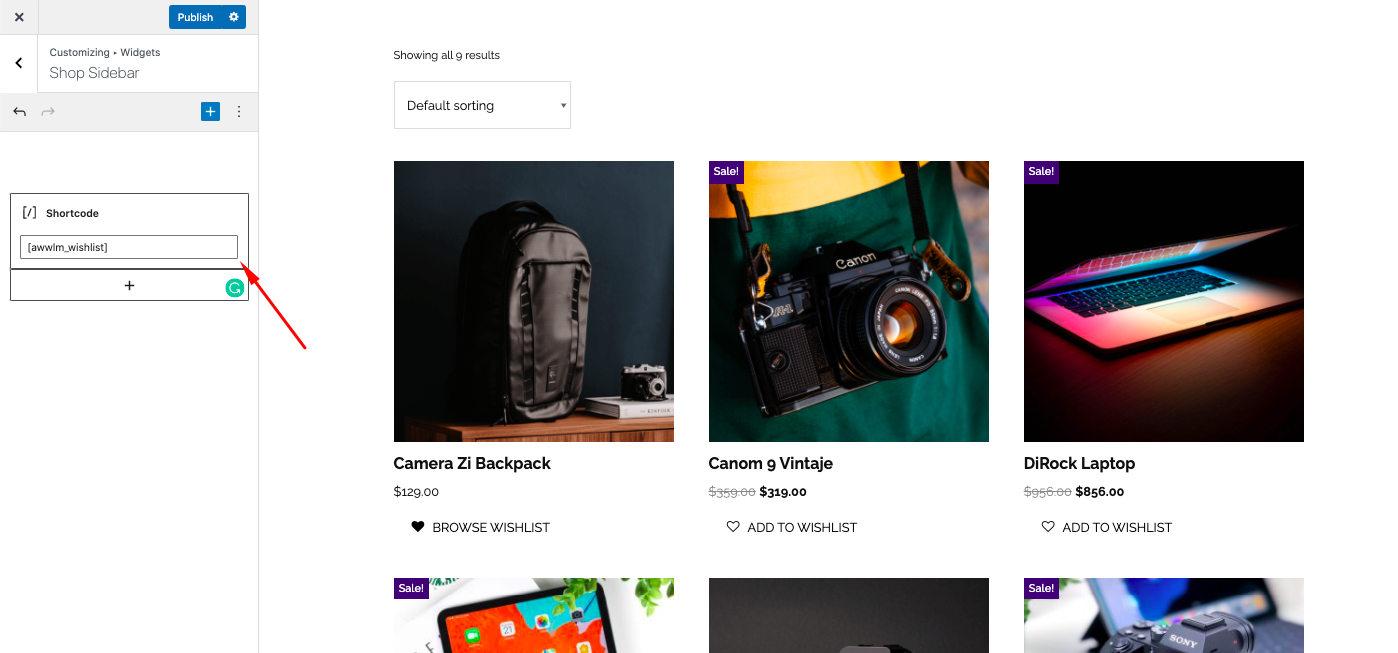
- Click on Publish.
Now, look at how the wishlist looks like in our shop page sidebar. Cool, isn’t it? And what’s more, it will influence the customers to add a product to the cart more often.
ALSO READ: A Comprehensive Guide on Adding Discounts in WooCommerce
Displaying the Wishlist Products on Footer
Likewise, we can also display the products on the footer section of the website. In order to do that, we will have to customize the footer from the widget section.
- First navigate to WP Admin Dashboard > Appearance > Widget
- Now click on the plus (+) button on the footer section of your desired footer.
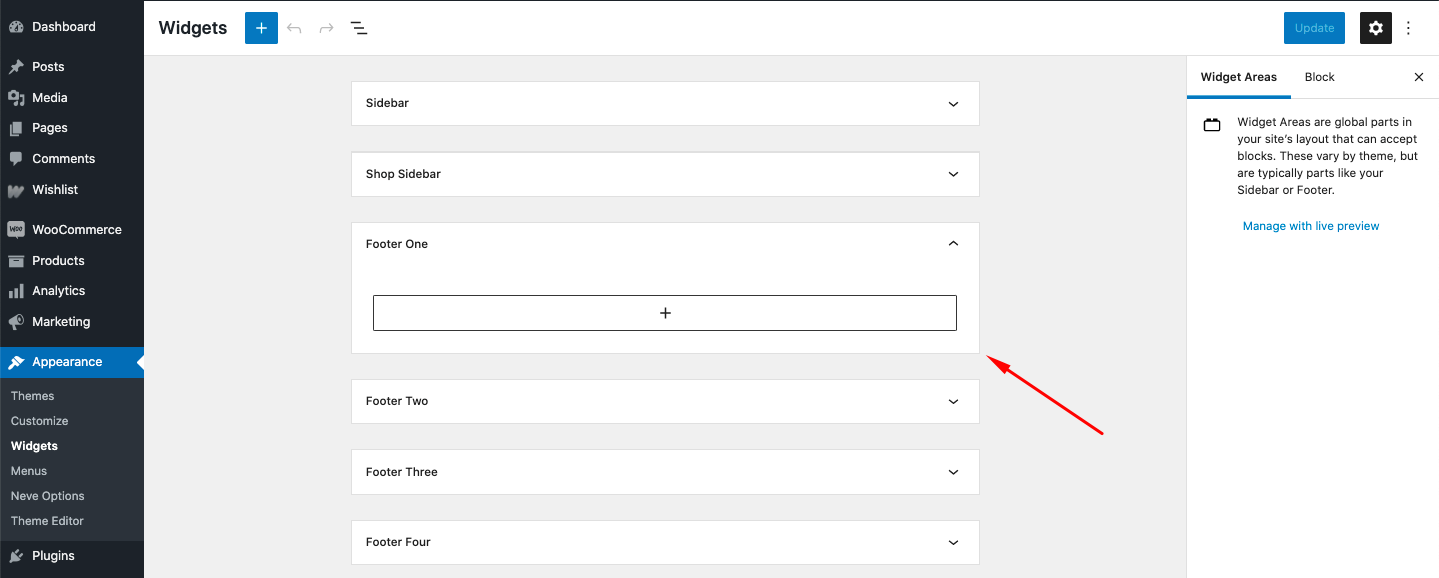
(For something, depending on the theme you might have to enable this footer, after customizing. You can do that by navigating to WP Admin Dashboard > Appearance > Customize > Footer)
- Now search and click on the Shortcode.
- Paste the WooCommerce Wishlist shortcode that we copied.
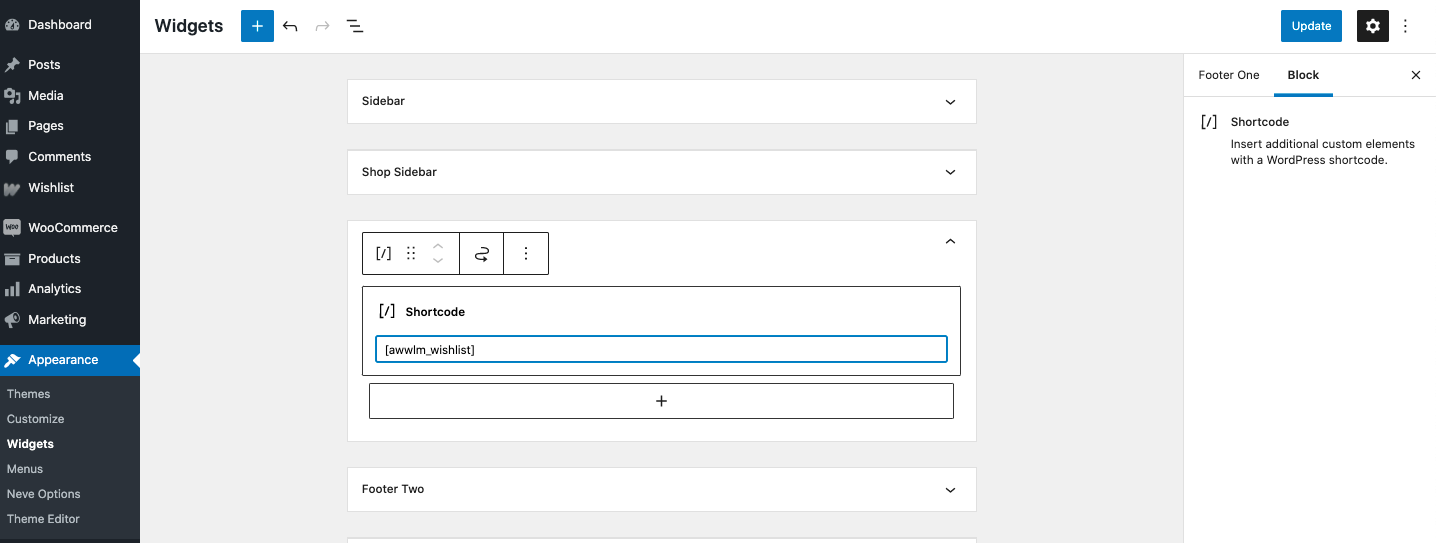
- Click on update and we are done.
Here’s how our wishlist turned out on the footer.
So there you have it. We showed you the way to display the wishlist products on several parts of a website.
You can A/B test and decide on displaying it anywhere you want based on the result. And Aco Wishlist will power you to do that. Let us know in the comment, which one you decide.
Conclusion
In a world where 55% of visitors spend fewer than 15 seconds on a site, getting the most out of those that stay, is crucial.
A wishlist can do exactly that. With Aco Wishlist, you can add an effective wishlist feature throughout your website.
In this article, we presented the ways you can display the wishlist products of a customer on a page, sidebar, and in the footer section of a website.
Now it is your time to implement the wishlist the way your visitors love it.
The wishlist plugin from Acowebs is one of our newest but increasingly popular plugins that are up for grab at just $29.
The premium version of this plugin will make sure you have the most state-of-the-art wishlist feature that you can offer to your customers.
Acowebs are developers of Woocommerce bulk discounts that will help you add bulk discounts to products in your store. It also has developed various other plugins like the popular plugin for managing the checkout form fields in WooCommerce, called Woocommerce Checkout Manager, which is highly feature-oriented yet lightweight and fast. There is also a free version of this plugin available in the WordPress directory named WooCommerce Checkout Field Editor.