Introduction to SSH
With a sprinkle of an interface, a dash of login details, and a reliable network connection, you will have a secure way of accessing your WordPress server. In this walkthrough, I take you through everything WordPress SSH to familiarize yourself with how things run.
It enables you to access your site remotely from anywhere, securely. Security is backed up by using public-key cryptography for creating the connection and authentication.
What are Client and Server?
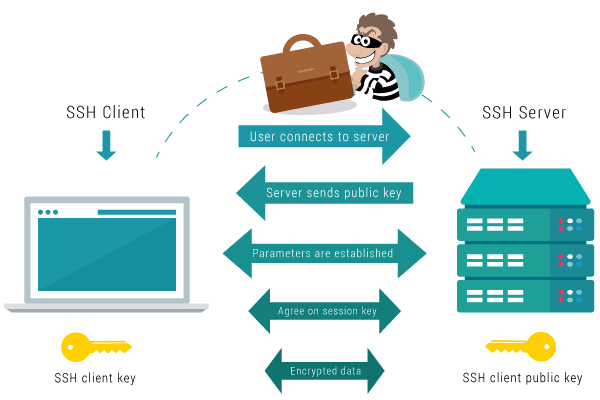
Both a client and server are required to establish an SSH connection. The client is installed on the computer that wants to initiate a connection to the server.
The remote server’s information is used to start the connection and when credentials are verified, an encrypted connection is established.
An SSH daemon is a component on the server-side that constantly listens for potential client connection requests on specific TCP/IP ports. When the client initiates a connection, the server responds with information about the supported protocols and software versions.
SSH creates a new session for the specific environment when all identification details are successfully exchanged. The items in the briefcase are kept secure until they are revealed by key.
ALSO READ: What SSL Encryption is and how it Works in WooCommerce
When to use SSH in WordPress
You might not have considered using SSH (Secure Shell) to access your WordPress before. SSH is a secure protocol for communicating with the server remotely. Unlike Telnet, SSH is a secure protocol over an insecure network.
The most common ways of connecting to your site would be through their dashboard or admin screens which are combined with phpMyAdmin and SFTP (Secured File Transfer Protocol) to access the database.
This provides a direct way to manage your site by accessing, downloading, or uploading files. However, SSH is an even more direct way of handling files.
It is termed as the most efficient way to speed up the workflow of your website. SSH provides more control and does not require a graphical user interface.
Prerequisites For SSH
The following requirements must be met before a secure session can be established between server and client:
- Proper permissions are required before accessing the site
- The firewall must allow remote connections
- The name of the remote machine or their IP address must be in handy
- The remote server must be up and be connected to the internet
- Client and server applications must be installed
macOS and Linux users should take note that a pair of public and private keys are built into the operating system. For Windows users, a client must be installed before getting started.
Examples of open-source Windows clients include PuTTY and Super PuTTY.
ALSO READ: Why WordPress is the Best Platform To Build Your Business or Startup Website
Setting up SSH
To begin the setup, a pair of public and private keys have to be generated. In this example, I will use the Linux Terminal. Press CTRL+ALT+T to start the Terminal. Next, run the command
ssh-keygen -t RSA
In this command, we have specified the type of key to create using the -t option, and in this case, we use RSA which is a widely used public-key cryptosystem in secure data transmissions.
Next, you will enter where to save the key pairs. This is followed by entering your passphrase or password which will be used to access the private key.
Creating the Connection
PuTTY client on Windows
PuTTY is used to connect to SSH on Windows machines. On running PuTTY for the first time, the client will ask for the destination IP of the remote computer. Enter the hostname and port number.
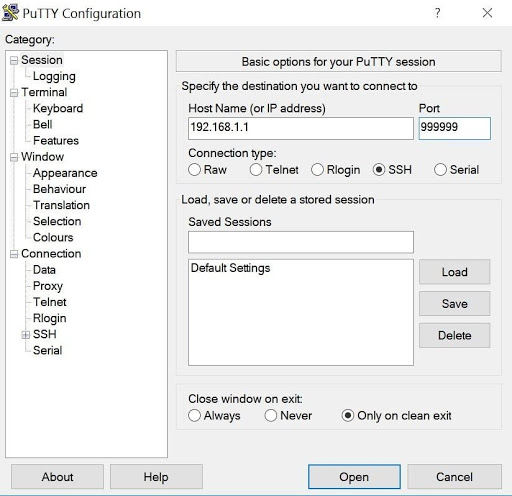
In the username login field, enter your username and select your private key. Once this step is complete, a command line will launch asking for the account credentials.
In most cases, the credentials for logging into the host dashboard are the same used to create this session but if it doesn’t work, check the SSH Access section of the admin control panel for more instructions.
Once the connection to the server has been established, commands can be entered right away just as you would in Terminal.
Command Line Interface (CLI)
If you are familiar with using the command line, you know it enables you to do almost anything you want. Using an appropriate command, you can access directories and files, create, delete, move, change user permissions, upload, download, etc.
In most cases, you must know the command you want to use to achieve a desirable result. For example, to list the files contained in a directory, just type ls and hit Enter.
SSH commands can be categorized as directory commands, file commands, folder commands, Terminal, or other useful commands while working with SSH.
In Linux/MAC, first, you launch the Terminal, use the following command to load your private key information: ssh-add /youruser/.ssh/id_rsa. You can now enter the passphrase you created or leave it blank if you didn’t create one.
Enter the command: ssh username@hostname -p port number
ALSO READ: A Comprehensive Guide to WooCommerce Shortcodes + Examples
Commands used with WordPress
SSH uses a series of commands used for interaction with the server. Let us take a close look at some of the most useful commands you could start working with:
- The ls command – the ls command lists all the files and directories in the current folder. To display file details such as size, file permissions, date modified, owner, etc. use ls -l. to show hidden files, use ls -a as shown in the snap below.

- The cd command – use cd to navigate to another directory. The Command-line indicates your current location

At this stage, you can again use ls to show the contents of the current directory. To move to the previous directory enter two dots after cd:
cd ..
To navigate to a particular directory, just type the whole path for example
cd public/wp-content/plugins
- The mkdir command – used to create a new directory within the new location. The directory name follows the command
mkdir articles
- The touch command – a new file can be created inside a directory using touch command e.g touch helloworld.html
- The cat command – used to print the details of the file to the command line
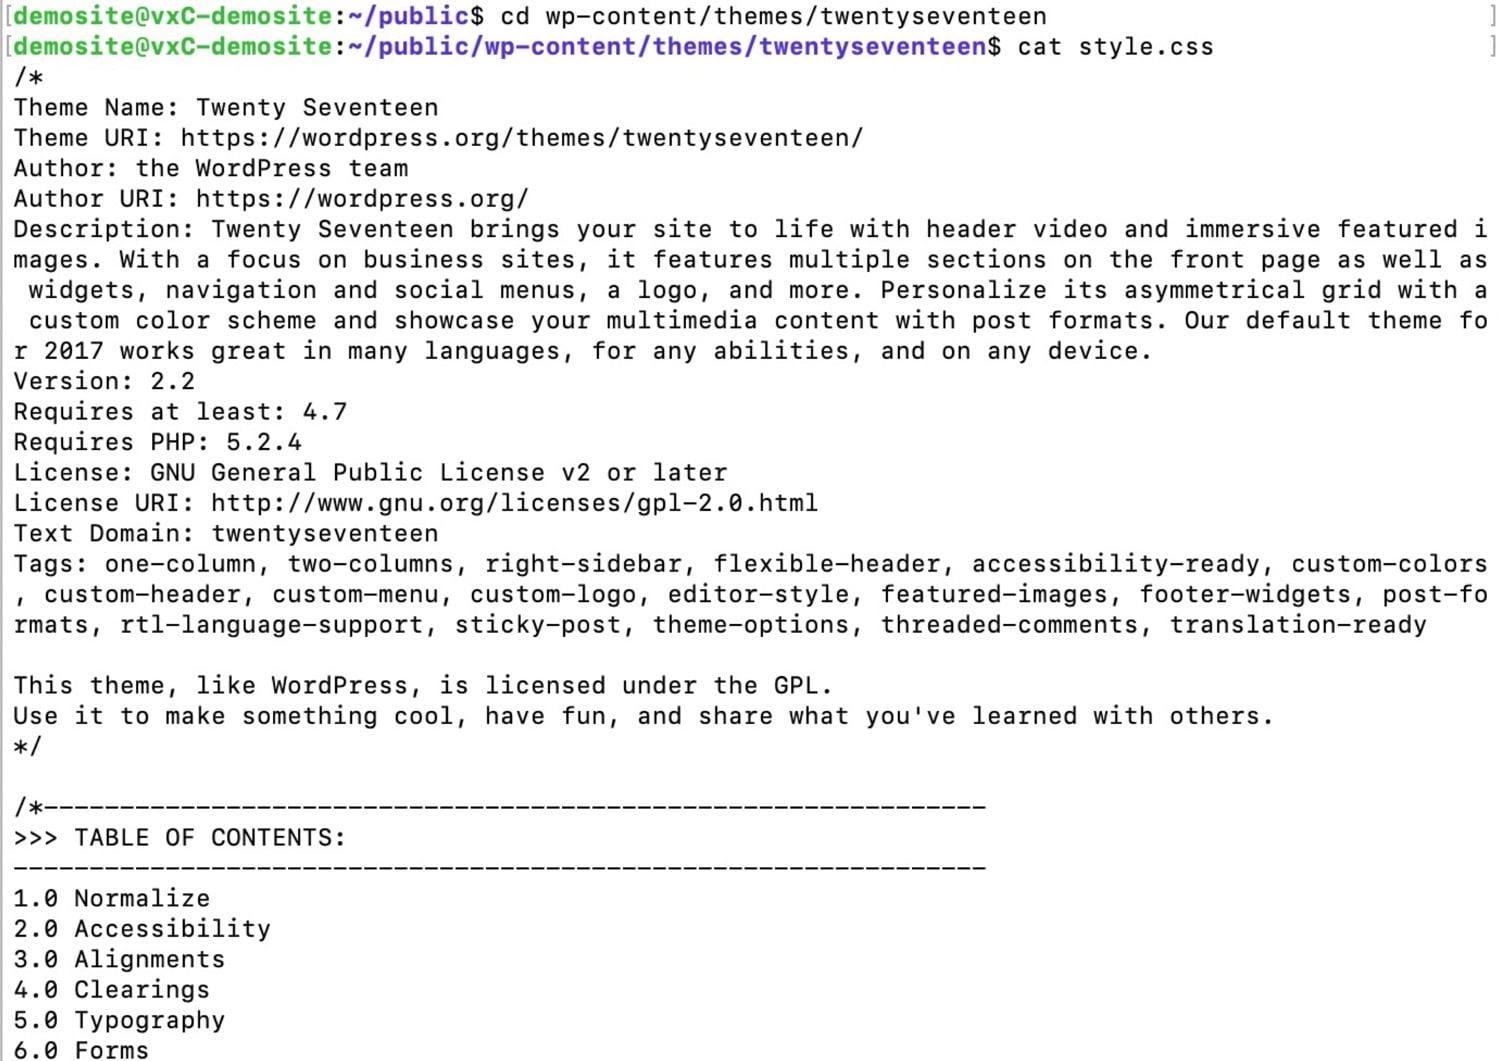
- The rm command- used to remove a file or folder example: rm helloworld.html
- The cp command – copies files and folders. You must provide the path where to copy the file or folder
cp [destination]
if the file already exists in the destination you get an error message. Some options used with the cp command include:
-u: copy the file if it is newer than the destination file
-a: archives a file
-n: doesn’t overwrite an existing file
-R: copies all files and folders inside the folder
-f: command creates a new file after changing write permissions for the destination file
- The mv command – in this command, just provide the source and destination folders and does not have options
- The zip command – the zip command is implemented to compress a directory and its components. The following parameters can be used together with a zip command:
-r: compresses a folder without deleting it
-m: compresses a folder and deletes the original, remaining with just the compressed version
-d: deletes a file from the specified existing zip
-u: makes an update on a file existing in a current zip archive. Useful if you have deleted the original folder and need to make an update in a file
The figure below shows an implementation of compression

Output:

- The unzip command – used to decompress a zip archive and create the original contents it was created from. Used when the original folder used to create the zip archive does not exist within the current directory
- The tar command – an alternative to zip command, is used to create and unpack .tar.gz archives. Use tar cvzf to compress a file or folder into the .tar.gz format. The command for compressing a folder would be tar cvzf example.tar.gz directoryname. The name of the archive to be created is example.tar.gz while the folder to be compressed is directoryname.
The tar xvzf command is used to decompress the archive. tar xvzf example.tar.gz
Instructions:
c tells tar to compress the files
x is used to extract
v displays verbose and displays the names of files the command will affect
z tells tar to uncompress the archive
f supplies the name of the archive to tar
SSH Connection Problems and Solutions
Sometimes you might experience various issues with regards to accessing your site using SSH. Probably there’s no connection or the command entered is not working as expected.
The following are some troubleshooting tips in case this happens:
No connection via SSH?
In this instance, you should inspect the error being returned on the interface and check whether it is a simple yes/no prompt to continue using the connection.
If that’s not the case, ensure that you are using the correct login credentials. WordPress has an SSH section on the dashboard and there you can check if your details are correct.
If neither of these solutions doesn’t seem to work, it would be better to reset the SSH password. Ensure there is an active internet connection and that your firewall is not blocking remote connections.
If need be, close down the client application or Terminal and restart it. It would be a good step to log into the host’s control panel and ensure there aren’t any issues with the server which might be preventing you from gaining access to your site.
SSH might not be allowed to access your port, therefore keep testing with other ports that are known to be working. If everything fails to bear fruit, create a support ticket with your hosting provider and they will be able to help you access your site and establish a connection.
ALSO READ: 12 Common WordPress Errors and How to Fix Them
Commands not Working as they should?
A command with incorrect syntax will display an error output. For example, typing is instead of ls will display the following error:

Here, the output shows there is an error so I try again with the appropriate command. Sometimes the command might be okay but with incorrect parameters.
The SSH documentation provides a list of all parameters used together with WP-CLI documentation for WP-CLI commands.
In case of connection problems, the command line will display this. It gives all details regarding what is going on with your connection and its benefits. It gives more precise and useful information than a graphical user interface would.
SFTP and FTP over SSH
File Transfer Protocol (FTP) is the standard protocol for file transfer over the internet. With the changes in the internet environment, FTP has become obsolete because of security concerns.
FTP transfers passwords in clear text format and an attacker can easily intercept traffic and read in between the lines. Traffic encryption has become a necessity as well as client and server authentication.
This led to the rise of SFTP (SSH File Transfer Protocol) and SSH over FTP which allows secure communications between server and client.
First, although SFTP does essentially the same job as FTP, they are completely different in that SFTP is very secure and more compatible and formal. For example, FTP does not have a formalized way of listing a directory’s contents upon request by a user.
This shows why SSH is worthwhile because connecting via SSH will yield more profitable results.
FTP over SSH, on the other hand, differs from SFTP. It is just an FTP tunnel created through an existing SSH connection. Then you could be asking won’t you just create an FTP port tunnel and have FTP running over SSH?
That might not be possible, since it uses several connections to work. Opening an SSH tunnel through an FTP port automatically secures the connection.
The FTP client should be tightly integrated with the SSH client to set up a completely secured environment.
So, what is the difference between SSH and FTP? SSH is way more secure than FTP. FTP offers no security and privacy; therefore, data transfer can be intercepted by sniffers.
SSH is the best choice especially for individuals great at using the command line interface which enables accessing files quickly. Further, SSH is a lot faster in terms of speeds.
SSH is particularly the best option for a reliable, fast, and secure information exchange.
Conclusion
Even though the WordPress dashboard is a powerful tool, accessing your WordPress site over an SSH connection offers a secure and convenient way to manage your website files without the need to open an FTP client or a browser.
SSH provides a higher degree of accessing and modifying your content directly. Using the commands listed in this article, you will be able to do most operations to get work done in a faster way.
Acowebs are developers of Woocommerce dynamic pricing that will help you add bulk discounts to products on your stores. It also developed the plugin for adding various extra product fields which is called Woocommerce custom fields, that are lightweight and fast. You can easily update your store with these add-ons and enjoy a hassle-free experience, check out the best options for additional Woocommerce custom product addons.


 Login
Login
 Cart
Cart