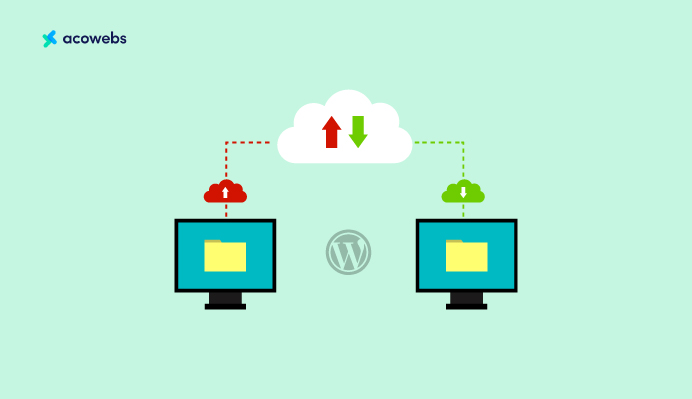
Are you running a website with a growing media library that’s becoming difficult to manage? As websites grow and become more complex, managing media files can become a challenge. Traditional hosting options can struggle to keep up with the increasing demands, leading to slow loading times or websites crashing, impacting your users’ experience and, ultimately, your business. If you’ve been experiencing this, it’s time to consider offloading your media files to cloud storage.
Imagine having a website that loads lightning fast, no matter where your users are located worldwide. You’ll be able to serve as many media files as you want without worrying about running out of space or overpaying for unnecessary storage. And even if there’s a technical glitch or an outage, your media files will remain accessible to your users.
By leveraging cloud storage solutions, you can ensure that your website is always fast, reliable, and secure, regardless of size or complexity. In this article, we’ll discuss why cloud storage is the best choice for serving media files for your website. We’ll also introduce you to three of the best cloud storage services -, Digital Ocean Spaces, Amazon S3 and Google Cloud Storage – and show you how to offload your WordPress media files to them using our Offload Media – Cloud Storage plugin. Plus, we’ll explore the plugin’s features and benefits and guide you through the process step-by-step.
Let’s get started!
What does Offloading Media to Cloud Storage Mean
Offloading media to cloud storage refers to storing and serving media files, such as images, videos, and audio files, on remote servers hosted by cloud storage providers. Instead of keeping the media files on your website’s server, you upload them to a cloud storage service, such as Amazon S3, Google Cloud Storage, or Digital Ocean Spaces, and serve them directly. This approach allows you to improve your website’s speed, scalability, reliability, and security while reducing the cost of storing and serving media files. Let’s look at how these cloud storage services work. When we are done, we’ll discuss all the benefits they can provide to your WordPress site.
Top Cloud Storage Providers for Offloading and Serving Media Files in WordPress
1. Google Cloud Storage
GCS (Google Cloud Storage) is a powerful player in the cloud storage market, offering robust features and seamless integration with Google’s extensive ecosystem. It is an essential component of the Google Cloud Platform. While the platform can host software and websites, it is incredibly well-regarded for its online storage solution.
Google Cloud stands out because of its impressive performance, security, and sharing features, all built on a scalable infrastructure. Besides, it provides three distinct storage services to accommodate various requirements:
- Filestore – an excellent choice for network file storage, enabling easy access and sharing of files across networks.
- Persistent Disks – ideal for segmented storage, suitable for managing data in segments or blocks for different applications.
- Cloud Storage – designed for handling objects, simplifying the management of diverse data objects like images, videos, and documents.
These core services represent the backbone of the Google Cloud infrastructure and are highly valued by many users.
Google Cloud Storage’s key features include the following:
- Competitive pricing with various storage classes
- High-performance global network with built-in CDN
- Automatic encryption of data at rest and in transit
- Integration with other Google services like Google Analytics and BigQuery
Benefits Google Cloud Storage Offer:
- Enhanced performance for faster content delivery
- Attractive pricing plans for different storage needs
- Redundant backups to ensure data safety
- Easy integration with your existing infrastructure
- Comprehensive documentation for easy implementation
- Availability of multiple regions for data storage
Famous brands using Google Cloud Storage: Target and Goldman Sachs.
2. Amazon S3
Amazon S3 (Simple Storage Service) is a popular and reliable cloud storage solution. It is an essential component within the AWS ecosystem that help you save and access data of any volume whenever you want, from anywhere online. Amazon S3 is fast, dependable, and cost-effective. So, if you’re searching for a simple and budget-friendly way to handle your data storage, Amazon S3 might be perfect for you.
Some of its key features include:
- Pay-as-you-go pricing model
- Unlimited storage capacity
- Flexible storage classes for cost optimization
- Integration with Amazon CloudFront CDN for faster media delivery
Benefits Amazon S3 offers:
- High-security measures to protect your data
- Straightforward management and migration processes
- Comprehensive documentation for developers
- Developer-friendly features and tools
- Multiple regions for data storage
- Added security using server-side encryption
Famous brands using Amazon S3: Siemens and Sysco.
3. DigitalOcean Spaces
DigitalOcean Spaces is a user-friendly and developer-focused object storage solution known for high-functioning servers, excellent service, and great customer support. Focused on simplicity, competitive pricing, and powerful virtual servers, it’s a preferred choice for scalable, cost-effective storage. As at the time of writing this, DigitalOcean’s offers 250 GB storage plus 1TB outbound transfer at $5 per month. It’s an attractive option for managing multiple media files.
Its key features include:
- Straightforward pricing with a flat rate for storage and bandwidth
- Built-in CDN for improved content delivery
- Simple API and easy integration with your WordPress site
- Compatibility with other Digital Ocean products
Benefits DigitalOcean Offers:
- Optimized file sizes to enhance site speed
- Minimized physical distance between users and content
- Serving static content from the cloud for faster load times
- Developer-friendly features and tools
- User-friendly UI for easy management
- Comprehensive documentation for seamless implementation
Famous brands using DigitalOcean Spaces: Loot.tv and Pionect.
Are you now convinced to incorporate cloud storage into your WordPress site? Awesome! We have the perfect tool for the job: the Offload Media – Cloud Storage plugin. Let’s show you why.
Benefits of Using a Cloud Storage Service to Manage Media Files for Your Website
The benefits of offloading your media files to cloud storage include the following:
Scalability: Meeting the Demands of Your Growing Website
As your business and website grow, it’s essential to have a storage solution capable of handling the increasing demands. Traditional hosting options often struggle to keep up with this growth, leading to slow loading times or even downtime. In contrast, cloud storage services offer virtually limitless scalability, allowing you to store and serve as many media files as necessary without sacrificing your site’s performance. With cloud storage, your media library can seamlessly scale alongside your website’s growth.
Speed and Performance: Ensuring Fast Media Delivery
One of the most significant benefits of using a cloud storage service is improving your website’s speed and performance. Cloud providers use Content Delivery Networks (CDNs) that cache and distribute your files across a global network of servers. When a user visits your site, the media files are served from the server closest to them, reducing latency and ensuring faster load times. For instance, Google Cloud Storage offers a built-in CDN, that allows you to deliver media content rapidly to your visitors, no matter where they’re located.
Reliability: Keeping Your Media Files Accessible
Maintaining a dependable website is crucial, and cloud storage services excel in providing consistent access to your media files. With data centres distributed worldwide, they can automatically store multiple copies of your files, ensuring that they remain accessible even if one data centre experiences an outage. This approach helps to keep your website running smoothly and your media files available to your users, regardless of any technical hiccups that may occur.
Cost-effectiveness: Saving Money While Improving Performance
Storing and serving media files can be expensive, especially with traditional hosting solutions. Cloud storage services provide a more budget-friendly alternative, featuring pay-as-you-go pricing models that allow you to pay only for the storage and bandwidth you use. As your site grows, you can easily adjust your expenses based on your requirements, making cloud storage an economical choice for managing your media files.
Security: Protecting Your Media Files from Threats
Protecting your website’s media files from unauthorized access and data breaches is essential; cloud storage services offer robust security features to help you achieve this. These services use advanced encryption methods to protect your files both in transit and at rest, and they regularly undergo rigorous security audits to ensure that your data remains secure.
For instance, Amazon S3 offers server-side encryption and access control policies, allowing you to fine-tune who can access your media files and under what conditions. Google Cloud Storage also provides multiple layers of security, including encryption, identity and access management, and security monitoring, providing the tools to secure your media files effectively.
So far, we’ve seen the numerous benefits cloud storage options offer compared to relying solely on a hosting provider. Now, let’s check out the best cloud storage services you can work with.
An Overview of the Offload Media – Cloud Storage Plugin by Acowebs
The Offload Media – Cloud Storage Plugin by Acowebs is a highly functional and user-friendly solution for WordPress websites to integrate and manage cloud storage services easily. This plugin enables you to seamlessly sync your media files with popular cloud storage providers such as Amazon S3, Digital Ocean Spaces, or Google Cloud Storage. It helps improve your site’s performance, saves server space, and offers numerous customization options to tailor your storage needs. What further sets this plugin apart from similar ones in the market is the number of fantastic features it offers at zero cost!
Some of the free features that make this plugin a must-have for your WordPress site include the following:
- Effortless media syncing with Amazon S3, Google Cloud Storage, or Digital Ocean Spaces simplifying cloud storage integration.
- Automatic removal of files from the server after uploading them to the cloud, conserving server space.
- Customization of server storage base path and URL structure to fit your requirements.
- Reduced media invalidations through object versioning.
- Enhanced website performance using a custom CDN for media URLs.
- Increased security with the option to generate pre-signed URLs.
- Seamless integration with WooCommerce for a cohesive experience.
- Compatibility with Advanced Custom Fields, allowing for more personalized content.
- RTL support and full compatibility with all Acowebs WordPress plugins.
- Easy management of multilingual sites with WPML string translation support.
And that’s not all! The PRO Version of the Offload Media – Cloud Storage plugin is coming soon, packed with even more awesome features. So, if you’re looking for even more advanced features, you are about to get them.
Now that you know about all these fantastic features, you might be curious how to use the Offload Media – Cloud Storage plugin to transfer your WordPress site’s media files to cloud storage. Don’t worry. We’ve got you covered! In the next section, we’ll walk you through the process.
Offloading WordPress Media Files to the Cloud: Step-by-Step
Now, we’ll guide you through the process of offloading your WordPress media files to each cloud storage option with the Offload Media – Cloud Storage plugin. Let’s start with the plugin installation.
How to Install the Offload Media – Cloud Storage
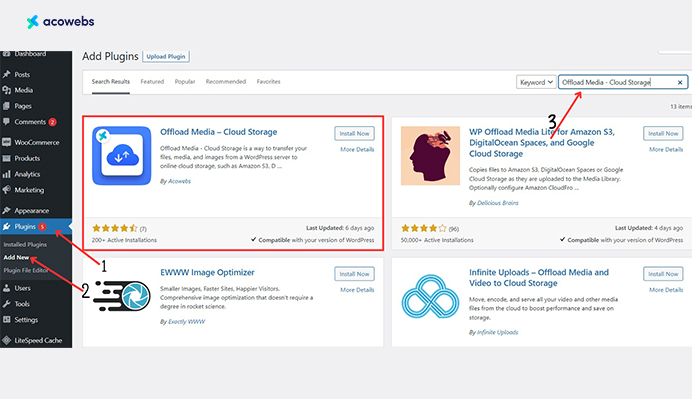
Like every WordPress plugin, go to Plugins > Add New on your Admin Dashboard. Search for Offload Media – Cloud Storage.
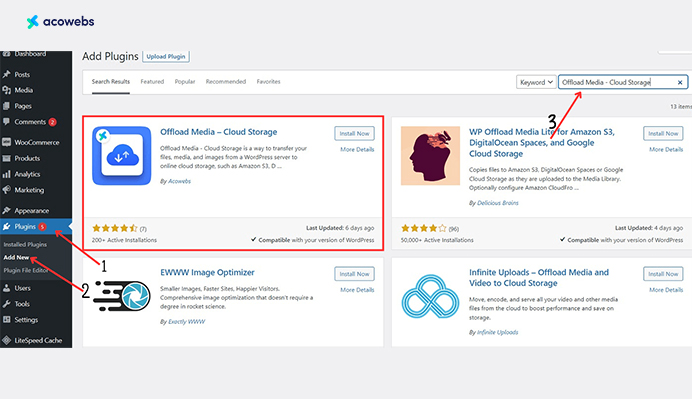
Install and activate the one by Acowebs. It should be the first result. Once activated, it’s ready for use on your website.
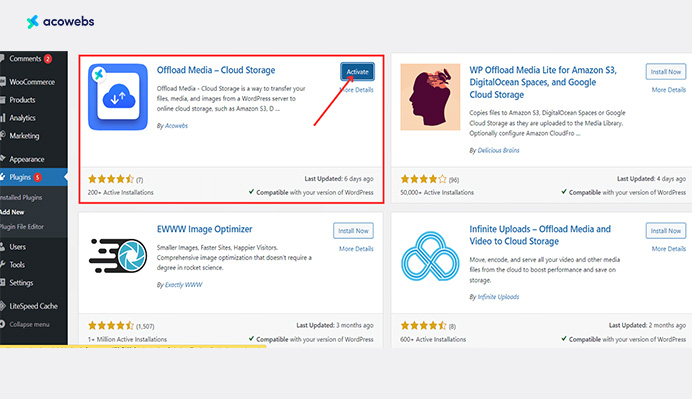
After installing the plugin, let’s take a look at how it functions in action.
A. Transferring Your WordPress Media Files Google Cloud Storage
Step 1: Prerequisite (Set up a Google Service Account)
Before you can connect your website with Google Cloud Storage, you need to create a Google Service Account.
Step 2: Configuring the Offload Media – Cloud Storage Plugin with Google Cloud Storage
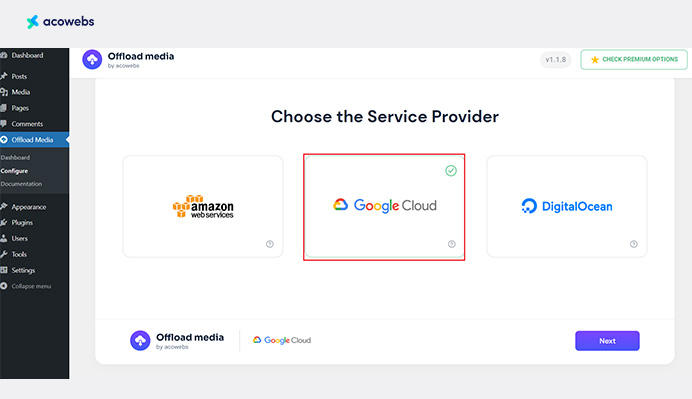
Back in your WordPress Admin Dashboard, go to Offload Media > Configure. Click on Next to leave the welcome page, and then select Google Cloud as your storage service provider.
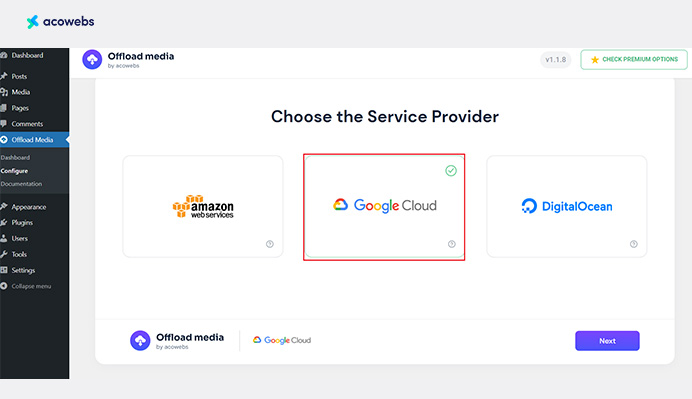
You’ll get a welcome screen for the Google Cloud. Click on Next to Configure Google Cloud Settings.
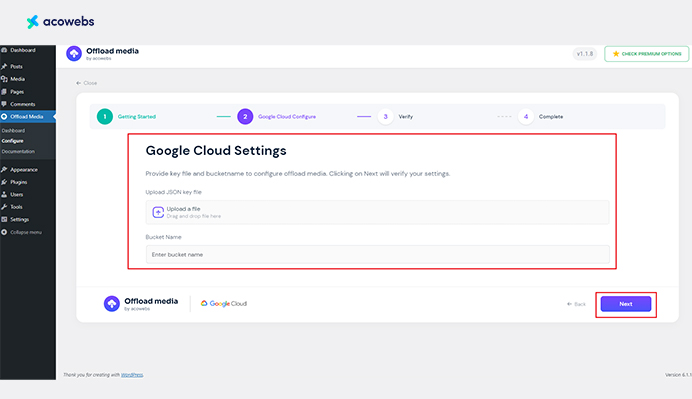
You’ll enter the credentials you created for the Google Cloud Storage configuration on the following page.
You’ll upload the JSON key file and the bucket name you created earlier. Click on Next to verify your settings. You will receive a verified result page. Click on the Save Configuration button to save your settings. And you’re good to go!
At this stage, you can customize your storage operations to your preference and requirements. We’ll get to that soon. Let’s first show you how to set up the remaining two storage options.
B. How To Transfer Your WordPress Media Files To Amazon S3
Let’s get started with offloading your media files to Amazon S3!
Step 1: Prerequisite (Set up an Amazon S3 account)
Before you begin, go to the Amazon S3 website and sign up for an IAM user account on AWS if you don’t have one already. Confused? Follow this documentation to create one.
Step 2: Configuring the Offload Media – Cloud Storage plugin with Amazon S3
Now, it’s time to connect your WordPress site with your Amazon S3 account. Next, go to Offload Media > Configure on your WordPress Dashboard, plugin settings and select Amazon S3 as your storage provider. Click on next to proceed to the next step.
Enter these Amazon S3 information:
- Access Key: This is the Access Key ID of your IAM user account.
- Secret Key: This is the private access key you created for your IAM user account.
- Bucket Name: This is the name of the S3 bucket you created earlier.
- Bucket Region: Here, you’ll enter your bucket’s region name.
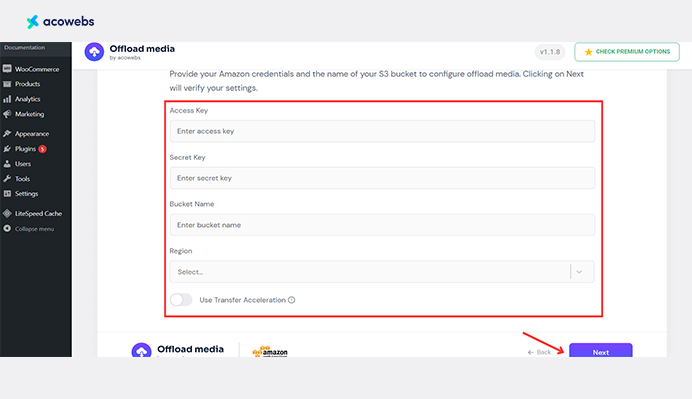
Once you’re done, click on Next to verify your settings.
Hit Save Changes, and you’re all set to offload your media files. When you upload a new file to your WordPress media library, the plugin automatically transfers it to your S3 bucket. Your website will serve the media files directly from Amazon S3, improving your site’s performance and saving you storage space on your server.
C. How To Transfer Your WordPress Media Files To Digital Ocean Space
Step 1: Setting up a Digital Ocean Account
First, sign up for a Digital Ocean account if you haven’t already. Once logged in, navigate to the “Spaces” section and create a new Space. This will be the storage location for your media files.
Step 2: Configuring the Offload Media – Cloud Storage plugin with Digital Ocean Space
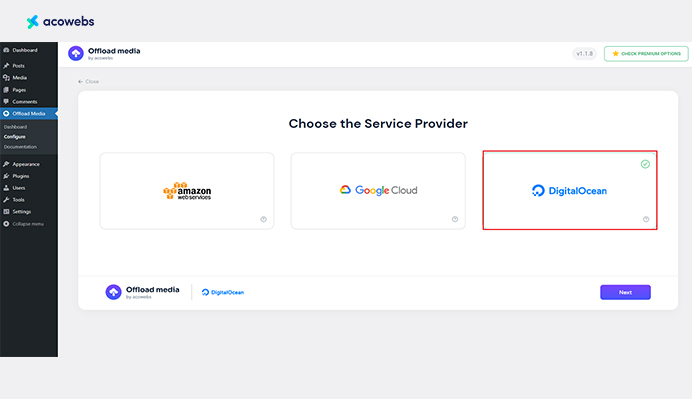
As usual, go to Offload Media > Configure. After the welcome page, choose Digital Ocean Space as your storage provider and click Next.
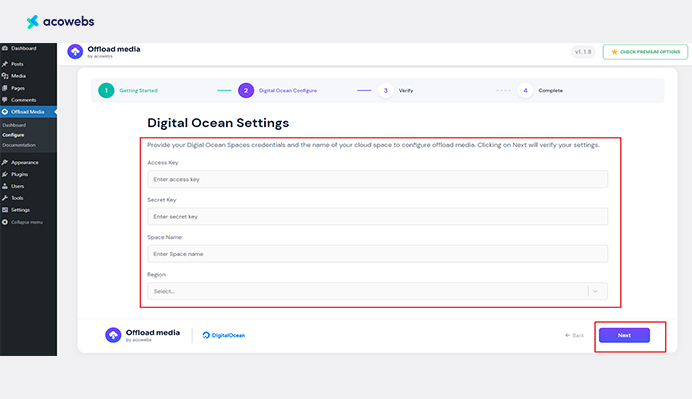
Enter the necessary details, such as your Digital Ocean Space access key, secret key, the name of the Space you created earlier, and your region. Click on Next to verify and save your settings.
With the plugin configured, you can offload your media files to Digital Ocean Space. Anytime you upload a new file to your WordPress media library, the plugin will transfer it automatically to your Digital Ocean Space. Subsequently, your website will serve the media files directly from Digital Ocean Space.
Once you’ve selected your preferred storage option and provided the corresponding credentials, you can modify your storage operation settings. This allows you to customize your storage operations according to your preferences and requirements. Let’s show you how
Customizing Your Storage Operations Settings
Go to Offload > Dashboard on your WP Admin Dashboard and click Settings.
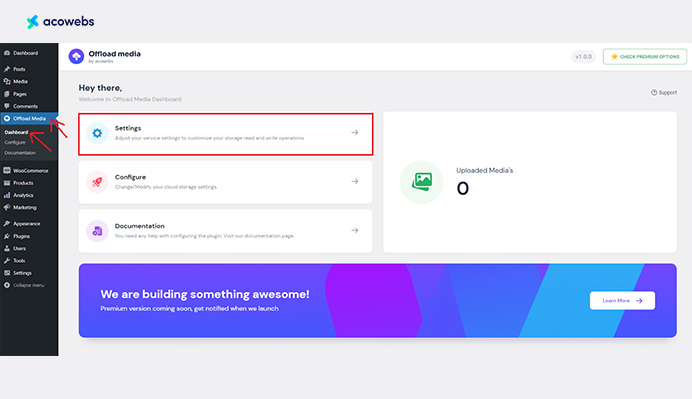
On the settings page, you’ll find various options, including:
- Copy files to bucket: With this option, you can choose whether to enable or disable uploading a copy of your media files to the bucket. When enabled, a copy is created in the bucket each time you upload a file to your Media Library.
- S3 base path: This setting allows you to modify the base directory path for your media storage. Feel free to change the path manually according to your needs if necessary.
- Year/Month Structure: Enable this option to organize your media files into year/month folders within your base path. If disabled, files will be uploaded directly into the base path.
- Object versioning: This handy feature helps prevent invalid media URLs. Each media file uploaded to the cloud server will have a unique URL. Even if you upload files with the same name, no invalidation is needed, as each file is saved in a timestamped folder on the server.
- Enable CDN: A CDN, or content delivery network, is a group of geographically distributed servers that work together to deliver content quickly. It’s best practice to enable a CDN to improve your site’s speed and performance. Toggle this option on or off, depending on your preference.
- Enable Pre-signed URL: This option causes the file URL to update periodically based on the specified time gap.
- CDN URL: Enter your required CDN here.
- Pre-signed expires: This is where you set the expiration time for file URLs.
- Remove files from server: If enabled, this setting deletes the file from the server after it has been uploaded to the cloud. Therefore, be careful when allowing it, as it could cause issues if you deactivate the plugin.
- Rewrite media URLs: When enabled, this option allows you to rewrite the URLs for media library files copied to the bucket so they are served from the bucket or CDN instead of your server.
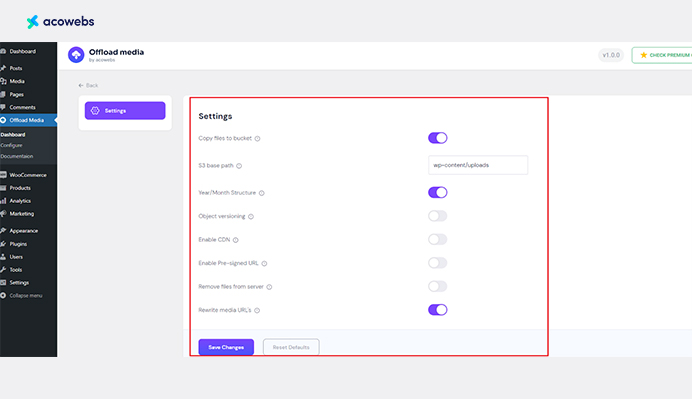
Once you’ve made the necessary changes, click Save Changes to apply them to your site. Now your plugin is fully functional and will offload your media files just as you’ve set.
Wrapping up
Overall, offloading media to cloud storage is smart for any website owner, whether you have a small blog or a large e-commerce store. With cloud storage services like Digital Ocean Spaces, Amazon S3 and Google Cloud Storage, you can improve your website’s speed, scalability, reliability, and security while reducing the cost of storing and serving media files.
Using the Offload Media – Cloud Storage plugin by Acowebs, you can easily sync your WordPress media files with these cloud storage providers, taking advantage of their powerful features and benefits. With customizable storage operation settings, you can fine-tune your solution to meet your specific requirements.
So why wait? If you’ve been struggling with managing your media files or dealing with slow loading times on your website, follow the steps outlined in this article and start offloading your media files to the cloud today.
Acowebs are the developers of the Offload Media – Cloud Storage Cloud Storage plugin helps you copy files from your media folder to cloud services. We also have developed applications like Email Customizer and Designer For WooCommerce that helps you build and customize WooCommerce emails with a drag-and-drop user interface.


 Login
Login
 Cart
Cart