















 Login
Login
 Cart
Cart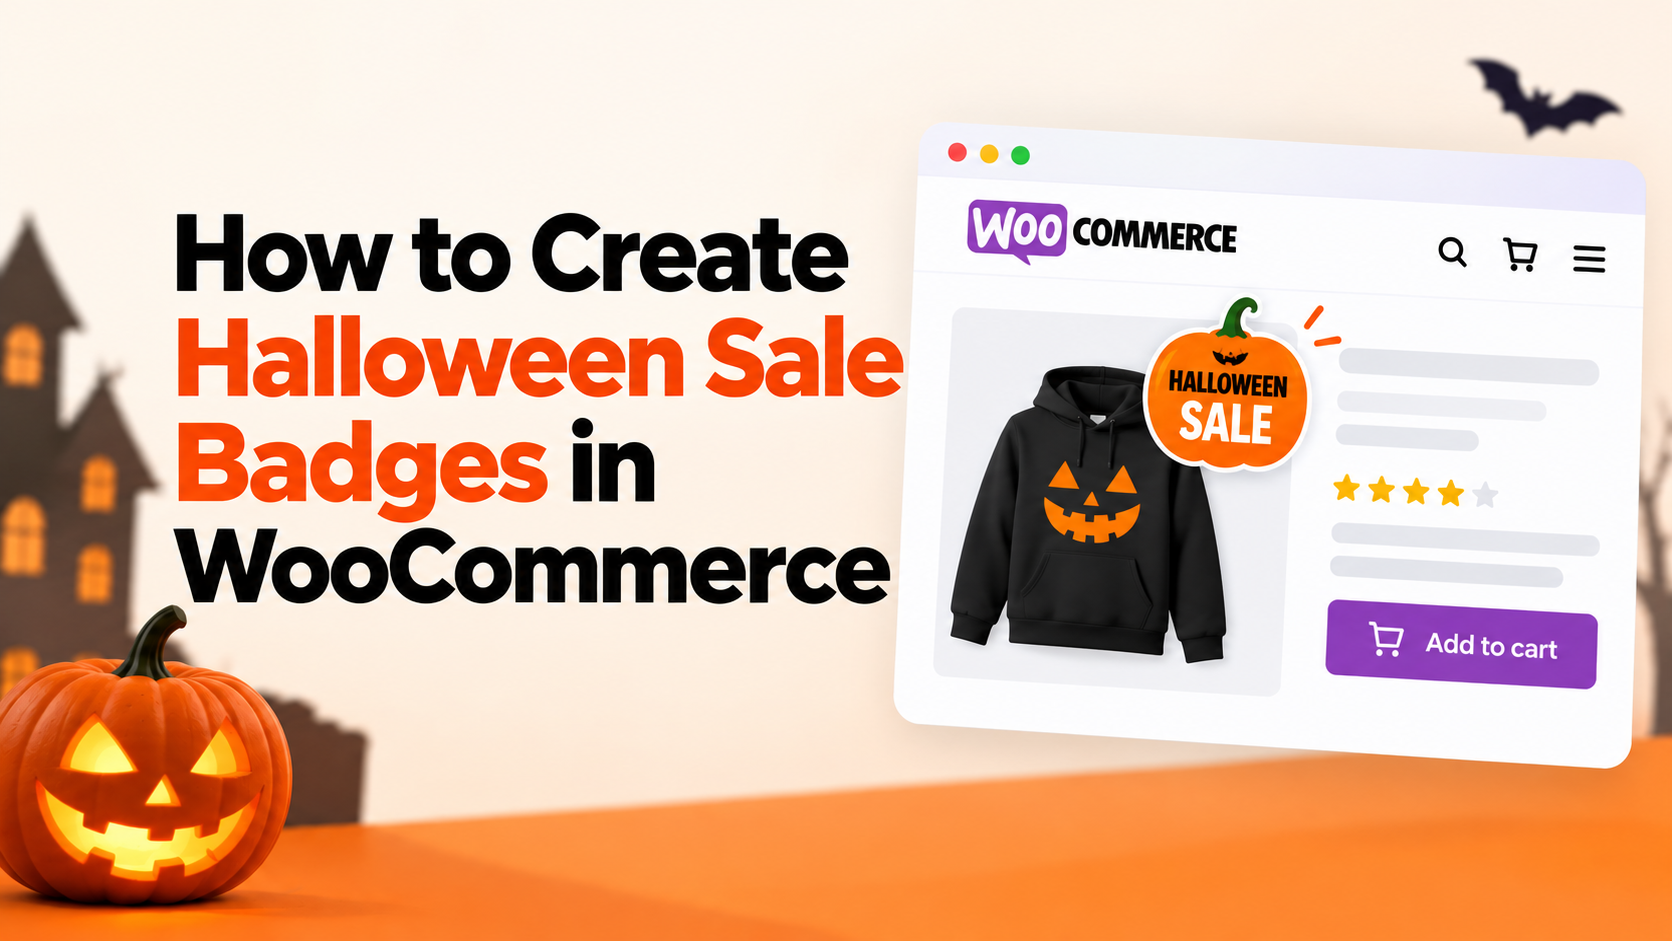
Halloween is one of the strongest seasonal sales windows of the year. Shoppers expect discounts, and stores that look the part get more clicks. Adding WooCommerce product badges to highlight Halloween offers can help attract customer attention and make discounted products stand out. That is where this guide comes in: it shows you how to create Halloween sale badges in WooCommerce without writing a line of code. By the end, you will know how to add spooky badges to products or categories, schedule them to appear and expire automatically. Everything runs through Product Labels for WooCommerce, a no-code plugin that takes about ten minutes to set up.
TL;DR: No code needed: create Halloween sale badges in WooCommerce with the Product Labels plugin no PHP, no CSS, no developer. Pick a style in minutes from 150+ predefined badge styles or upload a custom Halloween image, then target the badge to products, categories, tags, or sale items and schedule a start and end date so it appears and expires automatically. Build urgency with a countdown timer, stack badges such as “Halloween Sale” plus “Low Stock”, and hide the default “On Sale” badge so your design stays clean.
Why use sale badges for Halloween
Badges do three jobs during a seasonal sale. First, they create urgency: a “Spooky Sale” ribbon tells shoppers the offer is live now, not later. Second, they make discounted products visible: a badge stands out in a crowded product grid where the price change alone is easy to miss. Third, they give your store a festive look that matches the mood of the season.
Halloween, celebrated on 31 October each year, is a retail event well beyond one night. Costume, party, candy, home-decor, and even pet stores see a spike in traffic through October. A themed badge is a low-effort way to signal that your store is part of the celebration.
Those same jobs pay off on every storefront, not just during Halloween. The concrete benefits:
- Visibility where prices go unnoticed. In a product grid, a small price drop is easy to miss; a colored badge is not. Badges pull the eye to discounted items in category pages, search results, and related-product sections.
- Higher click-through on offers. A badge tells shoppers the offer is active before they read a single price. Products marked “On Sale” or “Limited-Time” get clicked more often than identical products without a badge.
- Urgency without extra discounting. A “Limited-Time Scare Deal” or a visible countdown creates a reason to buy now; you do not have to cut prices deeper to create urgency.
- A festive, on-brand storefront. Seasonal badges make the whole store feel part of the moment, which matters during themed shopping windows like Halloween.
- Campaigns that run and clean up themselves. With scheduling, badges appear on the start date and disappear on the end date no late-night manual removal, no “Halloween in January” mistakes.
- Consistency across the catalog. One badge can cover a whole category, every product on sale, or a hand-picked list, so the storefront looks deliberate instead of patched together.
Halloween badge ideas: text, colors, and placement
You do not need a designer to make badges look right. Start with short, punchy text that reads in under a second. These are proven patterns:
- “Spooky Sale” — a general discount badge in orange or purple.
- “Boo-tiful Deal” — playful tone for beauty, gifts, or home goods.
- “Limited-Time Scare Deal” — urgency for flash offers.
- “Trick or Treat: 30% Off” — specific discount, festive framing.
- “Haunted Deals” — a category-wide badge for your Halloween collection.
- “Free Gift with Purchase” — a bonus offer that lifts average order value.
Colors matter as much as words. Stick to the classic palette: orange backgrounds with black or white text, deep purple for a spookier mood, and black with white or orange text for contrast. Keep the badge text short so it stays readable on mobile screens, where most of your traffic will come from.
Placement is simple: the top-left corner of the product image is the standard position for sale badges, and shoppers are trained to look there. Keep it consistent across the whole store.

Make Your Store Halloween-Ready!
Create eye-catching Halloween product labels and boost your seasonal promotions with WooCommerce Product Labels.
Get Product Labels →Acowebs plugins for your Halloween badge ideas
Every idea above is built with Acowebs plugins — no design files, no PHP. Two plugins cover the whole campaign:
Product Labels for WooCommerce is the badge engine: 150+ predefined styles, custom image upload, text and color editing, position/rotation/opacity controls, scheduling, and sale timers.
WooCommerce Dynamic Pricing With Discount Rules is the discount engine: percentage or fixed-price discounts on products, carts, or quantities, plus gift and BOGO rules the actual offers your badges advertise.
Here is the ideal plugin setup for each badge idea:
| Badge idea | Ideal Acowebs plugin setup |
| “Spooky Sale” | Product Labels: pick a predefined seasonal style, set orange or purple text on a dark background, assign it to the Halloween category or all sale items. |
| “Trick or Treat: 30% Off” | Product Labels for the badge + Dynamic Pricing for the real 30% discount on the product price; the badge and the checkout always agree. |
| “Limited-Time Scare Deal” | Product Labels: add a scheduled start/end date and enable the built-in sale timer so shoppers see the countdown on the badge. |
| “Free Gift with Purchase” | Product Labels for the announcement badge + Dynamic Pricing’s gifting rule, which adds a chosen product as a gift based on cart total, category, or spend. |
| “Low Stock” / “Sold Out” | Product Labels: use the stock alert badge styles to mark scarcity, a strong companion to any Halloween sale badge. |
| “Haunted Deals” | Product Labels: assign the badge to the whole Halloween collection via category targeting, with specific products excluded if needed. |
Both plugins cost the same: $49 per year for a single site, with lifetime and multi-site options a small price for a campaign that runs itself.
Default WooCommerce sale badge limits
Out of the box, WooCommerce gives you a plain “Sale!” text badge on the product image. It works, but it has real limits:
- Text only — no icons, no images, no seasonal styling.
- No scheduling — the badge shows whenever the product is on sale; you cannot time it.
- No category control — the same badge appears on every discounted product, whether it fits or not.
- No positioning options — you cannot rotate, resize, or flip it.
Making the default badge seasonal usually means editing template files or pasting PHP snippets fragile work that breaks on theme or plugin updates. A plugin-based approach keeps everything in the WordPress admin and survives updates.
How to create Halloween sale badges in WooCommerce: Step-by-Step Guide
This section walks you through the full setup with Product Labels for WooCommerce. The plugin adds a Badges section to your dashboard, gives you over 150 predefined badge styles, and supports custom images, scheduling, and live preview.
Step 1: Install and activate the plugin
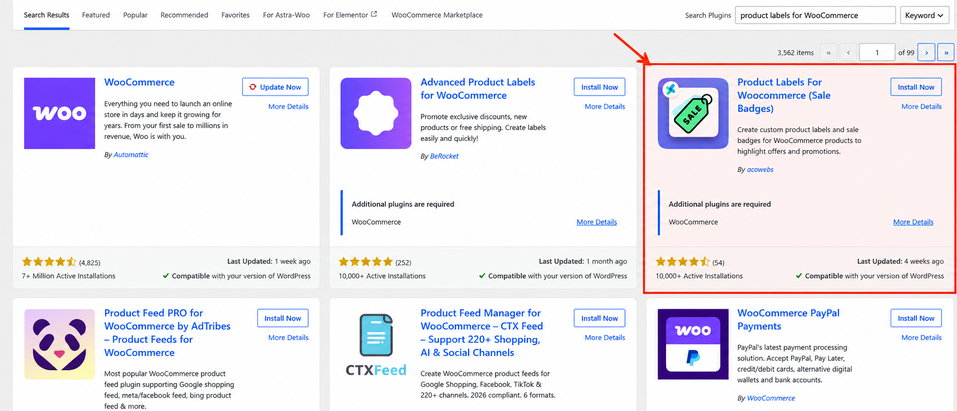
From your WordPress admin, go to Plugins → Add New, search for “Product Labels for WooCommerce” by Acowebs, and install it. You can also upload the ZIP file you received after purchase. Activate the plugin, and a Badges menu item appears on the left.
Step 2: Go to Badges and click Add New Badge
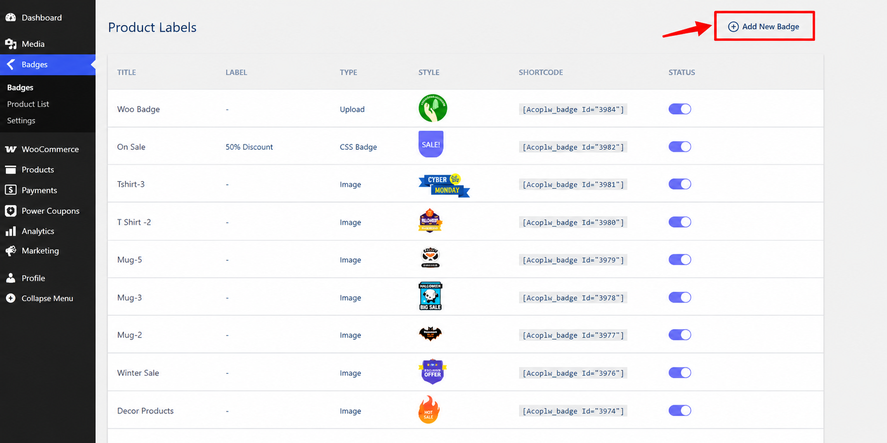
Open Badges → Add New Badge. You will see a badge editor with a live preview on the right, so every change you make shows up instantly.
Step 3: Pick a seasonal badge or upload a custom image
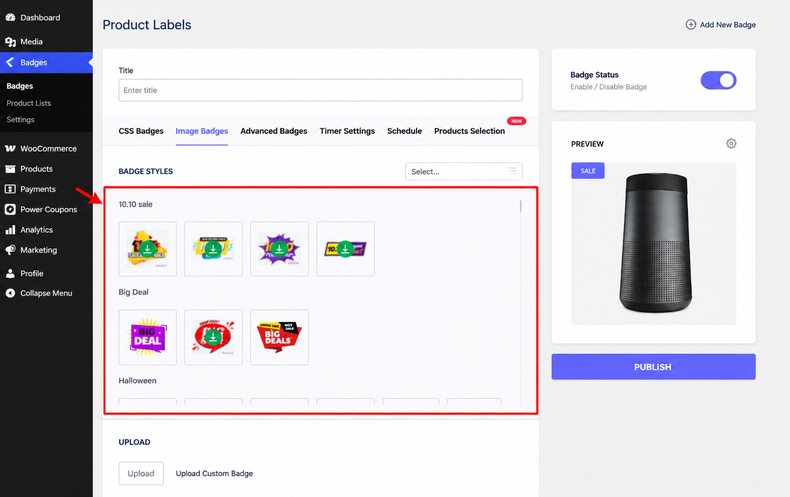
Browse the built-in library of 150+ predefined badge styles. Seasonal styles are included, and the library grows with each plugin update. Alternatively, upload your own Halloween image badge a pumpkin, a ghost, or a “Spooky Sale” ribbon from your media library.
Step 4: Edit the badge text, colors, and font
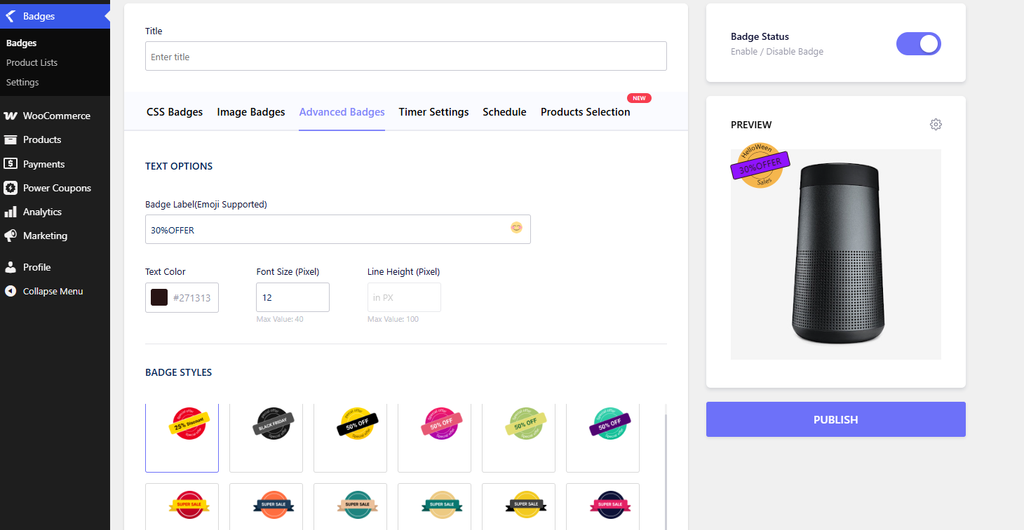
Type the badge text, then set the font size, line height, and background color. Use the orange, black, and purple palette from the ideas section above. The preview updates as you type.
Step 5: Set position, rotation, opacity, and flip
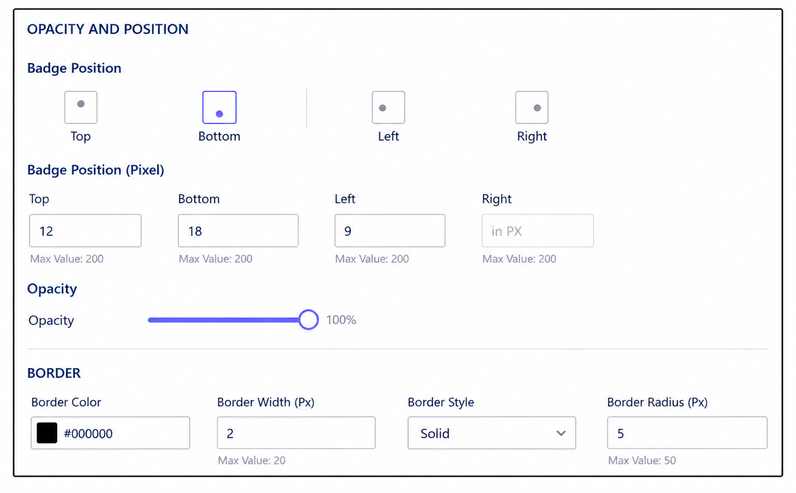
Use the controls to place the badge exactly where you want it: position on the image, rotation angle, opacity, and horizontal or vertical flip. Because the preview is live, you can experiment freely and see the result on a real product image. Product Labels for WooCommerce makes this a visual job rather than a CSS guessing game.
Step 6: Assign the badge to products, categories, or tags
Choose where the badge appears: specific products, whole categories, tags, or every product currently on sale. You can also exclude individual products from the list. For a Halloween campaign, assign the badge to your Halloween category and to all sale items with one badge, applied everywhere.
Step 7: Schedule the start and end date
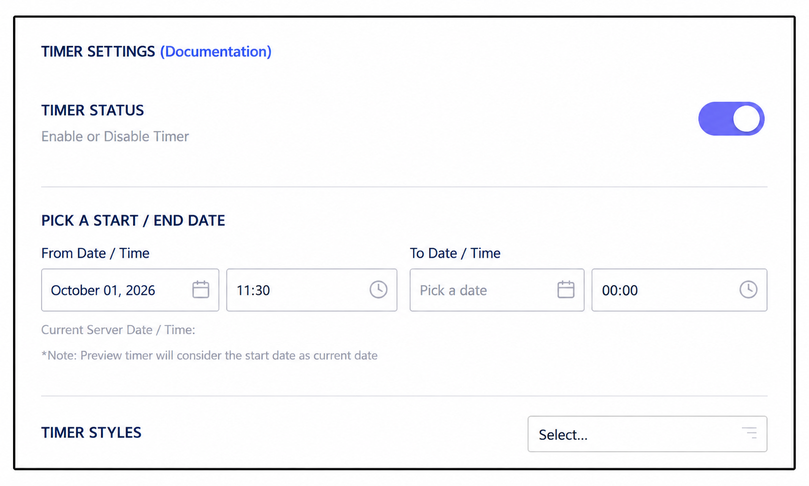
Set a start date and an end date for the badge. The badge goes live automatically on the start date and disappears on the end date no manual cleanup, and no “Halloween in January” mishaps. This works with the default WooCommerce sale schedule too.
Step 8: Hide the default WooCommerce “On Sale” badge
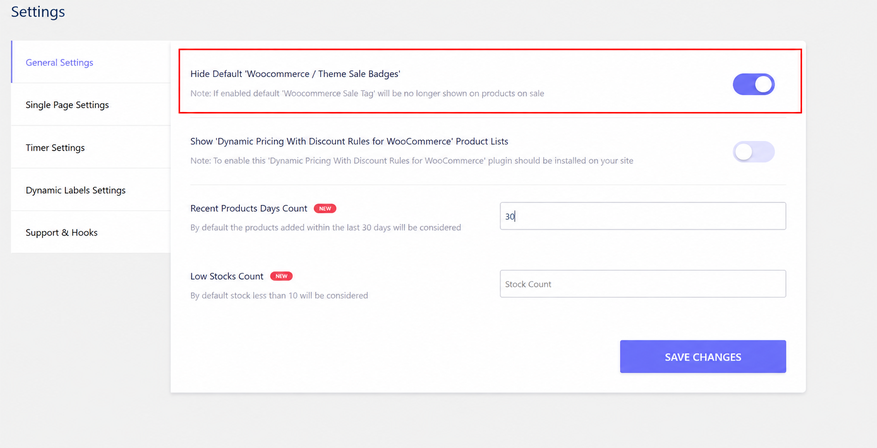
You can hide the plain default sale badge so the two badges do not clash. Enable the hide option in the plugin settings and your store shows only your custom Halloween badge.
Step 9: Enable the badge on the product detail page
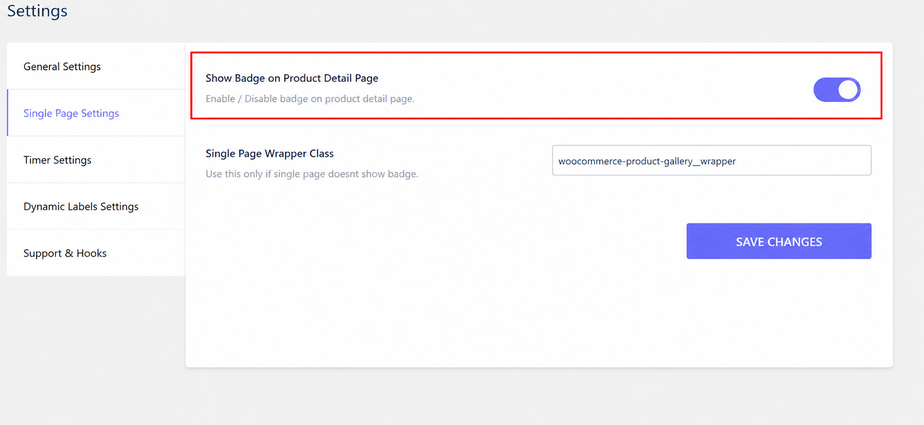
Badges can appear in the shop grid, on category pages, and on the single product page. Turn on the product-page option so visitors see the badge when they land on a product; that is where the final purchase decision happens.
Step 10: Preview and publish
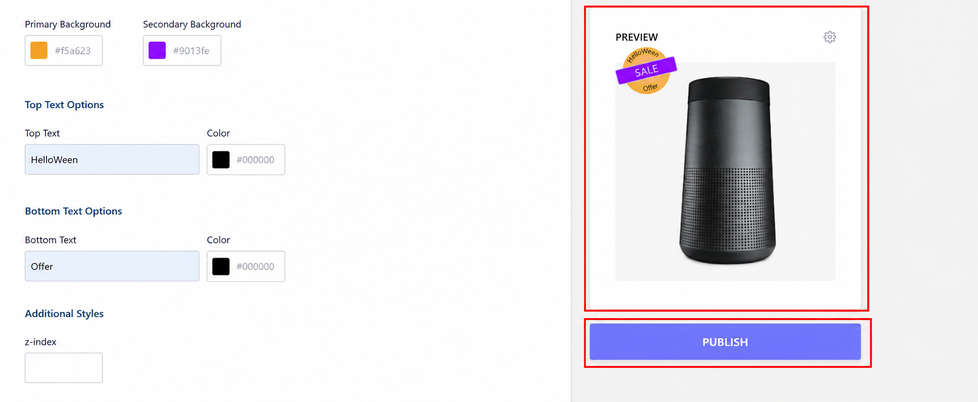
Check the live preview one last time, including how the badge looks at mobile width. Publish the badge, and your Halloween campaign is live.
Advanced tips
Once the basics work, these techniques push more sales:
- Add a countdown timer
Display a countdown timer on sale badges to create urgency. Set it to match the offer’s end date, especially for best-selling Halloween products.
- Stack multiple badges
Add multiple badges to a product, such as “Halloween Sale” and “Low Stock,” using different positions to highlight discounts and scarcity.
- Use weekday schedules for flash offers
Schedule badges for specific days, such as Friday flash sales or weekend offers, with automatic start and end times.
- Reuse your Dynamic Pricing product lists
Use product lists from WooCommerce Dynamic Pricing With Discount Rules to display badges on discounted products without managing separate lists.
- Set out-of-stock and coming-soon badges
Display “Sold Out” or “Coming Soon” badges to highlight product availability and promote upcoming Halloween items.
- Upload your own Halloween image badges
Use your own pumpkin, ghost, or branded sale images. Customize their position, rotation, opacity, and flip settings.
- Build one campaign, several badges
Create unlimited badges for different promotions, such as “Haunted Deals” for categories, “Trick or Treat: 30% Off” for products, and “Limited-Time Scare Deal” for flash sales.
Make Your Store Halloween-Ready!
Create eye-catching Halloween product labels and boost your seasonal promotions with WooCommerce Product Labels.
Get Product Labels →Best practices for seasonal badges
- Keep badge text under six words. It must be readable at a glance. Shoppers scan product grids in seconds, and long text turns a badge into an ad it gets skipped, not read. If the message does not fit in six words, put it in the product description instead.
- Use one or two badge styles per store. A consistent look builds trust; ten different styles look messy. If you need both a sale badge and a stock badge, keep them in the same orange-black-purple palette so the storefront stays coherent.
- Test mobile readability. Most shoppers browse on phones, and a badge that covers the product image is a bad trade. Use the live preview to check the badge at mobile width and against a real product photo before publishing; the badge should sit on the image, not swallow it.
- Match the badge schedule to the sale schedule. The badge’s start and end dates should line up with the actual discount, whether that is WooCommerce’s own sale dates or a Dynamic Pricing rule; otherwise, you advertise a price that no longer exists. The plugin can follow the default WooCommerce sale schedule so both change together.
- Remove badges when the campaign ends. Even scheduled badges deserve a final check that nothing lingered after the event. Set the end date a day past the campaign close to catch late visitors, then confirm the storefront is clean.
- Keep the message consistent across languages. If you run a multilingual store, remember that badge text is copy too. With the plugin’s WPML and PolyLang support, localize the badge so “Spooky Sale” reads naturally in every language your store speaks.
Also read: How to create a badge or label using trending stickers
Conclusion
Halloween badges are a small change with a big seasonal payoff: more visible discounts, a festive storefront, and offers that turn on and off by themselves. Product Labels for WooCommerce gives you 150+ predefined styles, custom image badges, scheduling, countdown timers, and full control over position and colors no code, no developer, no fragile PHP snippets.
Set up your first spooky badge today, schedule it for October, and let the plugin handle the cleanup. For more seasonal campaign ideas, see how to plan holiday discount schedules for WooCommerce and our Black Friday and Cyber Monday ecommerce marketing strategies.
Acowebs are the developers of the WooCommerce Product Labels which let customers include custom product labels or product badges for WooCommerce products. WooCommerce sales badges plugin provides you with different label styles and customizations for labels. It offers a easy-to-use UI to add labels to the selected products or categories and woocommerce email customizer using which you can easily build and customize WooCommerce emails with a drag-and-drop user interface.-
FAQ
Install Product Labels for WooCommerce, create a badge with Halloween text and colors, then assign it to the products, categories, or sale items you want. The badge appears on the product image automatically.
Yes. Every badge has a start date and an end date. Set the window to October dates and the badge disappears on its own when the sale finishes.
The plugin includes a hide option that switches off the plain “On Sale” badge. Enable it so only your custom Halloween badge shows.
Yes. When assigning the badge, choose a category from the list. You can also target tags, individual products, or all products on sale, and exclude specific products.
Yes. Upload any image from your media library a pumpkin, ghost, or custom ribbon design and use it as the badge. The same editor controls position, rotation, and opacity for uploaded images.
Yes. Create as many badges as you need and assign several to the same product, such as “Halloween Sale” plus “Low Stock.” Keep the count low for readability.