Login
Login
 Cart
Cart
Checkout Pages needs your special attention if you like to provide a next-level shopping experience to your customers. In this handy guide, you’ll learn how you can customize the WooCommerce checkout page, create custom fields and rearrange or delete fields.
The default WooCommerce checkout page comes with limited checkout page options. There is no support to rearrange or delete any custom field. Also, you cannot personalize the checkout page.
Keeping in view your business requirements, we have created a comprehensive guide to help you find out the best solution to customize the checkout page.
There are multiple ways to customize a WooCommerce checkout page; some of them are using WooCommerce extensions and custom coding, or you can use any third-party WooCommerce checkout plugin.
In this guide, we have used the WooCommerce Checkout Field Editor and Manager plugin to show you how you can add/ remove or personalize any custom field as per your business requirements.
The WooCommerce Checkout field editor and manager plugin provide an excellent user experience with a dynamic field customization option to optimize your checkout field.
But, before diving into the details, we’ll give you a brief overview of why adding custom checkout fields is important for the development of your business.
ALSO READ: 11 Silent Killers Of Customer Checkout And How To Fight Back
Why Do You Need A Custom WooCommerce Checkout?
You can maximize the seamless shopping experience of your customers with a simple and faster process to complete the checkout procedure.
The checkout pages work as a double resource to collect the user’s data.
Sometimes, you will have to add or remove custom fields to make your checkout form more precise.
Such as, if you are selling digital products, then there is no use of an address field or second address fields in your form because these are irrelevant to the task, and visitors may find it confusing.
Or if you are running an online restaurant, then you can add an extra field where the customers could add any specific order details regarding their meal.
So, there are multiple reasons you will need to customize your checkout page, edit, add, or delete some fields to get more conversions.
The easier is the shopping experience your customers have with you; the more trusted will become your brand.
Finally, the customers will get encouraged to buy more from you.
ALSO READ: Best UX Practices For An eCommerce Checkout
Make It Easier To Choose Products For Your Customers
Research says people tend to buy more if they go through an easier way to complete their shopping experience.
Most probably, the customers will abandon any purchase if they have to go through a long and sturdy process of clicking through multiple pages to get their shopping done.
They will simply quit and leave for any competitor online store.
That’s where the real trouble lies!
To overcome this problem, you have to come up with a simple and sleek user-experience to boost off their interest in buying more by simplifying the checkout procedure. Eventually, happy customers will return by buying more products.
ALSO READ: Top WooCommerce Tips To Make Your Website More Effective
Let Your Customers Add Multiple Products To The Shopping Cart At Ease
If your customers have the freedom to add multiple product variants to the shopping cart at once without switching to the single product pages, they will eventually enjoy more shopping and order more products.
So, encourage your customers to buy more by customizing your checkout page by letting them add multiple products at ease.
Offer A Secure Checkout Payment Gateway At Checkout
When the customers have the self-assurance that their contact and billing information is safe and secure, they will trust more and buy with the assurance that their personal information is in a safe hand. So, always offer a secure checkout payment gateway to deliver a great shopping experience.
Now, when you are pretty familiar with the importance of WooCommerce checkout page customization, it’s time to move on and take a close look at how this process goes on and how you can implement these techniques to your checkout page.
ALSO READ: Checklist To Create The Best WooCommerce Website
How To Customize Your Checkout Page Using Checkout Manager Plugin
To make the procedure simple and clear-cut, we have installed the WooCommerce Checkout Field Editor and Manager plugin, which provides next-level editing of checkout fields with ease.
But before we go any further, l would like to preface you with the checkout field editor and manager plugin and what wonders can it do to your checkout page customization.
So, let’s get down to it.
WooCommerce Checkout Field Editor and Manager Plugin
Checkout Field Editor and Manager plugin is a product by Acowebs, a renowned and award-winning Software Company that specializes in WordPress and WooCommerce related plugins.
It was manufactured in the hands of experts; therefore, no doubt about its legitimacy and functionality.
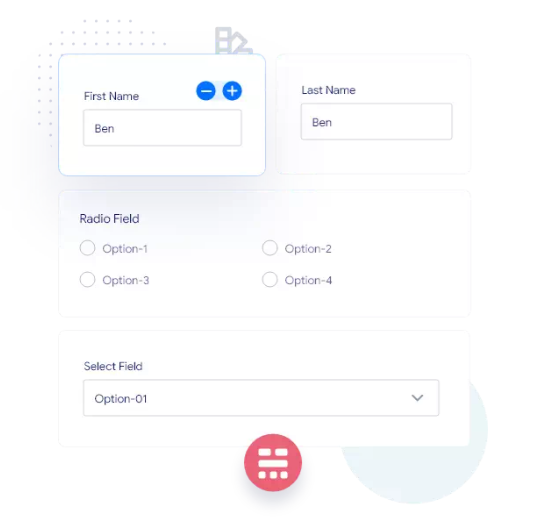
Now talking about the features of Checkout Field editor, it is the most convenient and efficient WordPress plugin that comes with complete management tools to edit the checkout pages. The robust drag and drop form builder that makes adding, modifying, or hiding any default WooCommerce checkout field like a breeze.
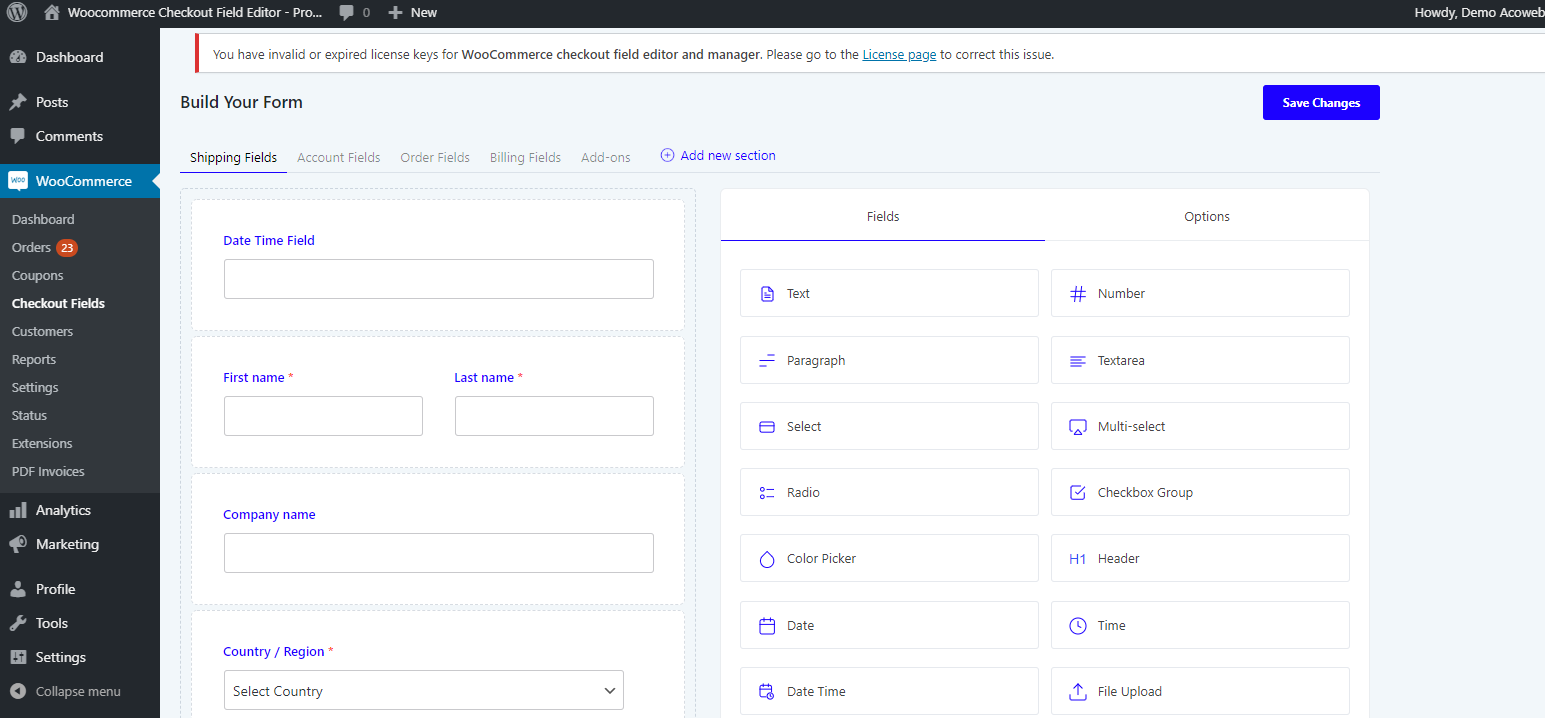
You will have options of more than 7+ custom checkout fields in the free version, and in the pro version, you will get 16+ custom field types.
Moreover, you can place a custom section on more than 13 places on the checkout pages. Also, the users can add custom fields everywhere in each section without any restrictions. Such as at the beginning of the end or in the middle of the default fields.
The pro version comes with more functionality where you can play around with different options.
This plugin comes in two versions; free and premium. The free version of WooCommerce Checkout Field Editor can be downloaded from the WordPress repository, and the premium version has four tiers. You can go with whichever suits you the most.
Let’s dig out deeper and discuss some of its key features in detail.
Robust Drop-Down Form Builder
With the Checkout Field Editor, you will get the freedom to manage all of your fields. The robust dropdown form builder can quickly set your fields in your desired order, or you can rearrange the existing fields in your preferred mode. Adding new fields or repositioning existing fields can all be done in a breeze.
One-click Field Edit window
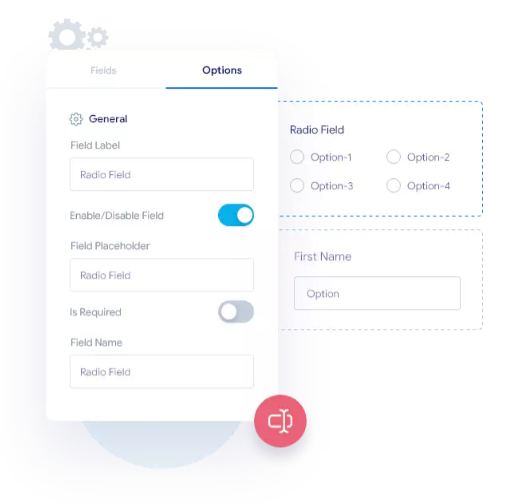
Each field has its setting area where you will get the general, advanced, and conditional option of that particular field. So, when you click on the “Options” tab, and edit option of that field will pop-up at the side of the window where you can easily edit its features.
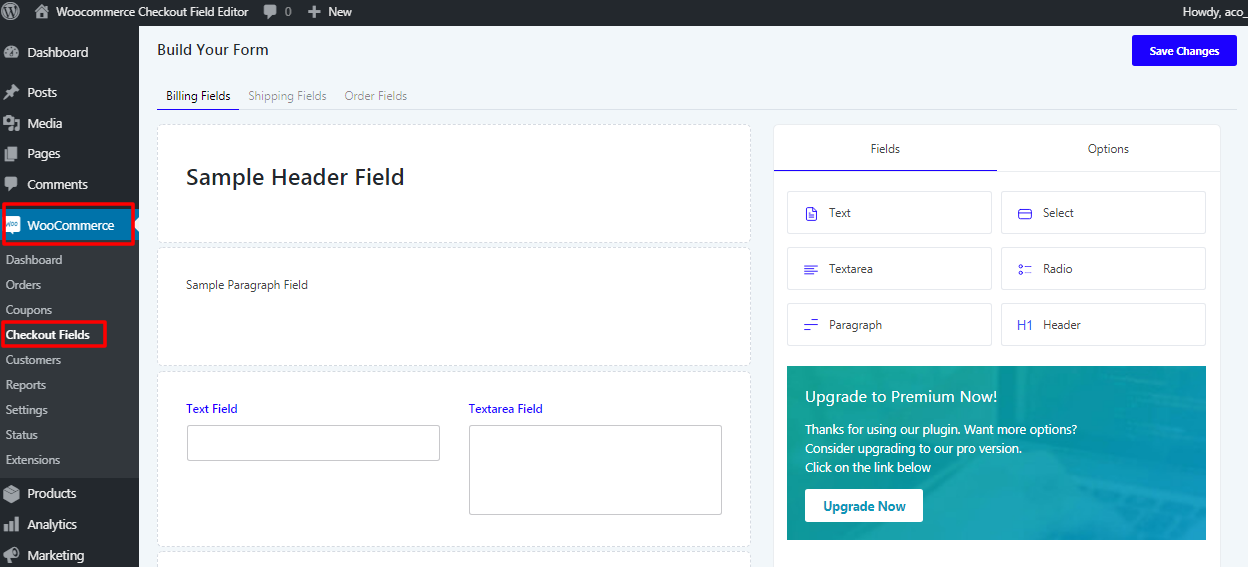
List Of Fields Supported By Checkout Field Editor
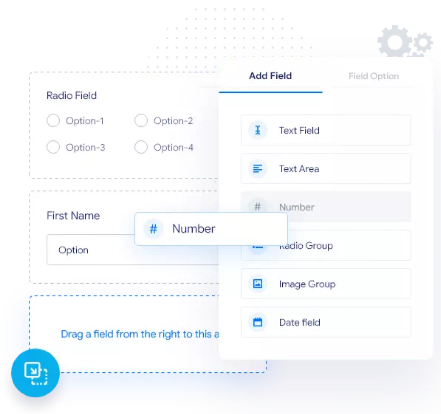
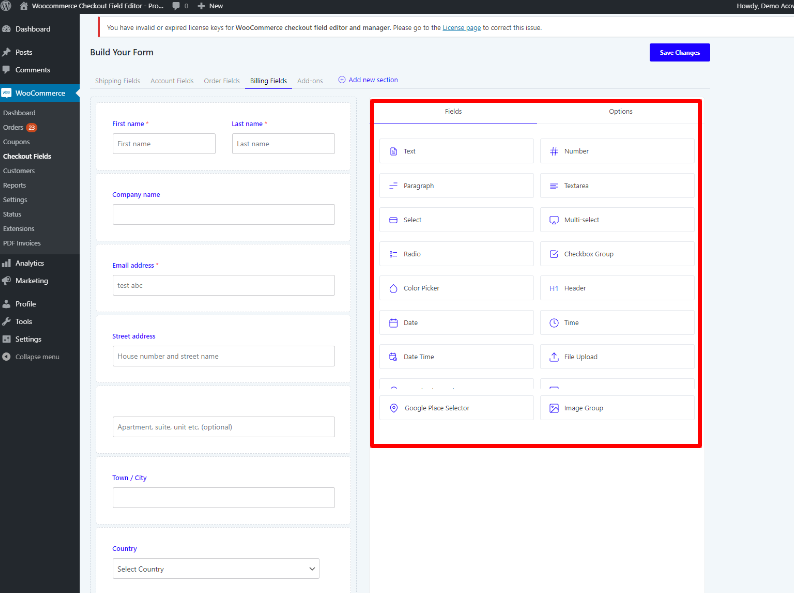
When you start editing your checkout form, a list of custom form fields can be seen on the right side of the editing section, where all of the supported fields are visible. You can choose any of these fields and drag’n drop in your required position. Here is the list of the supported fields.
Edit Default And Newly Added Fields

You can manage the fields by editing any existing default fields with Checkout Field Editor plugin, such as first and last name fields, but only limited editing is allowed for the default fields. You can only edit these default fields but cannot delete them altogether; however, if you are not interested in displaying these fields, you can simply disable them.
The newly added fields come with full authority to edit, you can easily edit, disable/enable them or even delete them if not required.
Conditional Logic Supported Field
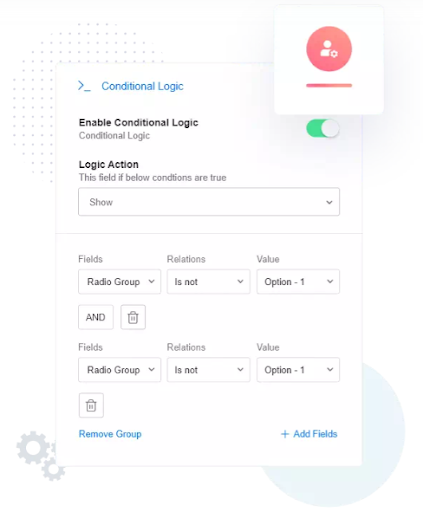
Conditional Logic is a smart feature that creates an illusion of short form because people run far away from filling out long forms. So, with conditional Logic, you can hide your fields smartly, and these will be visible only when your customer takes certain actions or fulfills certain conditions or groups of conditions you created.
Consider it as creating conditional branching, where certain fields will appear or hide based on the conditions you set. These conditional logic fields and sections can be added to the cart, user role, and cart subtotal and at cart total.
Add New Checkout Fields On Checkout Forms
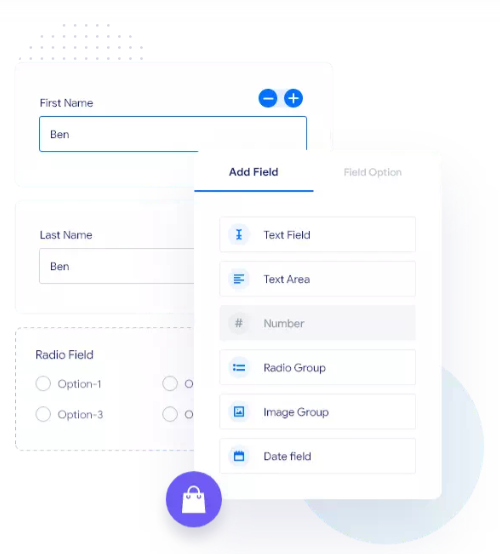
The prime feature of this checkout Field editor plugin is to provide you a quick set solution to add more functional fields relevant to your business. So, you could figure out what specifically your customers need from you.
As I have mentioned earlier, if you are running a jewelry business with customized jewelry options, then you must need a separate field where the customers could add their notes related to their custom jewelry order, which they want to engrave on their jewelry.
Or, if you are offering customized gifts services, then you can add a separate field where the customers could add if they need any gift wrapping or not or if they need any specific color or ribbon wrapping. You can place in as many fields as you like to add using this awesome checkout field editor plugin.
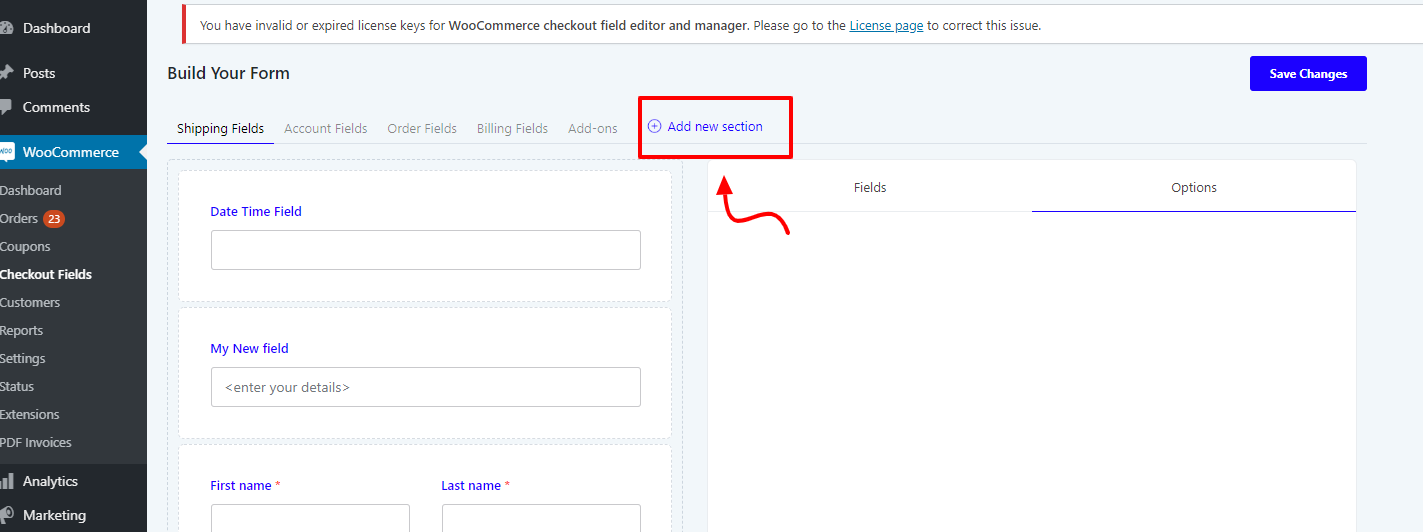
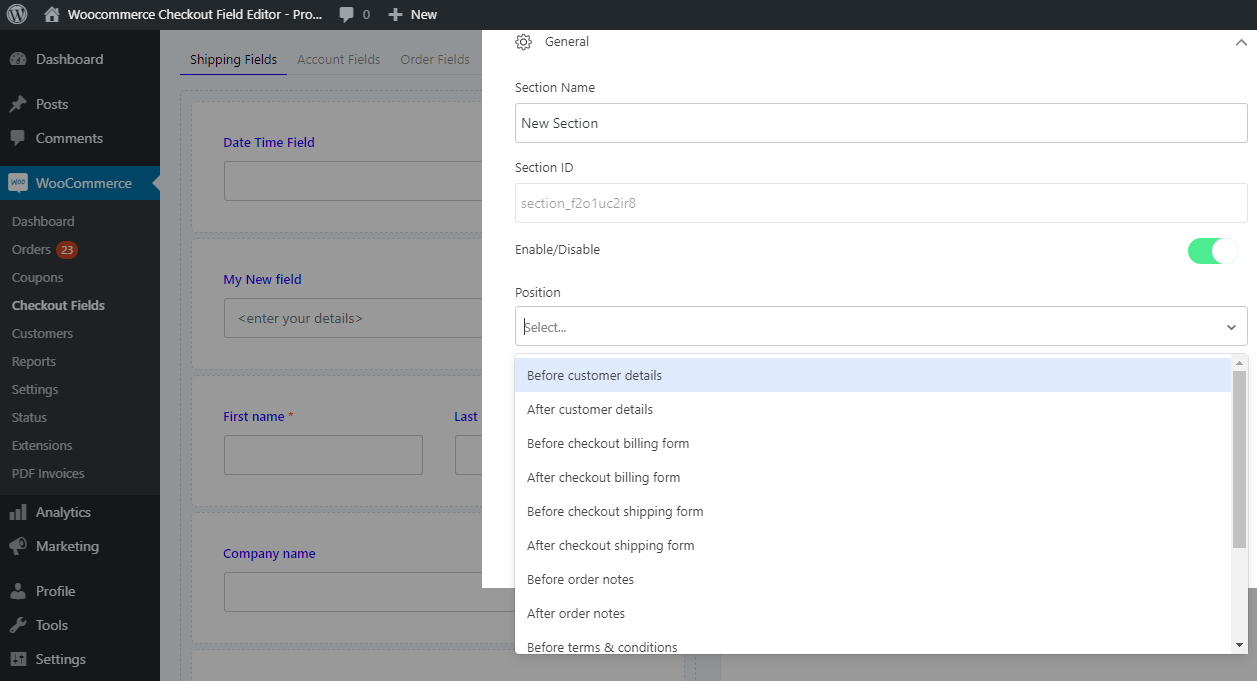
Add New Sections
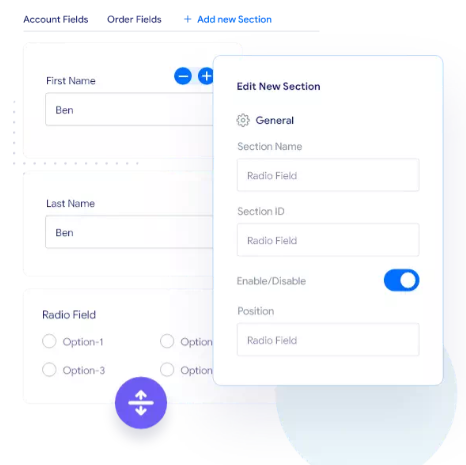
Other than just adding fields, you can also add new sections along with just the address and billing section. However, this is a pro feature and only available with the pro version.
Place Sections In Different Areas
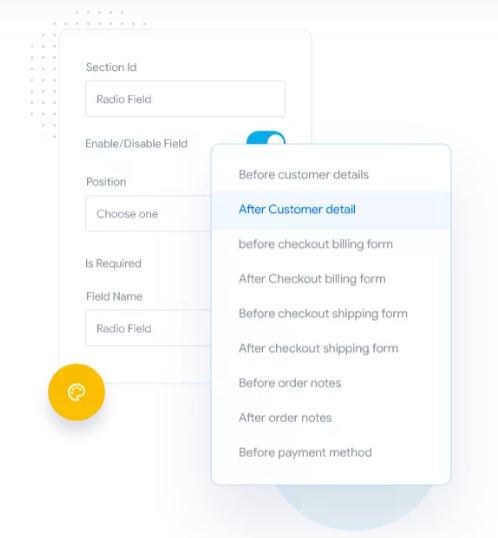
Here is another interesting feature of this plugin that you are not bound to place your section at any specific place on your checkout page. You can place it at more than ten different places, such as before and after customer details, after checkout billing form or before order notes.
Re-order Display Of Fields And Sections
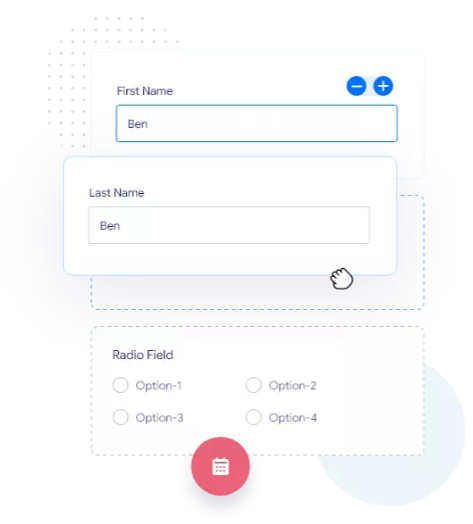
The fields can be displayed in any order; you can drag-and-drop the fields in any desired order in the backend. Likewise, the sections can be rearranged using the edit window of that section.
Enable/ Disable Checkout Fields And Sections
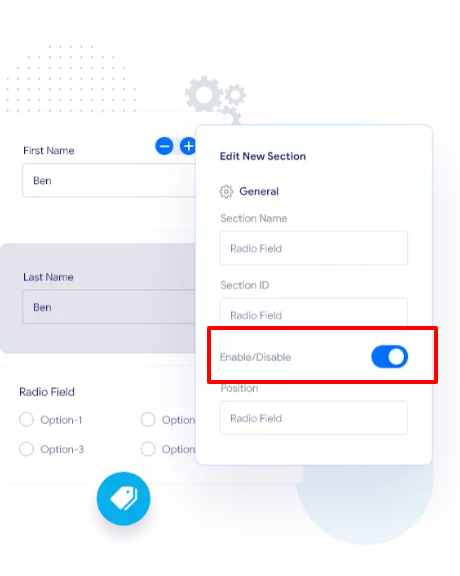
The Enable/ Disable feature lets you hide or display any field. The option is located at the edit window of each field.
One-click Duplication Of Any Field And Section
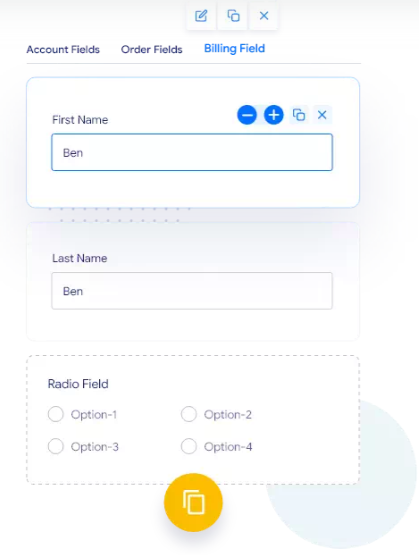
This time-saving feature will let you duplicate any section or field for your convenience. You can see a duplicate button option on top of the field once you hover over the window.
Show/Hide Fields On The Order Detail Page And Order Email
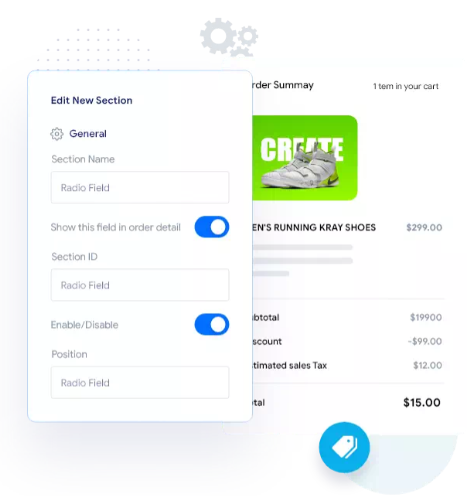
You will get an option to show or hide any field in the order details or order email. You can locate this option in the advanced tab of each field’s edit option.
Adjust To Show Fields In Two Columns
You can change the display of your fields in two columns or adjust the field height or width on the checkout page. To fine-tune the width and height of your fields on the checkout page, you will find an option when you hover over the field you want to adjust.
Now, when you have realized how functional the Checkout Field Editor plugin is. And how much help can it be to set a hassle-free checkout page, let’s move on to my favorite section where I will show you the practical aspect of using the Checkout Field Editor plugin.
ALSO READ: Customizing WooCommerce With A Child Theme: A Simple Guide
How To Customize Checkout Page Using WooCommerce Checkout Field Editor And Manager Plugin
First off, you will have to install WooCommerce checkout field Editor Plugin to get started.
Installation Of WooCommerce Checkout Field Editor Plugin
Installation can easily be done while taking these steps;
- Go to Dashboard > plugin > Add New plugin
- Type in the search bar “Checkout Field Editor and Manager.”
- Click on the install and then activate it.
- You will find the plugin in the left menu bar under the WooCommerce tab in the Dashboard area
That’s all, you are done with your installation.
Now, we will create a custom checkout form page to test the functionalities. Where we will add/ remove custom fields, add sections, and check out how things go on practically.
To take a close look, you can take advantage of Backend Demo available on the wordpress.org.
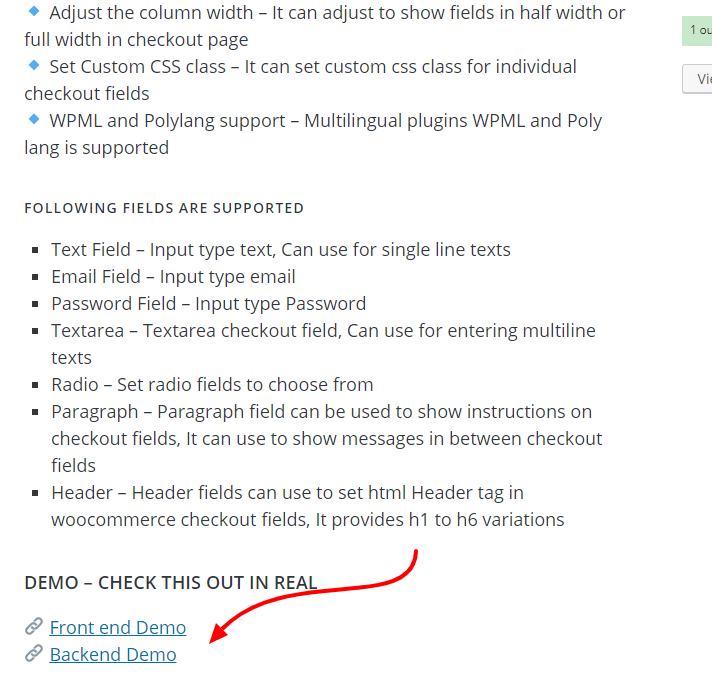
Once you click on the Backend Demo, you will enter into a demo site where you can test all the functionalities available in the free version.
Add/Remove The Field In The Checkout Page
On the right side there are multiple fields available to be added. You can simply drag’n drop any field from the right side column in the checkout field form on the left side.
I have added a text field in the form, and when you hover over the field, you will see the edit options of that specific field. When you click the edit option, an edit window will pop up alongside the form. Now, here you can edit all the settings related to that field.
ALSO READ: Top 8 Rich Snippets For WordPress
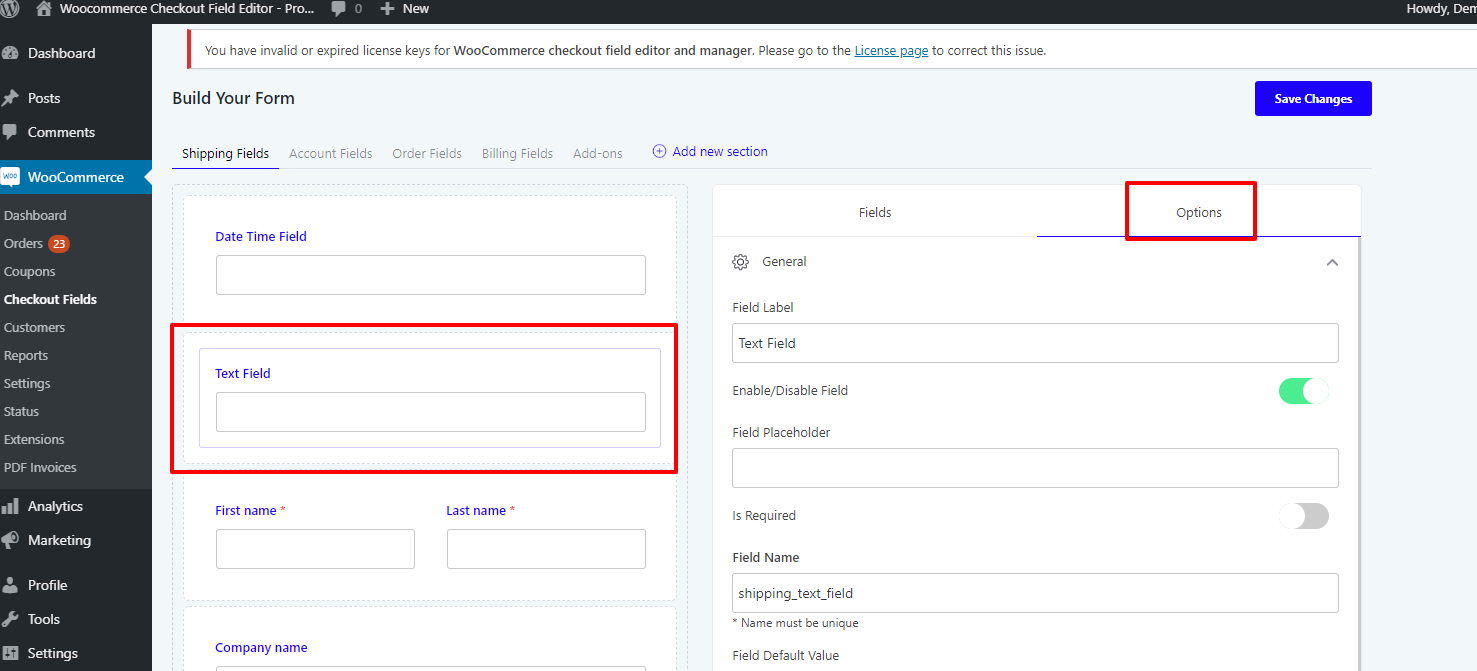
Here are the field options which can be edited.
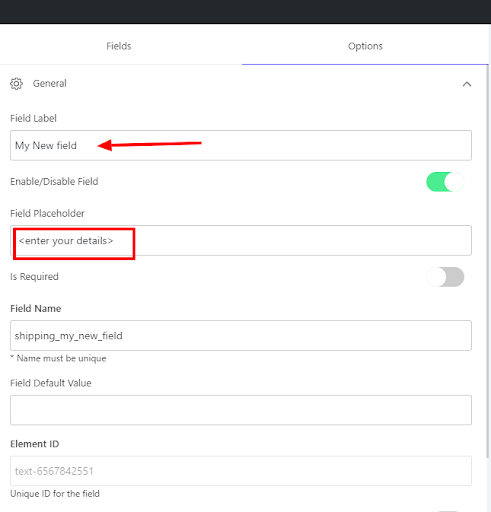
Name your field whatever you like to, as I have added “my new field,” then next, you can hide or display this field with the Enable/ disable option below the field name.
In the field placeholder, you can enter any text where you want your customer to add details.
Then the “is required” option will make it a compulsory field to be filled by the customer.
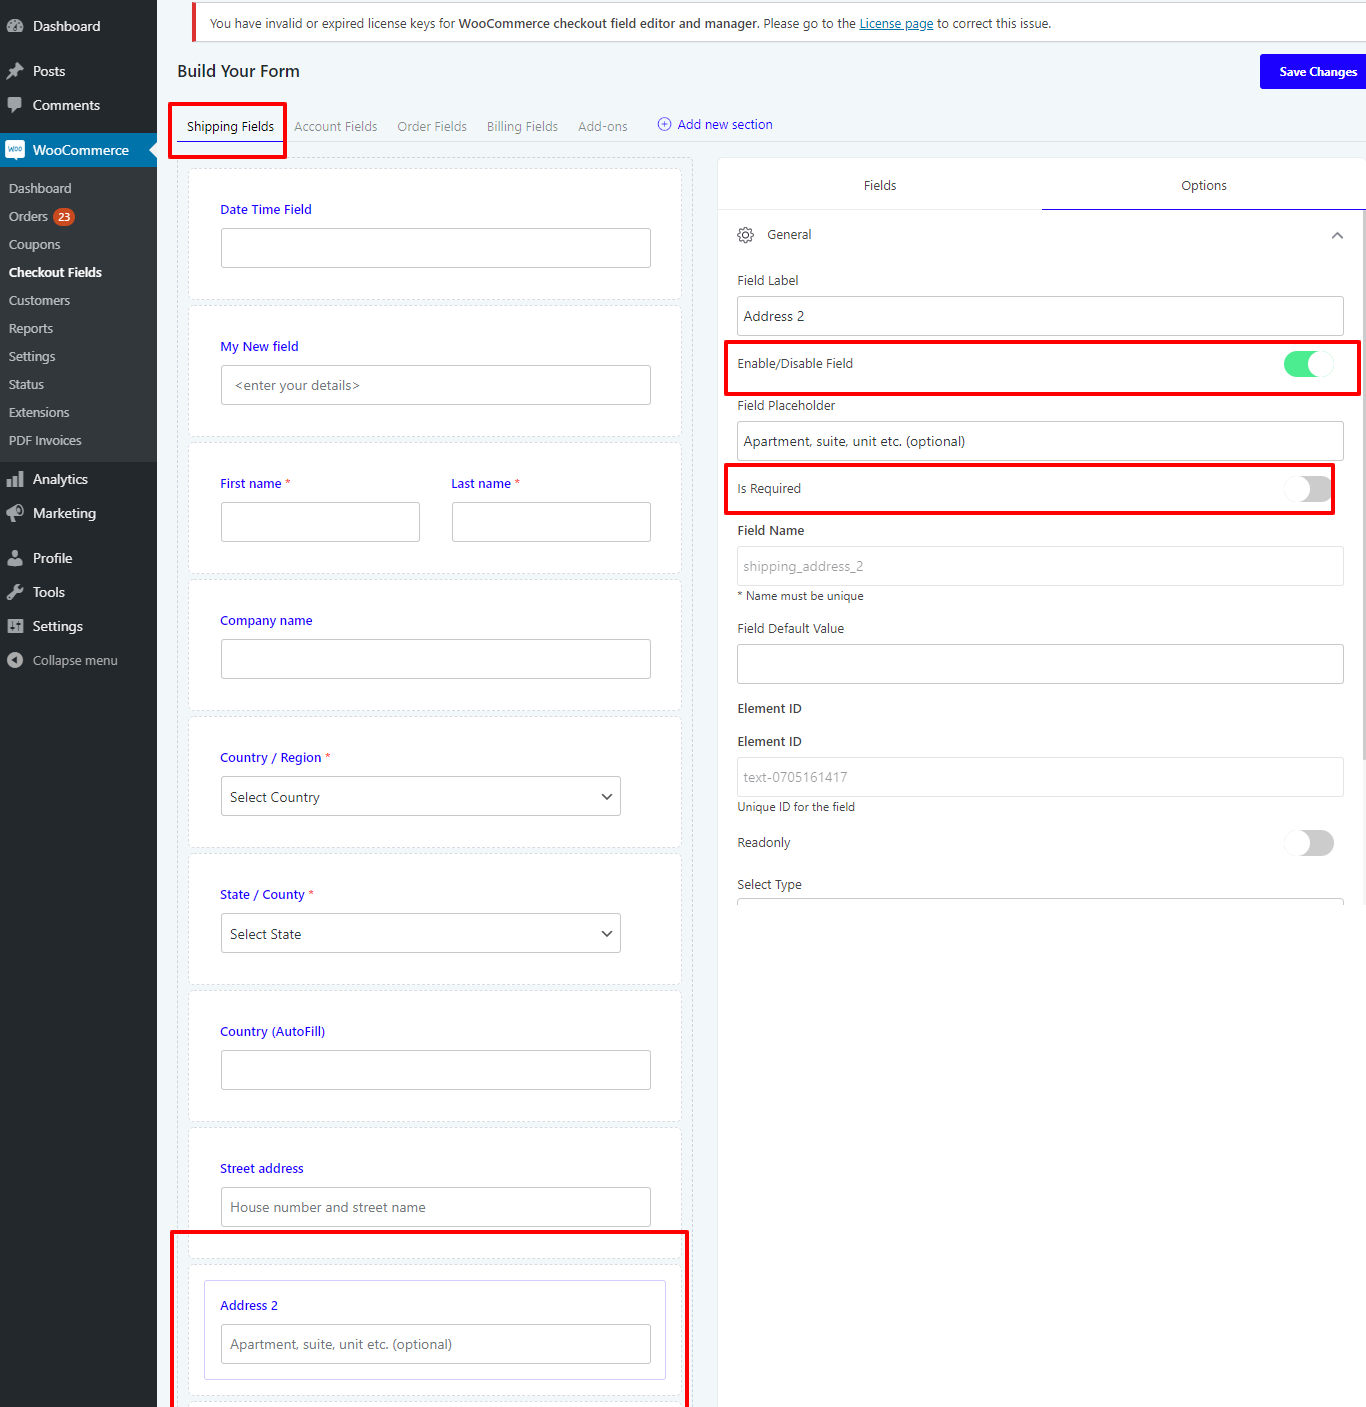
Shipping And Billing Address Field Editing
Often we do not require any shipping or billing address, so you can click on the field and then click on the enable/ disable option. Also, you can hide all other unnecessary fields which are irrelevant to your product.
Such as, if you are selling digital goods, then there will be no need for any billing address, you can hide this field by clicking on the enable/ disable option.
ALSO READ: How To Customize WooCommerce Product Page To Boost Your Sales
How To Show Fields On The Order Detail Page And Email?
If you like to show or hide some fields on the order detail page or in the email sent to the customer, you can do this by enabling some options in the advanced tab.
Click on the field you want to include in the order detail page and then go to the advanced tab options of that field and checkmark the “show this field in the order detail page” option
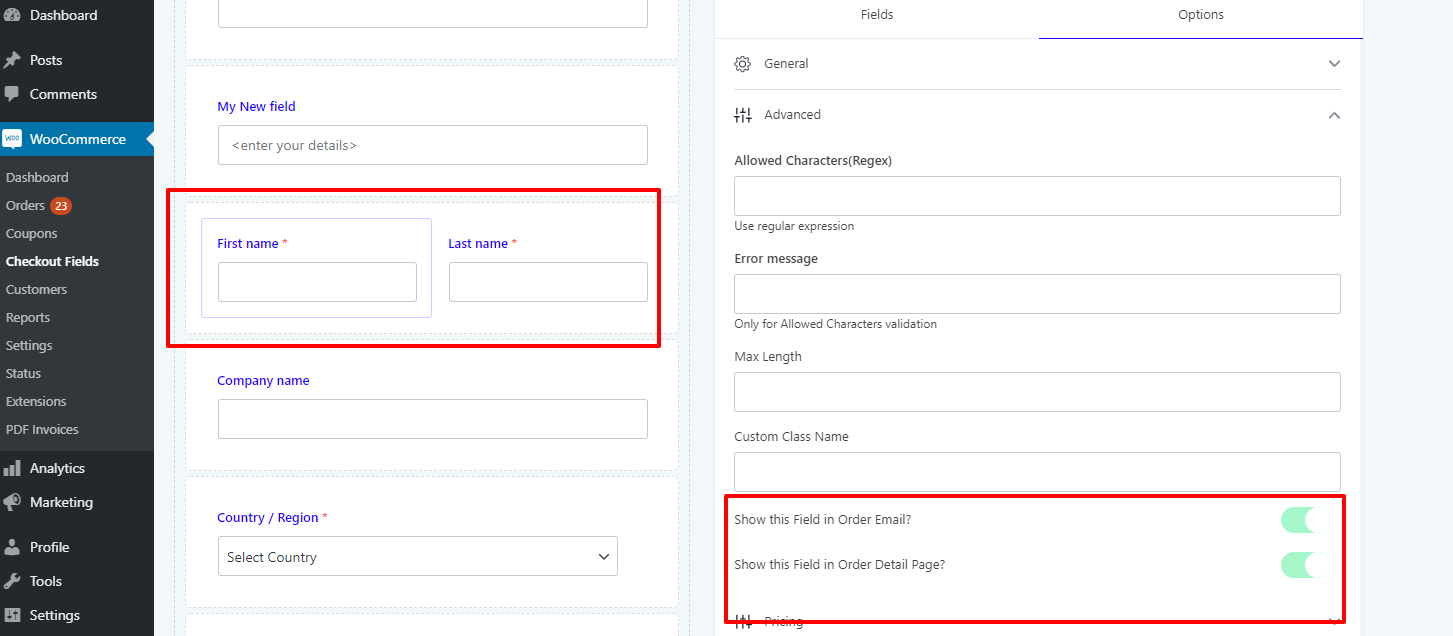
I want to include First name and last name field in the order detail form and the email so when I click on the field edit option, at the bottom of the options sections, there is an advanced tab, where I have enabled “show this field in order email” and “show this field in order detail page.”
Add New Sections And Place Them On Ten Different Areas On The Checkout Page
You can add a new section other than the general, shipping, and billing sections and place them wherever you like to add them. When you hover over the added section there, you will see edit options. You can add the section before the customer’s details or after customer details or any other recommended option.
How To Add Conditional Logic
Suppose you like to add any conditional logic to any of your checkout form fields. You can easily access that option under the advanced tab in the edit option of each field.
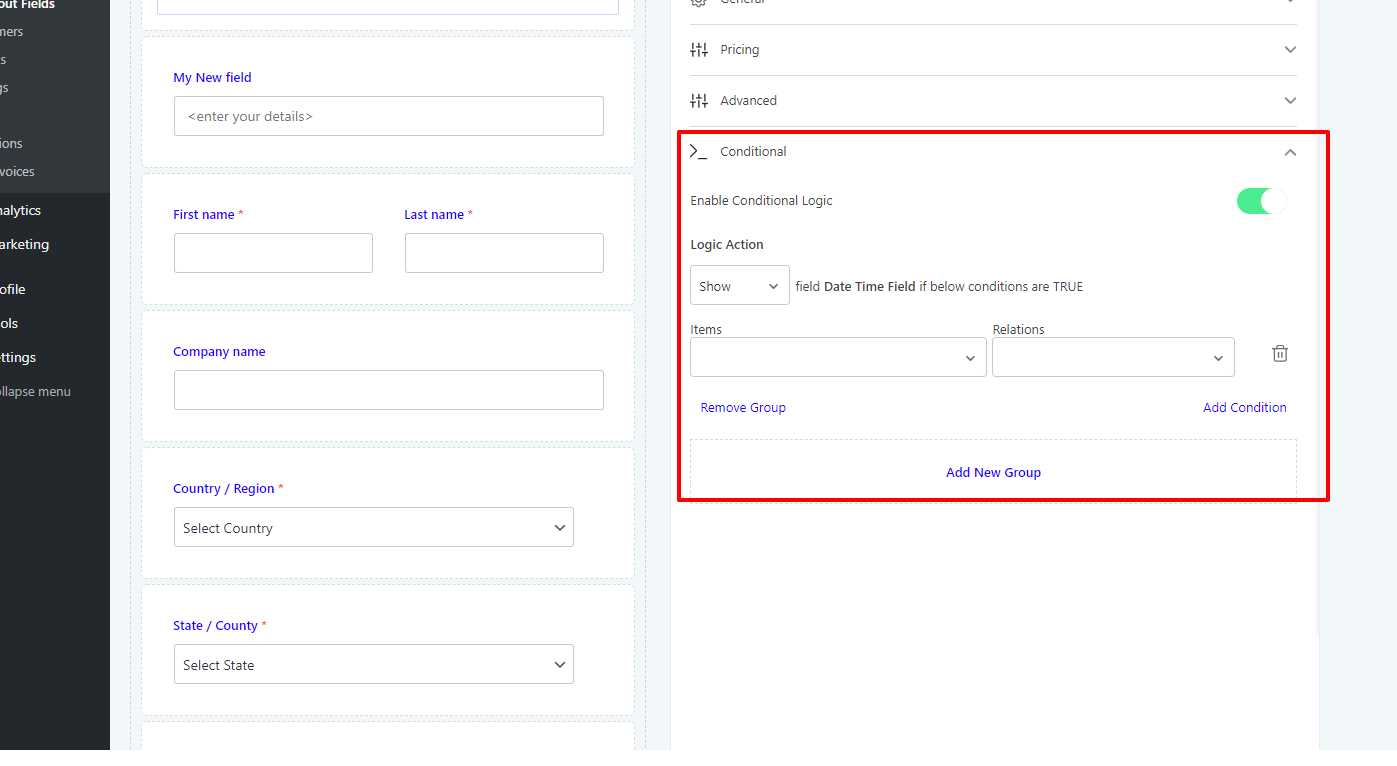
Here you can select the field from the dropdown menu and then set the relations with that field that you want to make as a condition, and you are done with adding conditional logic to your field.
Pricing Options
The WooCommerce checkout field editor is available with a free version and a pro version. The pro version has four tiers with all the pro features starting at $29/ year for a single site.

Final Verdict
So, here ends our tutorial, I hope you got a better picture of how to customize your checkout form easily. Woocommerce Checkout Field Editor is the most convenient and powerful field editor with almost all essential features one can find in a premium checkout plugin.
So, I highly recommend giving this plugin a shot. Now, it’s your turn, do write in the comment section, which feature is more exciting and helpful to you? And are you going to try this checkout plugin on your WooCommerce site or not?
Acowebs are developers of WooCommerce Discount Rules that will help you add bulk discounts to products on your stores. It also developed the plugin for adding various extra product fields which is called WooCommerce product addons, that are lightweight and fast. You can easily update your store with these add-ons and enjoy a hassle-free experience, check out the best options for additional WooCommerce product options.