
















 Login
Login
 Cart
Cart
Starting an online clothing store used to mean relying on third-party platforms like Etsy, Instagram DMs, or Shopify – each taking a cut of your profits and limiting your control. You don’t own your customer data, you’re locked into their payment terms, and your commission fees eat into your margins.
There’s a better way.
WordPress combined with WooCommerce gives boutique clothing brands complete control over their online store, full ownership of customer data, and the flexibility to scale without vendor lock-in. WooCommerce powers approximately 38% of online clothing stores worldwide, and for good reason: it’s free, extensible, and built specifically for e-commerce. In this guide, we’ll walk through every step needed to launch a professional, conversion-optimized clothing store from scratch – from domain registration through payment processing, product variations, discount strategies, and proven growth techniques. By the end, you’ll have a fully functional store ready to accept orders and grow your clothing brand.
What You Need Before Starting
Before you touch WordPress, gather these essentials:
- Domain Name: Pick a short, memorable, fashion-relevant domain. Examples: VintageThread.co, ModernHemline.com. Aim for .com if possible; it’s the easiest for customers to remember and trust. Expect to pay $10–15 per year.
- Web Hosting: You need a host that supports WordPress with managed installation and one-click setup. Top recommendations: SiteGround (excellent customer support, starting ~$3–4/month for the first term), Hostinger (budget-friendly, fast infrastructure), or Bluehost (WordPress-optimized, official partnership). Budget $40–100 per year after the first term.
- SSL Certificate: Required for payment processing and trust signals. Most modern hosts include SSL free with your plan. Verify this before purchasing hosting.
- Product Photography: Fashion is visual-first. High-quality images directly affect conversions. Invest in at least:
- 3–5 photos per product (front, back, detail, styled on model, flat lay)
- Consistent background and lighting
- Clear, natural colors (no heavy filters)
- A smartphone and natural window light can work; a proper photoshoot is ideal for serious boutiques
WooCommerce Plugins: Free. This transforms your WordPress site into a full ecommerce store with product catalogs, shopping carts, checkout pages, and payment processing.
Why you should start a clothing store website
In this digital age, every business is using the online platform to promote themselves. If you are interested in clothing and fashion but don’t have enough capital to set up a physical store, an online store is the way to go. Since Covid, the popularity of online businesses is on the rise, thanks to the range of benefits they offer over a traditional brick and mortar setup:
- Low startup costs – skip the rent, renovation, and store fittings a physical shop demands.
- Global audience – sell to customers anywhere, not just those near your target audience in one location.
- Sell 24/7 – your store stays open even while you sleep.
- Build your own brand – shape your identity through design, tone, and content instead of shelf space.
- Full ownership of customer data – track behavior and preferences to personalize marketing.
- Easier marketing through SEO and social media – reach buyers without a hefty ad budget.
A brick and mortar clothing store takes up space, needs upkeep, and depends on footfall. An online store makes up for this with high quality images, and while you’ll still need a warehouse, you can skip the prime real estate and pricey store aesthetics altogether.
Now, we will move on to the process to start an online clothing store usingWordPress, WooCommerce and otherplugins.
The first step is buying a domain name.
Step 1 – Get Your Domain & Hosting
The domain names are mostly the name of the brand itself. Examples of how a domain name looks are google.com and acowebs.com. The part that comes after www in the website address is the domain name. A domain name has two parts in it,
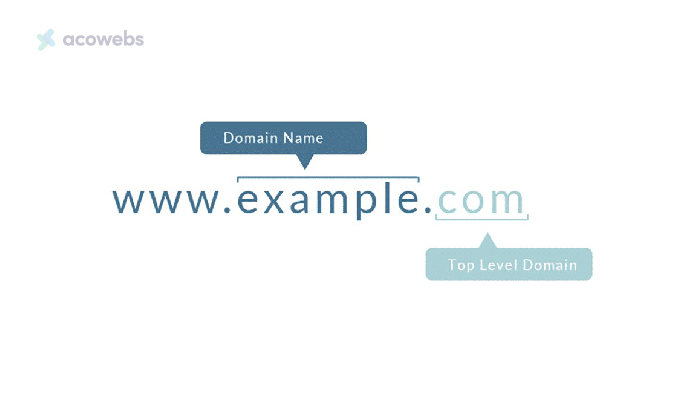
Second-level domains – This is the name associated with your website. This should be chosen carefully as this will be your brand identity. In acowebs.com, acowebs is the second-level domain.
Top-level domain – The top-level domain is the extension that appears in the domain name. This appears after the dot in your domain name. In acowebs.com, .com is the top-level domain. There are various types of top-level domains such as, .com, .net, .gov, .edu, .org, etc.
So, getting a domain name is an important step in website creation. Here is how you can buy a domain name.
- Choose a Domain Registrar – the first step in buying a domain name is to choose a domain registrar. Domain registrars are where your domain names could be registered and managed. There are several domain registrars out there but make sure to choose from a domain registrar accredited with the Internet Corporation for Assigned Names and Numbers (ICANN).
Also, make sure to check out the features of the registrar, like pricing, customer support, etc., before you choose the right domain registrar. Hostinger, GoDaddy, Namecheap, and Hover are some of the popular Domain Registrars. If you are confused about choosing the right domain registrar, go for Hostinger, as it is a popular and trusted ICANN accredited domain registrar with over 100 domain extensions to choose from.
- Check the availability of your domain – Search for your preferred domain name and check if it is available for use. Various tools are available to check the availability of your domain names.
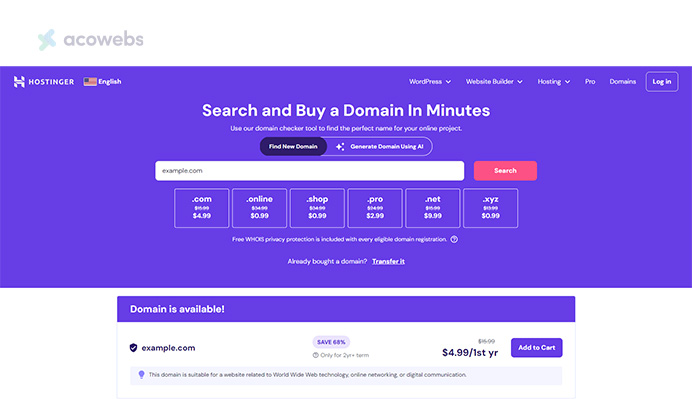
- Purchase the domain name – After finding a suitable domain name, register it with the domain registrar. The price range to buy a domain name can vary and start from $10 or even cheaper. Hostinger provides it for 4.99$ for the first year.This can vary according to the registrar you choose. Confirm the registration period and make sure to go with the auto-renewal feature to avoid chances of losing your domain name in case you forget to renew it after the registration period ends.
The next step after buying a domain name is to find a hosting provider. A hosting provider helps with hosting your website and the related data on a web server.
Hosting a website, and maintaining it yourself requires some advanced technical skills. Hence choosing a hosting provider will be better to ensure your website maintenance and security. GoDaddy and Hostinger are some of the popular hosting providers. Hostinger’s hosting plans even come with a free domain for the initial year and this can be a good choice for beginners. Here are a few steps in buying a hosting,
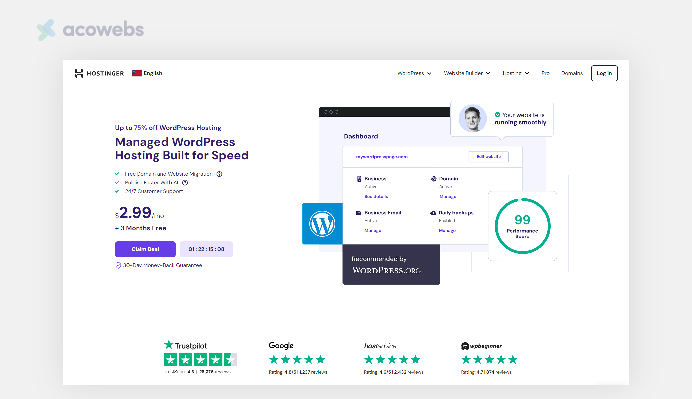
- Choose the hosting plan from the various hosting plans provided by the hosting providers. Hosting providers like Hostinger provide various plans with various features like premium and business. There are plans to manage the WordPress websites too.
- Once you have selected your hosting plan, select the period of hosting your website and finally purchase it.
- After purchasing your hosting , migrate your existing website to the hosting provider or create a new website.
Connect domain with a hosting plan
After purchasing a domain and hosting, now you need to connect the domain with the hosting. This is done so that your website is visible to the users on the internet. So, when your domain is entered, the users are directed to the server hosting your website, and makes the website accessible.
How to Connect a domain to hosting in Hostinger : https://support.hostinger.com/en/articles/1863967-how-to-point-a-domain-to-hostinger
The first step of connecting a domain to the hosting is to change the name servers to the name servers of your hosting provider. This could be changed in the DNS Settings. The nameservers of your hosting provider will be sent to you while you purchase the hosting plan. If not, contact your hosting provider for the nameservers.
Install WordPress
Now after you have your domain and hosting plan, start building your website. You can either build your website on your own or use WordPress to easily build your website. Contrary to website builders like WordPress, custom made websites are more costly to put up and require you to have technical knowledge like coding. This makes website builders like WordPress a popular choice when it comes to website building.
WordPress is an open-source Content Management System (CMS) that helps with the creation, management, and publication of websites, ecommerce stores, and blogs. Here is a guide on how to install WordPress and start your website building.
WordPress can be installed manually or can be set up using a hosting provider.
In the previous steps, we have discussed purchasing the hosting plan. Setting up WordPress manually can be a lot of work to do and an easier alternative would be using Hostinger to install the WordPress. Lets guide you through installing WordPress on one of the popular hosting providers, Hostinger.
- After signing up on Hostinger and choosing the hosting plan, go to the website option and select Add or migrate a website.
- Then, select the hosting plan that you want to add your website to.
- Select the website type from the list of options provided.
- In the next step, you will see two options: create new website, and migrate website. As we are creating a new website, select the former choice. The latter choice is when you have already created a website.
- Choose WordPress in the Select a platform section.
- Next, you will need to create WordPress login details. Here, you will be required to select the preferred language, provide an email address, and provide a password of your choice. Click continue.
- Next you will be asked to select plugins. From the list of options, select the plugins and continue or you can skip this step and save this for later.
- Like the previous step for selecting plugins, you will be asked to select a template, and create content on the website using the AI Text Generator in the upcoming steps. You can finish these steps and click continue or skip and save them for later.
- Name your website is the next step. Here, you will have two options: Choose a Domain, and Use an Existing Domain. Select the former option to use the domain that is registered with Hostinger or select the latter if you want to use the domain registered with another domain register.
- After selecting the domain, you will be directed to the Finish Setting Up page. Once you click on Finish setup button, WordPress installation on your domain will be completed along with the installation of the free SSL certificate.
- Once you are done, you will get the option to edit or manage your website.
Install the theme on WordPress
WordPress comes with a custom theme that can be customized to alter the designs and functionality of the website. You can change the themes according to your preferences and brand identity. With themes, you can change your website’s overall appearance and functionality without having to code them. WordPress has a list of themes to choose from. We recommend you download the Astra theme that is suitable for all kinds of websites. Astra is a popular free WordPress theme that is fast and easily customisable. Here, we will explain how to install a theme on WordPress.
Step 2 – Choose a Fashion Theme
Your theme controls your store’s appearance and user experience. While free themes work, premium themes are optimized for clothing e-commerce.
Top Recommendations:
- Astra (free with paid extensions): Lightweight, fast, excellent for fashion
- Flatsome ($39 one-time purchase): Industry-leading conversion rates, built for clothing stores
- Neve (free with paid pro version): Mobile-first, clean design, great for boutiques
Installing Flatsome (Recommended)
- Go to Appearance → Themes → Add New
- Click “Upload Theme” (you’ve already purchased a license)
- Upload the Flatsome zip file
- Click Activate
- After activation, complete the demo import:
- Go to Flatsome → Demo Import (via theme dashboard)
- Select “Fashion Store” or similar template
- Click Import
Post-Installation Customization Checklist
Once your theme is active, configure these brand elements:
- Logo: Appearance → Customize → Site Identity → Upload Logo
- Brand Colors: Appearance → Customize → Colors (primary, secondary, accents)
- Typography: Appearance → Customize → Typography (choose readable fonts for product titles and descriptions)
- Hero Banner: Add a banner image on the homepage that communicates your brand promise
- Tagline & CTA: Create a clear call-to-action button (“Shop Now,” “Browse Collection,” etc.)

Here are the instructions on installing the Astra theme
To manually install Astra, go to the WordPress repository to download and install the zip file.
Make your website into an ecommerce store
After the above-mentioned steps, you will have successfully completed creating a website. But how do you make your website into an ecommerce store? The answer is WooCommerce! In the upcoming sections, you will learn how to transform your website into an ecommerce store.
What is WooCommerce?
WooCommerce is a WordPress plugin that helps transform your website into an ecommerce store. WooCommerce comes with features like order and inventory management, secure payments, etc., necessary to manage an ecommerce store. To kickstart your online store, WooCommerce is an affordable choice with many free features. The next section will take you through steps in installing WooCommerce and other plugins necessary for your online store.
Step 3 – Install WooCommerce plugin
- After the WordPress installation, go to the dashboard and select add new plugin from the plugins tab on the left.
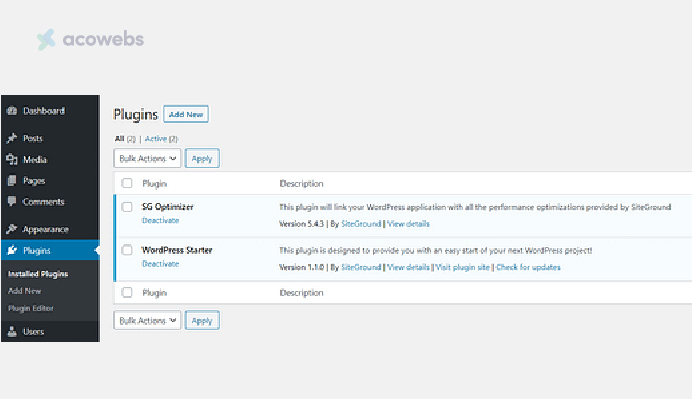
- Search for woocommerce on the search bar and select the WooCommerce plugin and click on install button and then activate.
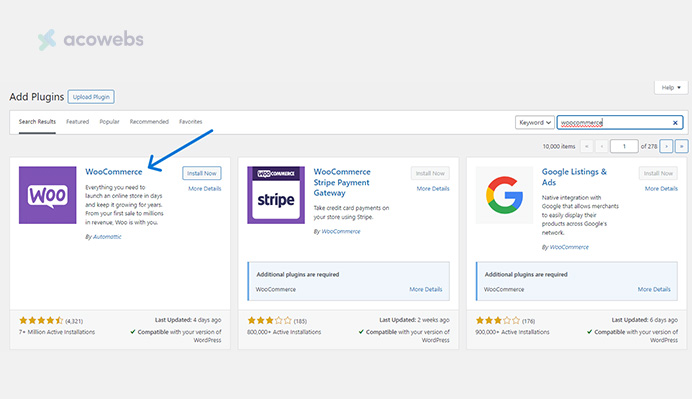
- Complete the setup by filling in the details on the WooCommerce tab. Click on Let’s go!
Additionally, you can add other WooCommerce plugins to add extra functionality and customize your store. WooCommerce recommends plugins which you can select or skip.
Install Template for Woocommerce
To instantly transform your website into an ecommerce store you can make use of templates that are custom built for an ecommerce store. Earlier, we discussed the Astra theme for WordPress. The Astra has starter packs, which have various templates pre-designed for different types of websites.
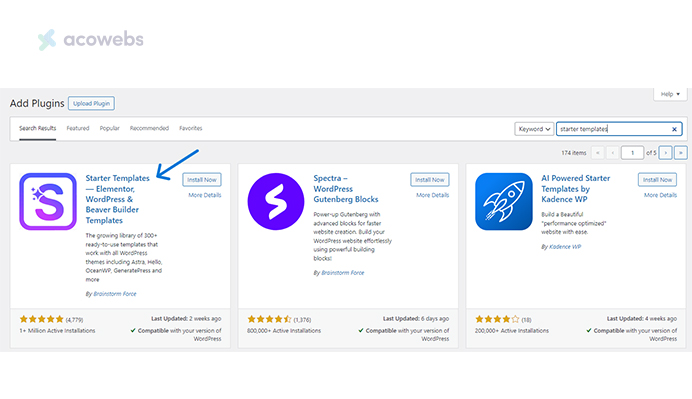
The Astra starter pack has a template pre-built for clothing stores with features like a shopping cart, product gallery, payment systems, etc., which helps transform a website into a fully-fledged ecommerce website. The Astra starter pack comes with free as well as paid premium templates. For a starter, these templates are really beneficial as they can be used to customise websites even without possessing any technical skills. These are easily customisable and save a lot of time.
Click on the link here to download the free Starter Templates
To use the premium version, you must have either the Essential Toolkit or Business Toolkit.
Step 4: Add Your Clothing Products
Now, let’s populate your store with products. This is where the magic happens.
Add a Product:
- Go to Products → Add New.
- Enter the Product Name (e.g., “Midnight Navy Linen Shirt”).
- Write a detailed Product Description that includes:
- Fabric content and weight (e.g., “100% organic linen, 150gsm”)
- Fit description (e.g., “relaxed fit, great for layering”)
- Sizing notes (e.g., “runs large; we recommend sizing down”)
- Care instructions (e.g., “hand wash, lay flat to dry”)
- Upload Product Images:
- At least 3 images per product (more is better).
- Front view, back view, detail shots, and ideally on-model photos.
- Set one as the featured image.
- Under Product Data, select Variable Product (required for sizes and colors).
- Create Attributes:
- Add a Size attribute with values: XS, S, M, L, XL, XXL.
- Add a Color attribute with values: Black, Navy, White, Grey, etc.
- Check “Used for variations” on both.
- Go to Variations and click Generate variations (creates every size/color combination).
- For each variation, set the Price and Stock Qty.
- Assign Product Categories: Tops, Bottoms, Dresses, Accessories, New Arrivals, Sale.
- Click Publish.
The Problem with Default WooCommerce:
By default, WooCommerce displays size and color as plain text dropdowns. A customer sees:
Size: [Select an option ▼]
Color: [Select an option ▼].
This is friction. In a visual medium like fashion, customers expect to see color swatches and clickable size buttons. High-end stores (H&M, ASOS, Zara) all use visual swatches. Your customers expect the same experience.
This is where Variation Swatches comes in our next step solves this problem completely.
Installing Additional Plugins
A WooCommerce store needs to be optimized for enhanced performance and customer satisfaction. You can install additional plugins like Variation Swatches For WooCommerce or WooCommerce Quick View.
Variation Swatches For WooCommerce
Variation Swatches For WooCommerce provides an intuitive user interface by displaying your product attributes in various styles instead of using the traditional dropdowns.
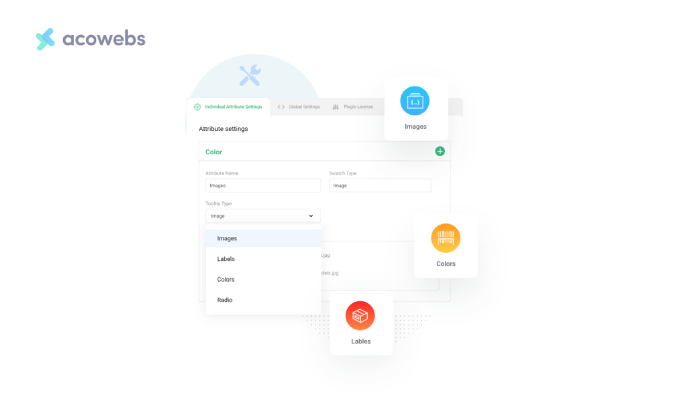
A clothing store can have different product attributes, such as size and color. This plugin allows you to present product variations in colors, images, labels, radio, and buttons. You can set color or image variations of the product.
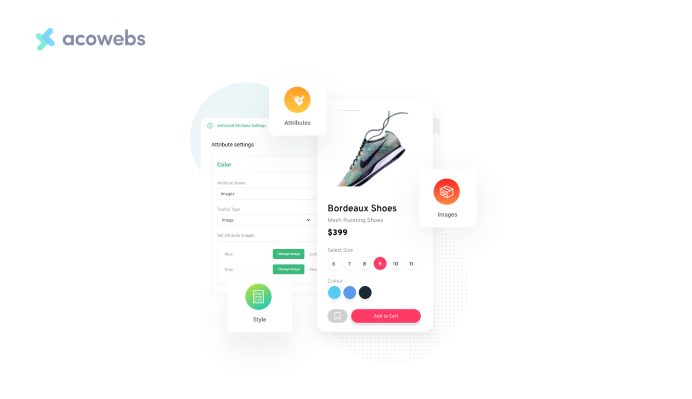
This plugin also lets you present the variation swatches in quick view boxes, allowing the visitors to purchase the item from different points on the website. On the product listing page, you can display swatches, making it easy for the customers to add products to the cart by easily selecting the product attributes from the product listing page itself. Your product page can be customised according to the theme of the product page using this plugin. The tooltip feature lets you change the tooltip style easily. It also has an image variation tooltip that displays the image as a tooltip for the selected products, which helps with getting a better idea of the product variation. There are various additional features that you can add to your product page with Variation Swatches For WooCommerce plugin.
WooCommerce Quick View
Navigating through each product page on a clothing website can be tiring at times, especially when the customer only wants a peek at the product. The WooCommervce Quick View plugin is used to get a quick view of the product and the necessary details within a product page.
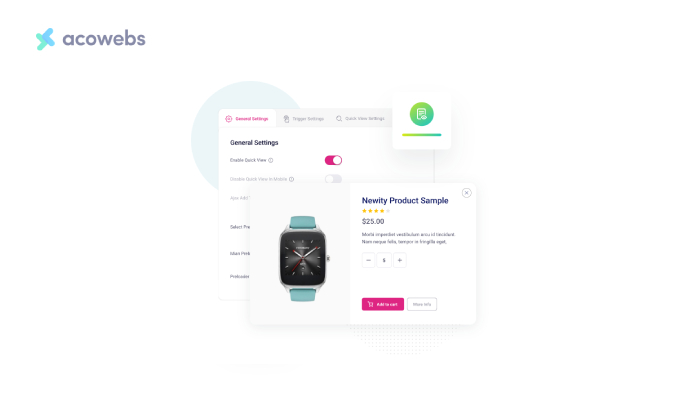
With this plugin, you can add a quick-view product list placed anywhere on the product page. The list can be navigated easily with the next and previous buttons within the quick view. Customers can also go to the detailed product page directly from the quick view.
The product view count increases every time a user visits a product, and you can list the products according to the view count. The elements on the quick view, from the font size and borders to icons, can be customised. In addition to these, the social media sharing option that can be displayed on the quick view allows users to share products across social media, thereby boosting sales.
With the Ajax functionality, customers can engage with the product by adding it to the cart directly from the quick view. They can also select the necessary product specifications from here. You can choose the elements to be added in the quick view, such as product name, images, size, price, add to cart, etc. This leads to a simplified and user-friendly shopping experience.
Step 5: Install Variation Swatches for WooCommerce by Acowebs
Why Visual Swatches Matter
Dropdown menus force customers to guess. “Navy Blue” means something different to everyone. One person imagines a light sky blue; another thinks deep midnight. Visual swatches eliminate guesswork.
When a customer can click a color circle and see the product instantly update to that color, they:
- Make faster purchasing decisions (less friction = higher conversion)
- Feel more confident about their choice (reduces returns)
- Have a premium shopping experience (increases brand perception)
Out-of-stock sizes and colors? With visual swatches, they’re automatically grayed out and crossed out so customers know what’s available without confusion.
What Variation Swatches for WooCommerce Does
This Acowebs plugin replaces default dropdowns with three types of visual selectors:
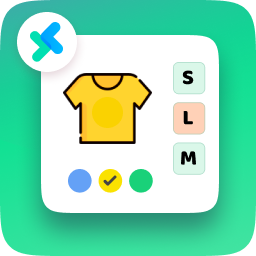
- Color Swatches Circular color dots that match each variation. Click the navy circle, and the product images instantly update to show navy. Hover over a swatch to see a tooltip (“Midnight Navy”).
- Image Swatches Small product thumbnails for each color. Click the swatch to see the product in that color. This is the premium experience seen on major fashion sites.
- Size Buttons Instead of a dropdown, sizes appear as clickable pill-shaped buttons: XS S M L XL XXL. Out-of-stock sizes automatically gray out and strikethrough.
These swatches work on both your product detail page and your shop/archive grid so customers can select a size/color before they even land on the product page.
Installation:
- Go to Plugins → Add New.
- Search for “Variation Swatches for WooCommerce” by Acowebs.
- Click Install Now → Activate.
(Or purchase the Pro version for advanced styling options at acowebs.com/variation-swatches-for-woocommerce/)
Setting Up Color Swatches (Step by Step)
- Go to Products → Attributes.
- Click Edit next to your “Color” attribute.
- Scroll down to Variation Swatches Settings.
- Set Attribute Type to “Color”.
- Click Save.
- Now, click each color term (Red, Blue, Black, etc.).
- For each, assign a Hex Color Code (e.g., #000000 for black, #0033CC for navy) or upload a custom swatch image.
- Click Update and return.
- Open any product with color variations the swatches now display as colored circles.
Setting Up Size Button Swatches (Step by Step)
- Go to Products → Attributes.
- Click Edit next to your “Size” attribute.
- Set Attribute Type to “Button”.
- Click Save.
- Your sizes (XS, S, M, L, XL, XXL) now render as styled buttons on the product page.
- Out-of-stock sizes automatically gray out and strikethrough no manual work needed.
The Shopper Experience
Here’s exactly what your customer sees and does:
- They land on your product page.
- They see a row of color circles (navy, black, white, grey, etc.).
- They click Navy Blue → all product images instantly update to show navy.
- They see size buttons below: XS S M L XL XXL
- XL is grayed out with a strikethrough it’s out of stock.
- They click M and see “Medium Selected.”
- They click Add to Cart.
- They proceed to checkout.
This is the exact experience major fashion brands deliver. Now your boutique offers the same premium interface and you’re using a free plugin to do it. That’s competitive advantage.
Step 6: Add Product Labels
Product labels create urgency, highlight key items, and guide shoppers through your store.
WooCommerce Product Labels by Acowebs
Labels like “New Arrival,” “Best Seller,” “Sale,” “Limited Edition,” and “Only 3 Left” work at the psychology level. They catch attention on the shop grid, reduce decision fatigue, and drive impulse purchases.
Installation:
- Go to Plugins → Add New.
- Search “WooCommerce Product Labels Acowebs” → Install Now → Activate.
Creating a Label:
- Go to WooCommerce → Labels → Add New.
- Enter the Label Text (e.g., “New Arrival”).
- Choose Background Color and Text Color (make them visually distinct).
- Set Label Position (top-left, top-right, bottom-left, etc.).
- Choose assignment method:
- Manual: Select individual products to label.
- Rule-based: Auto-label all products in a category, or products added in the last 7 days.
- Click Save.
No coding required. Labels appear automatically on shop pages and product grids.
Step 7: Set Up Pricing & Discounts
WooCommerce’s built-in coupon system has limits. You can create a discount code, but you can’t run automatic discounts based on categories, purchase quantity, or customer role without a plugin.
WooCommerce Dynamic Pricing With Discount Rules by Acowebs
This plugin lets you run sophisticated pricing strategies automatically:
- Bulk discounts: “Buy 2 tops, get 15% off.”
- Category discounts: “All dresses 20% off this weekend.”
- Role-based pricing: Wholesale prices for business buyers.
- BOGO deals: “Buy one, get one 50% off.”
- Flash sales: Automatic discounts on specific products during a time window.
Installation:
- Go to Plugins → Add New.
- Search “WooCommerce Dynamic Pricing” by Acowebs → Install → Activate.
- Or purchase Pro features at acowebs.com/woocommerce-dynamic-pricing-with-discount-rules-pro/
Creating a Discount Rule:
- Go to WooCommerce → Dynamic Pricing → Add Rule.
- Set Rule Name (e.g., “Summer Dress Sale”).
- Select Scope (product, category, or entire cart).
- Set Discount Type (percentage or fixed amount).
- Define Conditions (e.g., “if product category is Dresses” or “if cart total exceeds $100”).
- Choose Start & End Dates (optional, for time-limited sales).
- Click Save.
The discount applies automatically at checkout customers don’t need a coupon code. This drives conversions because there’s no friction.
Step 8: Add Wishlist & Quick View
WooCommerce Wishlist by Acowebs
Fashion shoppers don’t buy on their first visit. They browse, think, compare, and return. A wishlist lets them save items without making an account.
- Customers click a heart icon to save products.
- They can share wishlists with friends via a public link (free word-of-mouth marketing).
- Works for guest users no account required.
- You can email abandoned wishlist reminders.
Install or upgrade at acowebs.com/woocommerce-wishlist/
WooCommerce Quick View by Acowebs
Quick View opens product details in a lightweight popup customers see images, price, description, and variations without leaving the shop grid.
- Reduces friction in the browsing experience.
- Keeps customers on-site instead of bouncing back and forth.
- Increases time-on-site and page views.
Learn more at acowebs.com/woocommerce-quick-view/
Click here to explore all the features and to get a back-end and front-end demo of the WooCommerce Quick View plugin.
How to install additional plugins
Adding additional plugins to your store is fairly easy. Here is how to do it,
- Once you purchase the plugin, you get a zip file of the plugin to be downloaded.
- Now you can go to the plugins section on the dashboard and select the upload plugin option under add new. Attach the zip file and click on Install now.
- After that, finish by clicking on the activate plugin button.
- You will be required to enter the license key, which can be copied from the confirmation page of your purchase. Paste it to the plugin license key box in the product addon button on your dashboard. Click on Activate.
- To confirm whether the plugin is activated, go to license activation on the settings page of product add-ons. The license status must be active, if successful.
To add extra functionality to your ecommerce store, check out the various WooCommerce plugins like the one mentioned above from Acowebs.
Basic WooCommerce settings
Before adding products to your website, make sure your store functions properly. You can always go to the Settings on WooCommerce and add or manage various options.
- Set up shipping options by navigating to the Shipping option inside the settings in WooCommerce and entering the necessary details, like shipping zones where you want to sell your products.
- To set up payment methods on your online store, go to settings on WooCommerce in the dashboard and select the preferred payment gateway option.
Several other options are available on the settings page of WooCommerce like general settings, product settings, tax settings, accounts and privacy settings, email settings, integration settings, and advanced settings.
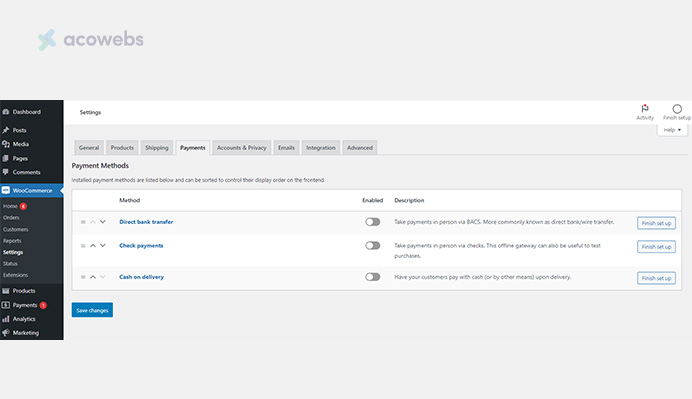
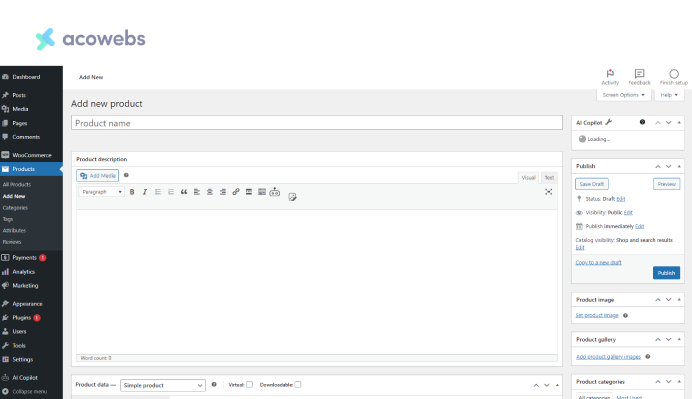
After completing these steps, do a quick website check to see if you missed out on anything. You can now add products to your website by navigating to the Products section on your WordPress dashboard and fill in the necessary information on the box provided like product name and details, pricing, and images.
If you are adding multiple images, use the product gallery option. Add products one at a time or select the import option in the product section to add the products in large quantities. You can upload the products in CSV file format.
Tips for increasing the visibility of your website
After setting up your online store, now you need to make sure your website reaches the target audience. Search Engine optimization (SEO) is the most important thing that helps in boosting your online visibility. SEO involves various techniques to rank your website on search engines. Only if your website is ranked higher on search engine result pages (SERPs), that your website reaches a wider audience. Let’s look into some tips on improving your website visibility.
- Keywords – Keywords are an important factor in SEO. The keywords are those words used by your target audience to search for your products. Research and find the right keywords and include them in your website content to help your website rank higher. Tools like SEMrush, Moz, etc. are helpful in keyword research. You can also use tools like Ahref to search for the keywords used by your competitors that rank and which will be helpful in you keyword strategy.
- Optimization – Optimization is of two kinds, on-page and off-page optimization. On-page optimization involves optimizing the contents on your page like the content, meta title, meta descriptions, and adding relevant images. Off -page optimization includes adding links to your website from other websites.
- Images and videos – Add high quality images on your online store and add alt tags. As you are running an ecommerce clothing store, you can add images of the product from various angles. Adding videos of the product can also be helpful to the audience to view the product from different angles.
- Product descriptions – Product descriptions should be carefully crafted. Adding keywords is necessary but do not stuff your website content or product description with keywords. Provide a complete description of the product like the material used and other specifications.
- Website optimization – Make sure your website is optimized for all screen sizes including mobile phones. Your website should easily adapt to the screen size from which it is viewed. Also your website should be optimized for speed and performance, an increased page load time can increase the bounce rate.
FAQ
A: Budget $400–800 for year one:
Domain: $10–15/year
Hosting: $30–50/year
Themes & Plugins: $50–200/year
Initial inventory: $200–500
WooCommerce itself is free. Payment processing fees come from transactions, not upfront costs.
A: No. WooCommerce has a user-friendly dashboard for adding products, managing orders, and configuring settings. Most customization uses plugins (no coding required). You may need a developer for custom features, but 90% of stores operate code-free.
A: Variation Swatches for WooCommerce by Acowebs is industry-leading. It offers:
Color swatches with visual preview
Size buttons with custom styling
Image swatches (show fabric texture)
Mobile-optimized interface
Other solid options include WooCommerce Product Add-Ons and Elementor, but Acowebs offers the best fashion-specific features.
A: Install the Variation Swatches plugin (steps in Section 6), then:
Go to Products → Attributes
Find your Color attribute
For each color, select “Swatch Type: Color”
Choose the hex code or upload an image
Save
Dropdowns automatically convert to clickable swatches on the front end.
A: Use Dynamic Pricing (Section 8):
Install WooCommerce Dynamic Pricing Pro
Create a rule: “Accessories category, 20% off”
Set conditions (cart total, specific products, date range)
Save and enable
Discounts apply automatically – no coupon code needed.
Conclusion
Launching a professional online clothing store is no longer out of reach. WordPress and WooCommerce provide the flexibility, control, and features needed to compete with major brands—without exorbitant platform fees.
By following this guide, you’ve:
✓ Registered your domain and set up secure hosting ✓ Installed WordPress and configured WooCommerce ✓ Selected a fashion-optimized theme ✓ Added variable products with color and size options ✓ Implemented variation swatches for better UX ✓ Set up product labels and dynamic pricing ✓ Configured payment gateways and shipping ✓ Created essential pages and SEO structure
The final step: Don’t launch with just your own effort. Leverage:
- Variation Swatches for WooCommerce — Convert dropdowns to visual swatches
- Product Labels — Highlight sales and new arrivals
- Dynamic Pricing — Run complex discount strategies
- Wishlist Plugin — Increase customer engagement
- Quick View — Reduce friction on shop pages
If you are planning to open an online clothing store, WordPress and WooCommerce can definitely help you ease the process. This article has provided the step-by-step process on a website creation and turning your website into an ecommerce store. The article has also mentioned various other plugins that can enhance your website performance. If you follow these steps, you can easily create your own clothing store without advanced technical knowledge. Happy Selling!
Acowebs are the developers of the WooCommerce PDF Invoices and Packing Slips which generate PDF invoices automatically and add them to the confirmation emails sent to your customers. WooCommerce invoice plugin allow you Create, edit, and modify your own templates and to download or print invoices and packing slips from the WooCommerce admin.